How to Assign a Public IP to Virtual Machine?
Introduction
This guide explains how to assign a public IP address to a virtual machine using the CMP dashboard. A public IP allows the virtual machine to be accessed through a public network based on the configured network interface and security group settings.
The process includes accessing the CMP dashboard, selecting the required virtual machine, editing its network interfaces, adding a public network, configuring secondary IPv4 addresses if required, selecting or creating a security group, and saving the network configuration.
Step 1: Access the Dashboard
Log in to your CMP Main Dashboard.
From the CMP Region Advanced Dashboard, navigate to the virtual machine management section.
Navigate to Virtual Machine to view the list of created virtual machines.
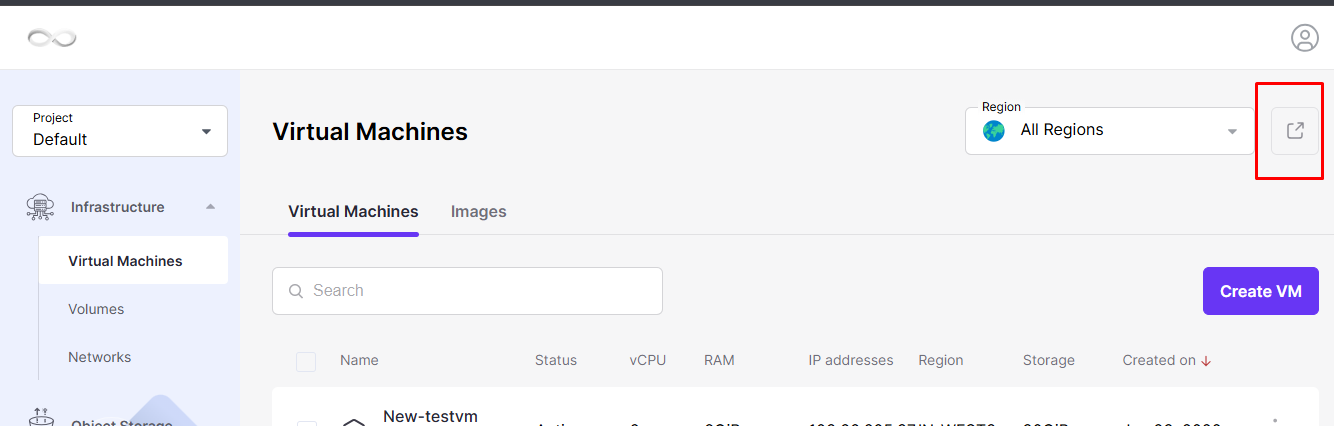
Note: Ensure that the required virtual machine has already been created before assigning a public IP.
Step 2: Select the Virtual Machine
Click on the name of the virtual machine from the list.
Open the detailed overview of the virtual machine.
Navigate to the Network Interfaces section.
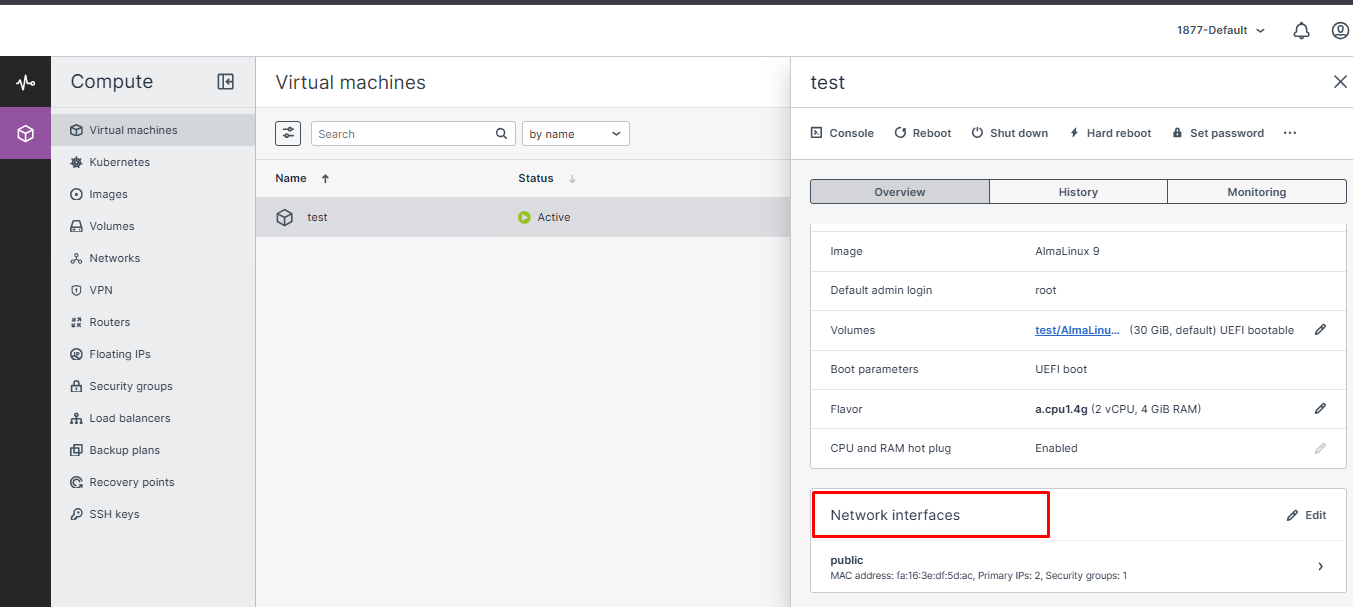
Click Edit.
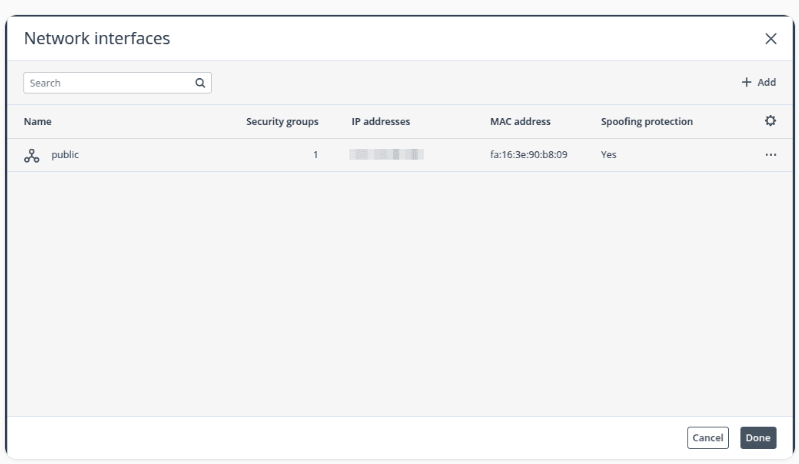
Step 3: Manage Network Interfaces
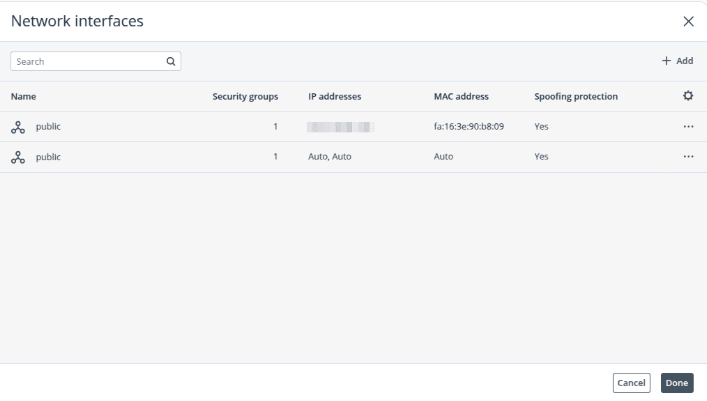
A Network Interfaces window will appear, displaying the existing network configuration.
Review the existing network configuration.
To add a new network interface, click + Add.
Step 4: Configure the Network
Select a Public network for the virtual machine according to your requirements.
To add secondary IPv4 addresses, select Secondary IPv4 Addresses.
Use the Add or Delete options to add or remove multiple IPv4 addresses.
Create a new security group for your project or select the Default security group.
Important:
Select the appropriate public network according to your requirements.
Review the IPv4 addresses and security group configuration before saving the changes.
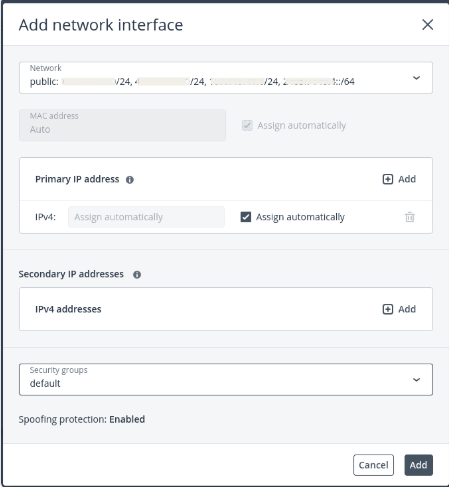
Step 5: Add the Network Interface
Click Add to save the network configuration and create the network interface.
The newly created network interface will appear in the list.
Click Done to finish the configuration.
The public IP address will now be assigned to the virtual machine.
Conclusion
Assigning a public IP to a virtual machine in CMP can be completed through the virtual machine’s Network Interfaces configuration. By selecting a Public network and configuring the required IPv4 addresses and security group, the network interface can be added to the virtual machine.
Follow the steps in this guide to configure and assign a public IP to your virtual machine through the CMP dashboard.
Frequently Asked Questions
1. How do I assign a public IP to a virtual machine in CMP?
Log in to the CMP dashboard, select the required virtual machine, open Network Interfaces, click Edit, add a new network interface, and select a Public network.
2. Where can I configure the network interface?
Open the required virtual machine and navigate to the Network Interfaces section. Click Edit to manage the network configuration.
3. Can I add multiple secondary IPv4 addresses?
Yes. Secondary IPv4 addresses can be added or removed using the Add and Delete options under Secondary IPv4 Addresses.
4. Can I select a security group when configuring the public network?
Yes. You can create a new security group for the project or select the Default security group.
5. How do I save the public network configuration?
After configuring the network, click Add to create the network interface. The new interface will appear in the list. Click Done to complete the configuration.
6. When is the public IP assigned to the virtual machine?
The public IP is assigned to the virtual machine after the new public network interface is successfully added.
7. What should I check before adding the network interface?
Review the selected Public network, secondary IPv4 addresses if configured, and security group settings before clicking Add.
8. Can I remove a secondary IPv4 address?
Yes. Secondary IPv4 addresses can be removed using the Delete option in the Secondary IPv4 Addresses configuration.