How to Manage Newly Added Disks on a Windows VM?
Introduction
When a new disk is attached to a Windows virtual machine, Windows may detect the disk but display it as Offline or Not Initialized. Before the new storage can be used, the disk may need to be brought online, initialized, and configured with a new volume.
This guide explains how to manage newly added disks on a Windows VM using the built-in Disk Management utility. It covers checking the disk status, bringing an offline disk online, initializing the disk using the GPT partition style, creating a new simple volume, assigning a drive letter, formatting the volume, and verifying that the new storage is available in File Explorer.
Check the Disk Status
Windows Disk Management displays whether a disk is Online and available or Offline.
Newly discovered disks are generally brought online automatically with read/write access. However, a newly attached disk may sometimes be displayed as Offline because of a Windows disk policy.
Step 1: Open Computer Management
- Search for Computer Management from the Windows taskbar.
- Open Computer Management.
Step 2: Open Disk Management
Navigate to:
Storage > Disk Management
Disk Management displays the disks connected to the Windows VM and their current status.
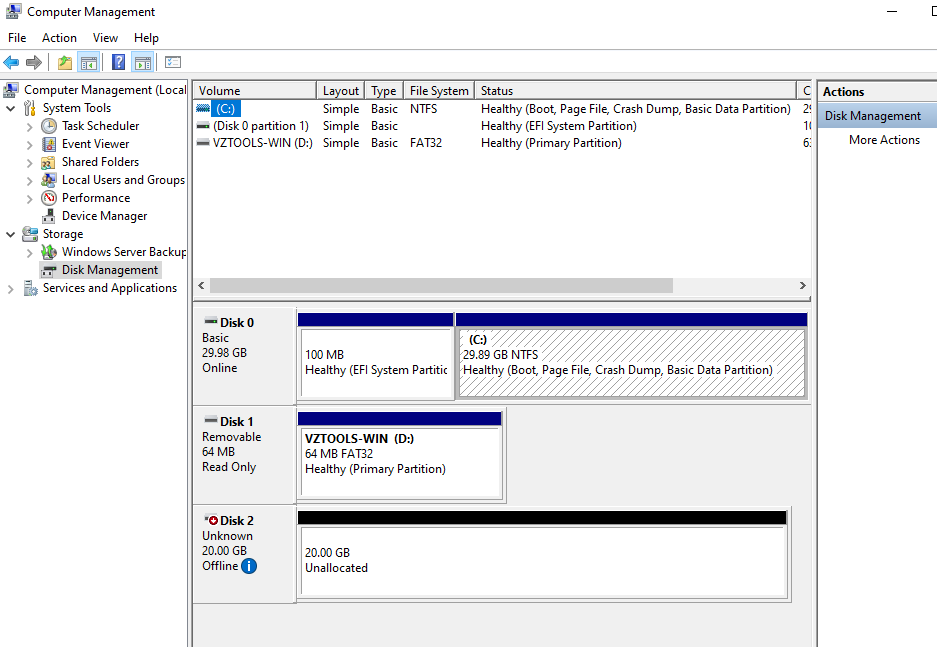
Note: Check the disk number and status carefully before performing any disk operation.
Bring an Offline Disk Online
If the newly attached disk is displayed as Offline, it must be brought online before it can be initialized or used to create a volume.
An offline disk may display a message similar to:
The disk is offline because of a policy set by an administrator.
Step 1: Select the Offline Disk
In Disk Management, locate the newly attached disk.
For example:
Disk 2 — Offline
Step 2: Bring the Disk Online
- Right-click the disk name, such as Disk 2.
- Select Online.
The disk will become available for further configuration.
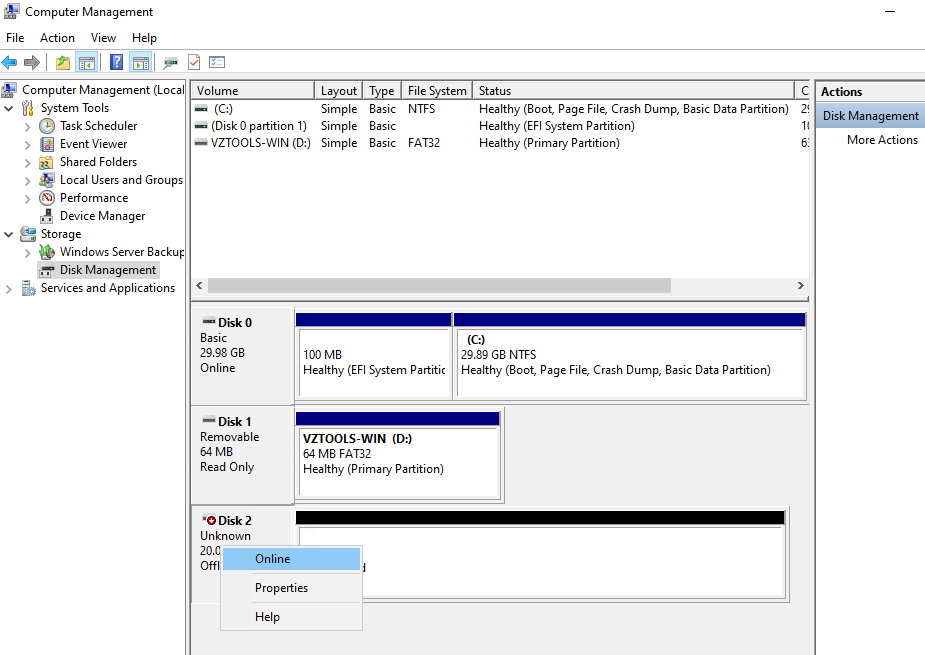
Important: Make sure you select the newly attached disk. Do not bring an existing production disk online or modify it unless you have confirmed that it is the intended disk.
After the disk is brought online, it may appear as:
- Not Initialized
- Unallocated
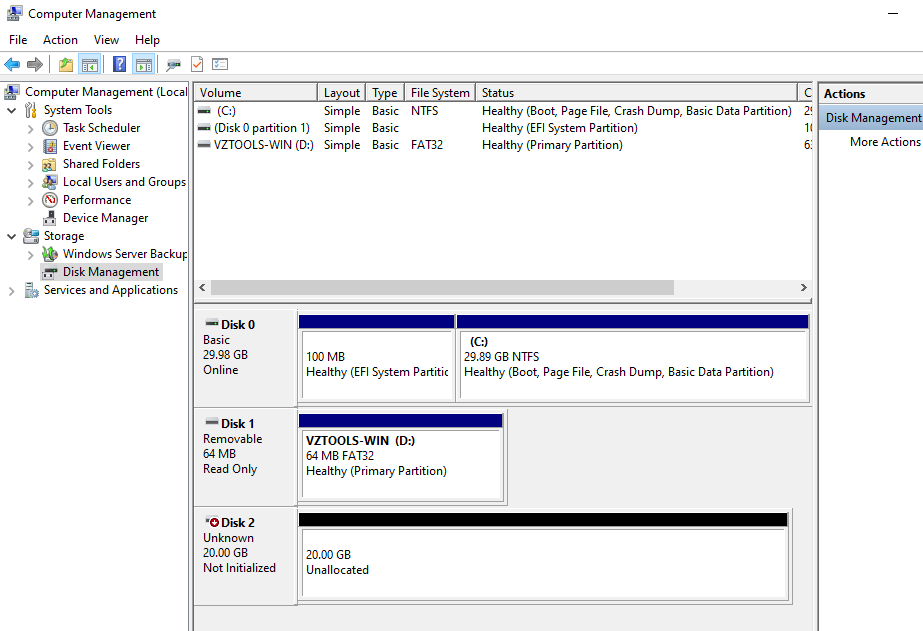
Initialize the New Disk
A newly attached disk may need to be initialized before a volume can be created.
Step 1: Open Initialize Disk
In Disk Management:
- Right-click the disk that you want to initialize.
- Select Initialize Disk.
If the disk is still Offline, right-click the disk first and select Online.
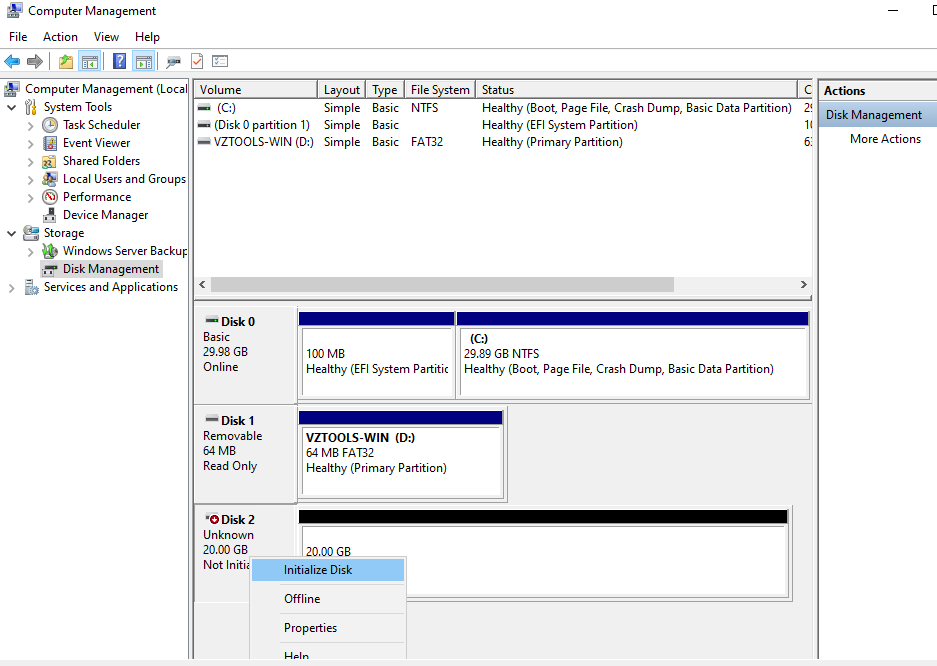
Step 2: Select the Partition Style
In the Initialize Disk dialog box:
- Verify that the correct disk is selected.
- Select GPT (GUID Partition Table) as the partition style.
- Select OK.
GPT is a modern partitioning scheme that replaces the older MBR partitioning scheme and is associated with UEFI-based systems.
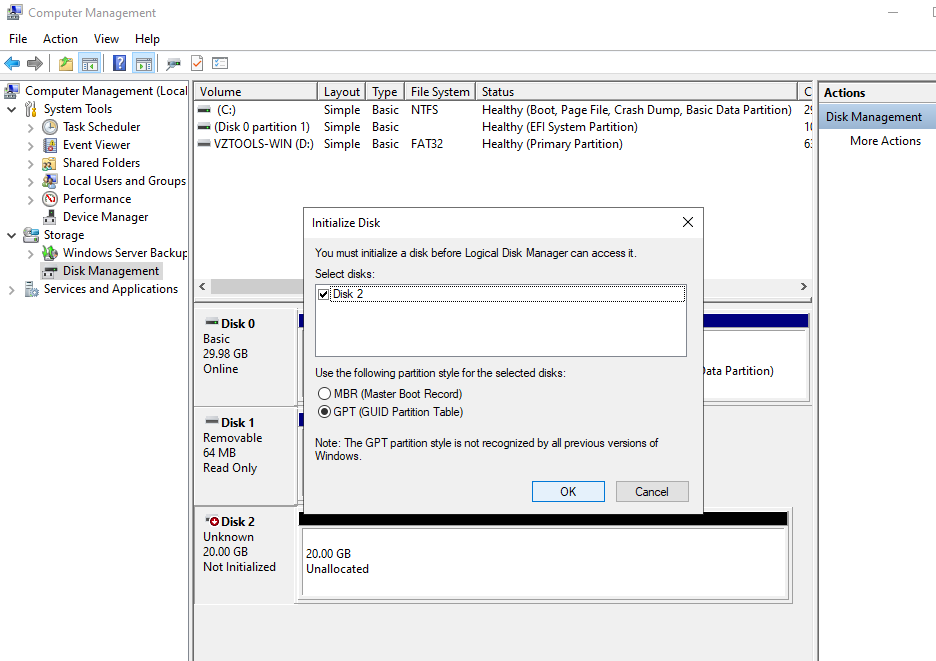
After initialization, the disk status changes from Initializing to Online.
Create a New Simple Volume
After the disk has been initialized, the available disk space is displayed as Unallocated.
You can create a new volume from this unallocated space.
Step 1: Start the New Simple Volume Wizard
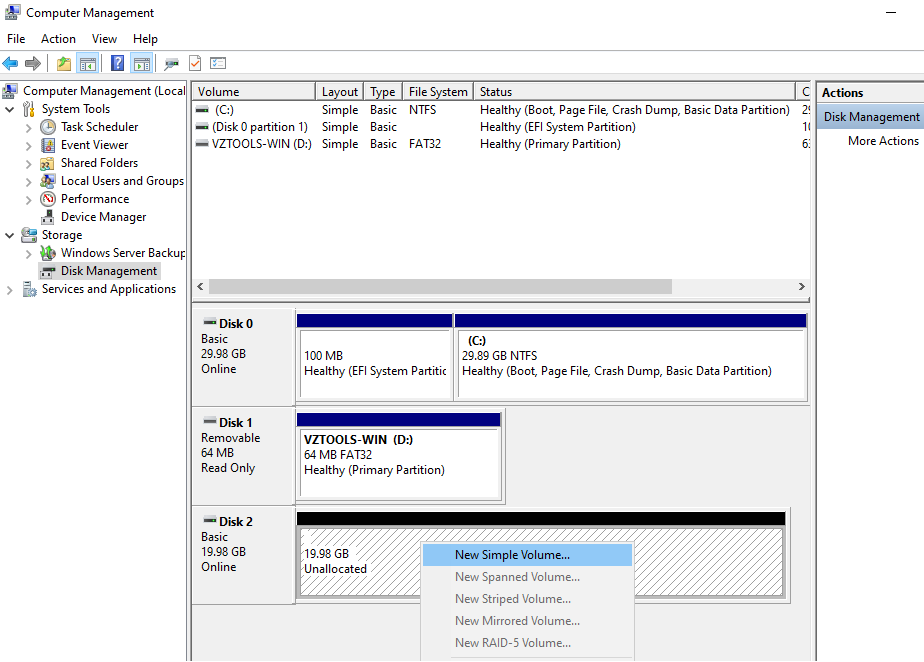
- Right-click the Unallocated space on the disk.
- Select New Simple Volume.
Step 2: Specify the Volume Size
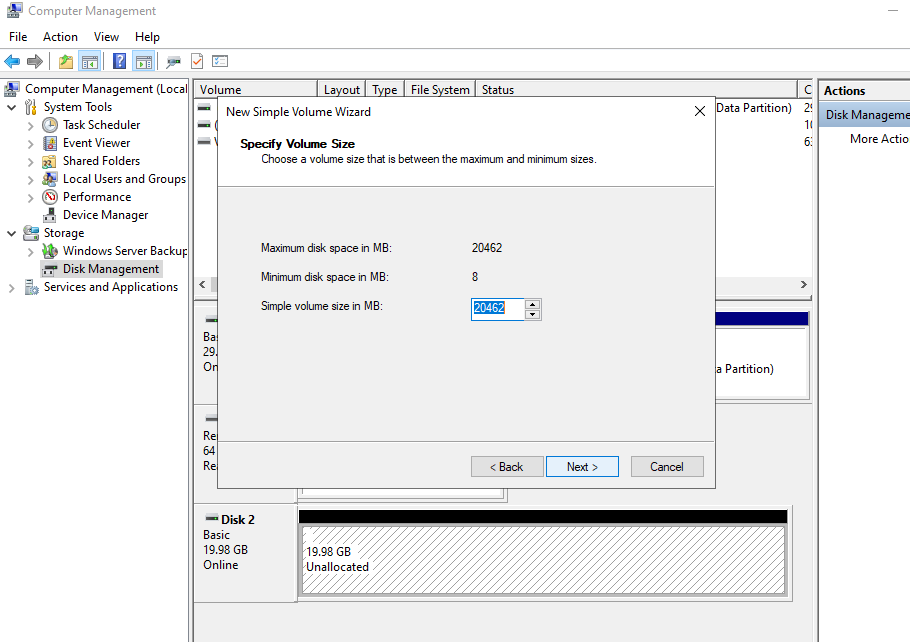
The New Simple Volume Wizard opens.
- Select Next.
- Specify the size of the volume.
- Select Next.
By default, you can use the entire available disk space for the new volume.
Tip: If you want the entire disk to be used as a single volume, accept the default maximum volume size.
Step 3: Assign a Drive Letter
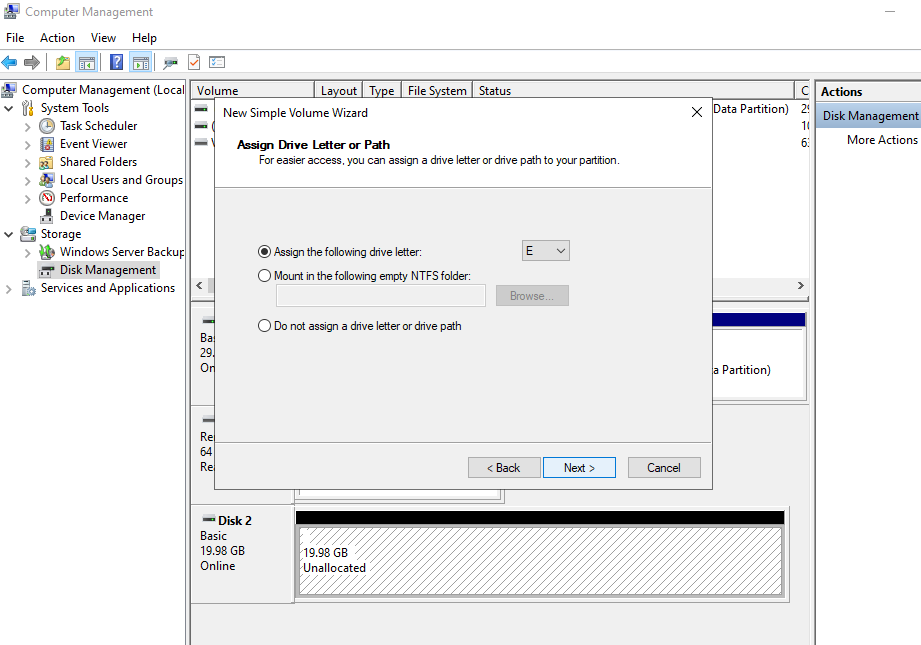
Specify the drive letter that you want to assign to the new volume.
For example:
E:
Select Next.
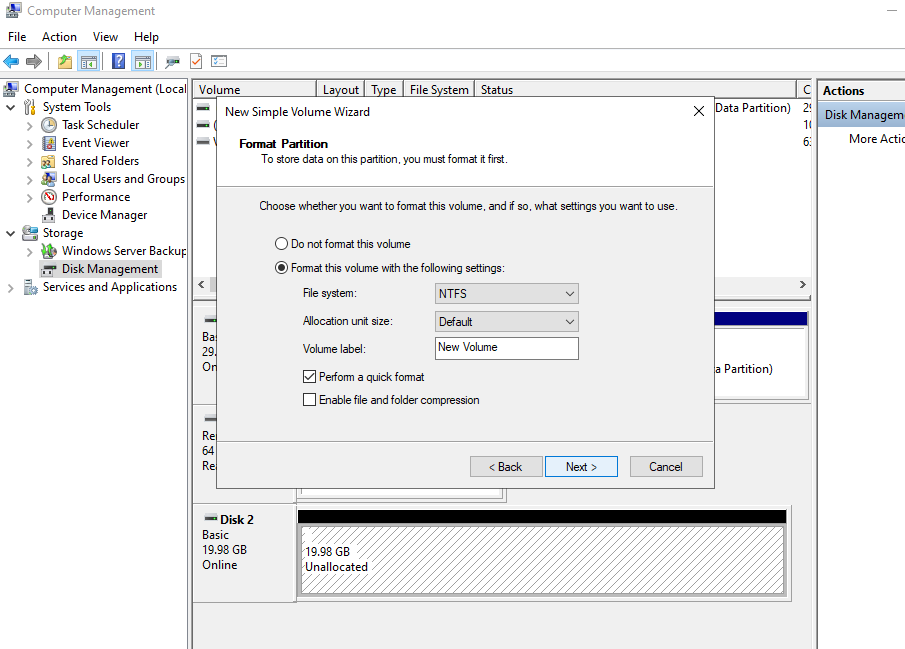
Step 4: Format the Volume
Specify the filesystem and volume label.
For a typical Windows volume:
- File system: NTFS
- Volume label: Specify an appropriate name for the volume.
Select Next.
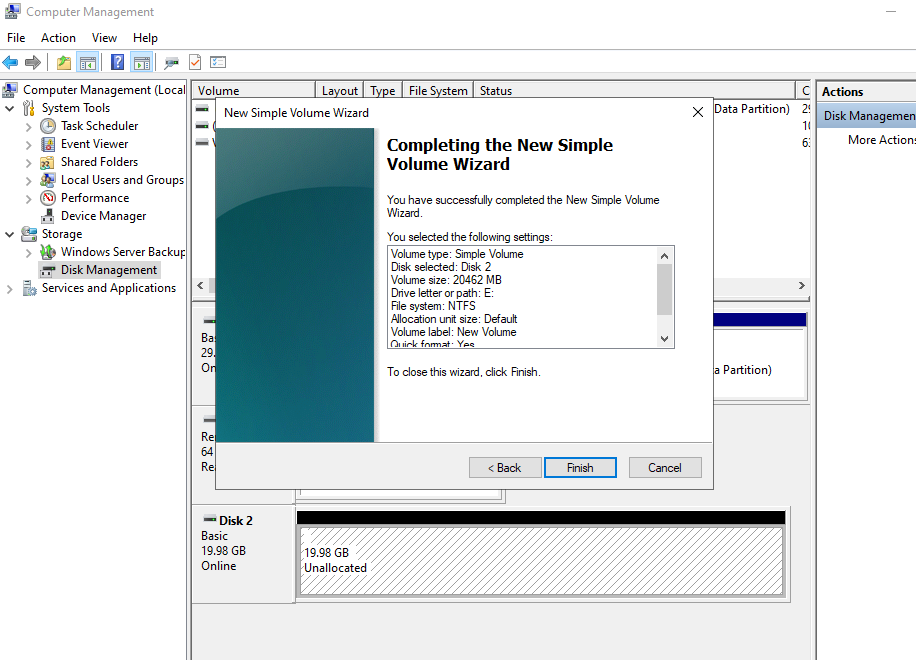
Step 5: Complete the Wizard
Review the selected configuration and select Finish.
Windows will create and format the new volume.
Verify the New Volume
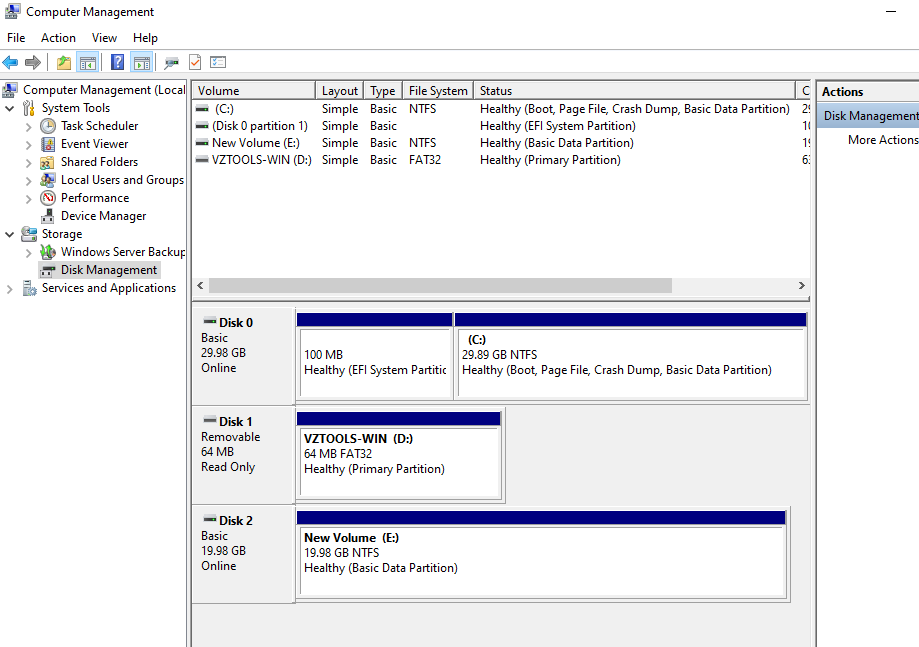
After the wizard completes, return to Disk Management.
The newly configured disk should be displayed as:
Healthy (Online)
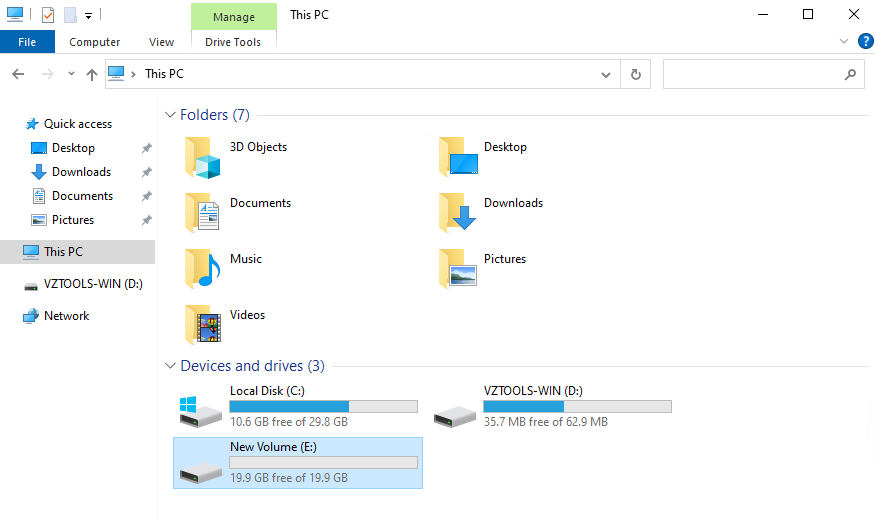
The new volume should also be visible in File Explorer under This PC.
For example:
New Volume (E:)
You can now use the new volume for storing files and application data.
Troubleshooting
The Newly Added Disk Is Offline
If the disk is displayed as Offline:
- Open Computer Management.
- Navigate to Storage > Disk Management.
- Locate the newly attached disk.
- Right-click the disk.
- Select Online.
After the disk becomes online, continue with disk initialization.
The Disk Shows as Not Initialized
If the disk is displayed as Not Initialized:
- Right-click the disk.
- Select Initialize Disk.
- Confirm that the correct disk is selected.
- Select GPT.
- Select OK.
The disk should then become available as Unallocated space.
The New Volume Is Not Visible in File Explorer
If the volume is not visible in File Explorer:
- Open Disk Management.
- Verify that the disk is Online.
- Confirm that the volume was successfully created.
- Verify that a drive letter has been assigned.
- Confirm that the volume is displayed as Healthy.
If a drive letter has not been assigned, review the volume configuration in Disk Management.
Important Notes
- Verify the disk number before performing any disk operation.
- An offline disk must be brought online before it can be initialized or used.
- A disk must be initialized before creating a new volume.
- The source procedure uses GPT as the partition style.
- Unallocated space can be used to create a New Simple Volume.
- The new volume can be assigned a drive letter such as E:.
- The source procedure uses NTFS as the typical filesystem.
- After configuration, the disk should appear as Healthy (Online) in Disk Management.
- The new volume should be visible in File Explorer.
Warning: Always verify the correct disk before initializing or creating volumes. Initializing or modifying the wrong disk can affect existing data.
Related Guide
After a newly added disk is online and initialized, you can create a new volume or use the available space to extend an existing volume.
To know more about “How to Extend a Basic Volume on a Windows VM?”. Click Here for more details.
Conclusion
Managing a newly added disk on a Windows VM involves checking its status, bringing it online if required, initializing the disk, and creating a new volume. Windows Disk Management provides the required tools to complete these tasks without additional software.
For a newly attached disk, verify that the correct disk is selected before making any changes. Once the disk is initialized and a volume is created, assign a drive letter, format the volume, and confirm that it is displayed as Healthy (Online) and available through File Explorer.
FAQ’s
Why is my newly added disk showing as Offline?
A newly attached disk may sometimes be detected by Windows but remain offline because of a disk policy. You can bring it online from Computer Management > Storage > Disk Management.
What should I do if the disk is Offline?
Right-click the disk in Disk Management and select Online. The disk can then be initialized and configured.
Which partition style should I select when initializing the disk?
The source procedure recommends GPT (GUID Partition Table) as the partition style.
Can I create a volume immediately after bringing the disk online?
If the disk is not initialized, it must first be initialized. After initialization, the unallocated space can be used to create a new simple volume.
How do I create a new volume on the disk?
Right-click the Unallocated space in Disk Management and select New Simple Volume. Follow the wizard to specify the size, assign a drive letter, select the filesystem, and complete the setup.
Which filesystem should I use for the new Windows volume?
The source procedure uses NTFS as the typical filesystem.
How can I verify that the new disk is ready?
In Disk Management, verify that the disk is displayed as Healthy (Online). Then open File Explorer > This PC and confirm that the new volume and assigned drive letter are visible.
Can I use the newly added disk to extend an existing Windows volume?
Yes, once the disk is online and initialized, the appropriate storage configuration can be performed. For extending an existing basic volume, refer to the related How to Extend a Basic Volume on a Windows VM? guide.