Managing Kubernetes Clusters
1. Overview
Users can deploy ready-to-use Kubernetes clusters with persistent storage for managing containerized applications.
Only users who have access to the related Project can create and manage Kubernetes clusters.
2. Create a Kubernetes Cluster
Step 1: Start Cluster Creation
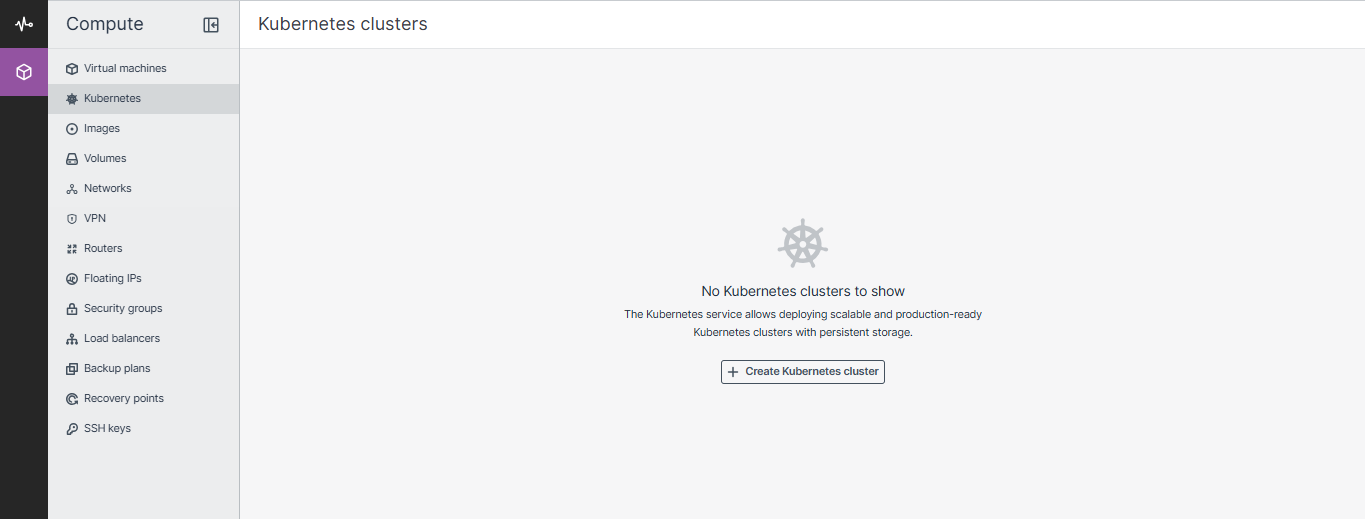
- Go to the Kubernetes Clusters screen.
- Click Create.
- A window will open where you can configure the Kubernetes cluster.
Step 2: Configure Basic Settings
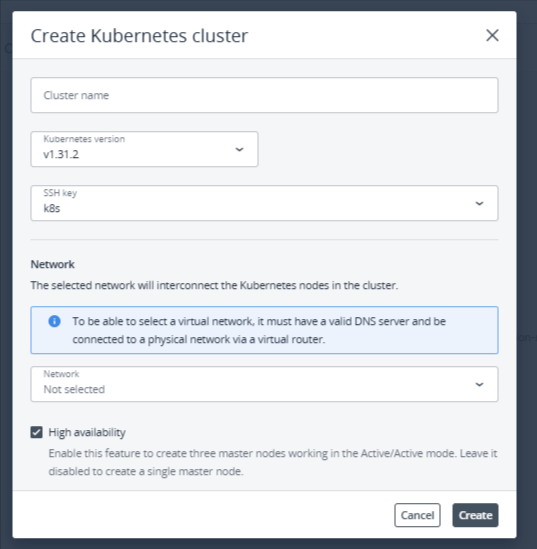
Enter or select the following:
- Cluster Name
- Kubernetes Version
- SSH Key
Step 3: Configure the Network
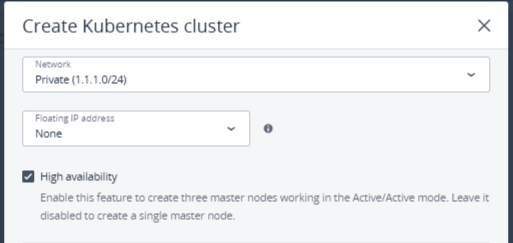
In the Network section, select the network that will connect the Kubernetes nodes.
If you select a virtual network, choose the required floating IP configuration.
None
If you select None, you will not have access to the Kubernetes API.
For Kubernetes API
A floating IP address will be assigned to:
- The master node, or
- The load balancer if the master node uses High Availability.
For Kubernetes API and Nodes
Floating IP addresses will be assigned to:
- The Kubernetes API.
- Master nodes.
- Worker nodes.
You can also choose whether to enable High Availability for the master node.
If High Availability is enabled, three master node instances will be created and will operate in Active/Active mode.
Step 4: Configure the Master Node
In the Master Node section, select a flavor for the master node.
For production Kubernetes clusters, it is strongly recommended to use a flavor with at least:
- 2 vCPUs
- 8 GiB RAM
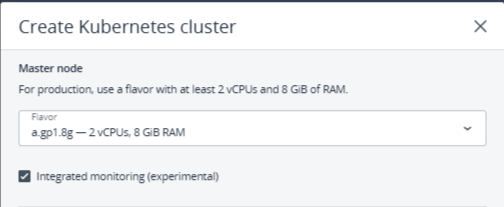
You can also enable Integrated Monitoring.
When enabled, the following monitoring components are automatically deployed:
- Prometheus
- Alertmanager
- Grafana
Step 5: Configure Container Volumes
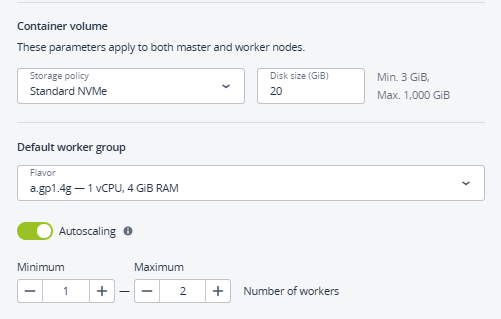
In the Container Volume section:
- Select a storage policy.
- Enter the required volume size for the master and worker nodes.
Step 6: Configure the Default Worker Group
In the Default Worker Group section:
- Select a flavor for each worker node.
- Configure the required number of worker nodes.
- Choose whether to enable Autoscaling.
Autoscaling Enabled
When Autoscaling is enabled:
- Worker nodes are automatically added if pods remain in a pending state because of insufficient resources.
- Worker nodes are automatically removed when they have no pods running.
- Configure the minimum and maximum number of workers.
Autoscaling Disabled
When Autoscaling is disabled, the configured number of worker nodes remains fixed.
Step 7: Configure Labels
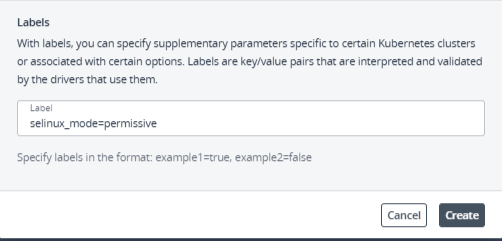
In the Labels section, enter additional Kubernetes cluster parameters using the following format:
key=value
Example:
selinux_mode=permissive
Currently supported labels are:
- selinux
- flannel_network_cidr
Step 8: Create the Cluster
Click Create.
The Kubernetes cluster creation process will begin.
After creation:
- Master and worker nodes will appear on the Virtual Machines screen.
- Their storage volumes will appear on the Volumes screen.
After the cluster is ready, click Kubernetes Access to view instructions for accessing the Kubernetes dashboard.
You can also access the master and worker nodes through SSH using the assigned SSH key and the username core.
3. Access Kubernetes Nodes Using SSH
To access a Kubernetes node, run:
ssh -i <private-key> core@<IP-address>Replace:
<private-key> with the path to your private key file.
<IP-address> with the public IP address of the VM.
Note: Verify the required port accessibility from your network or firewall if needed.
4. Delete a Kubernetes Cluster
To delete a Kubernetes cluster:
- Go to the Kubernetes Clusters screen.
- Select the required Kubernetes cluster.
- Click Delete.
The master and worker Virtual Machines will be deleted along with their volumes.

5. Managing Kubernetes Worker Groups
Kubernetes worker groups allow you to use worker nodes with different CPU and RAM configurations based on application requirements.
When creating a Kubernetes cluster, you can configure only one worker group called the Default Worker Group.
After the cluster is created, you can:
- Add additional worker groups.
- Use different configurations for each worker group.
- Change the number of workers in each group.
Note: The Default Worker Group cannot be deleted.
6. Add a Worker Group
Step 1: Open the Worker Groups
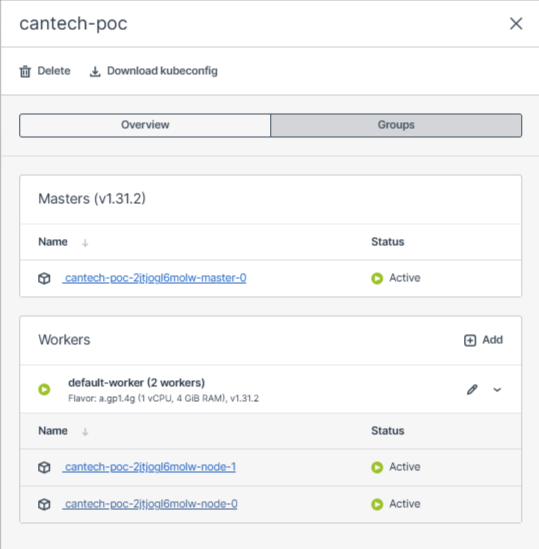
- Go to the Kubernetes Clusters screen.
- Select the required Kubernetes cluster.
- Open the Groups tab.
- In the Workers section, click Add.
Step 2: Configure the Worker Group
In the Add Worker Group window, enter a name for the group.
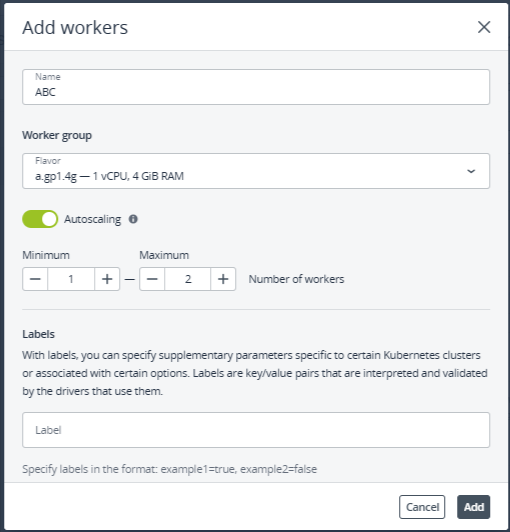
In the Worker Group section:
- Select a flavor for each worker.
- Choose whether to enable Autoscaling.
Autoscaling Enabled
The number of workers will automatically increase when pods remain pending because of insufficient resources.
Workers will be reduced when there are worker nodes with no pods running.
Configure the minimum and maximum worker group size.
Autoscaling Disabled
The number of worker nodes you configure will remain fixed.
Step 3: Configure Labels
Enter additional parameters using the following format:
key=value
Example:
selinux_mode=permissive
Currently supported labels are:
- selinux
- flannel_network_cidr
Other labels can be used at your own risk. Refer to the OpenStack documentation for the complete list of supported labels.
Step 4: Add the Worker Group
Click Add.
After the worker group is created, pods can be assigned to these worker nodes as explained in Assigning Kubernetes Pods to Specific Nodes.
7. Change the Number of Workers
To modify the number of worker nodes:
- Open the Kubernetes cluster.
- Go to the Groups tab.
- In the Workers section:
- Click the pencil icon for the Default Worker Group.
- For other worker groups, click the ellipsis (⋯) and select Edit.
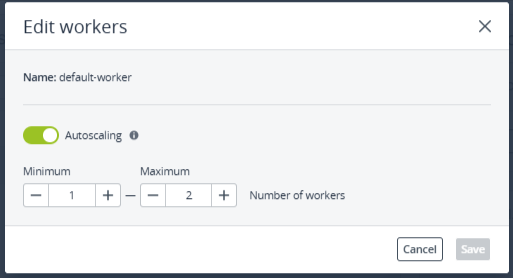
- In the Edit Workers window:
- Enable or disable Autoscaling, or
- Change the number of worker nodes.
- Click Save.
8. Delete a Worker Group
To delete a worker group:
- Click the ellipsis (⋯) next to the required worker group.
- Select Delete.
The worker group and all of its worker nodes will be deleted.
Note: After deletion, the worker group data will be lost.
9. Updating Kubernetes Clusters
When a new Kubernetes version becomes available, you can update the cluster.
Worker nodes are updated one at a time to maintain data availability.
The Kubernetes API will be unavailable during the update unless High Availability is enabled for the master node.
Before starting the update, ensure that the compute cluster has enough resources and quota for at least one additional VM using the largest flavor configured in the Kubernetes cluster.
If the master and worker nodes use different flavors, consider the largest flavor when checking available resources.
10. Kubernetes Update Limitations
The following limitations apply:
- Kubernetes clusters running versions 1.15.x to 1.17.x cannot be updated to newer versions.
- Kubernetes can be updated only one minor version at a time.
Example:
1.28 → 1.29 → 1.30 - Node groups can have only a one-minor-version difference.
Example:
1.29 and 1.30 - Kubernetes 1.29 clusters can be updated to 1.30 only if they were created using the Cilium network plugin.
- Kubernetes clusters cannot be managed through the self-service panel while an update is in progress.
11. Update a Kubernetes Cluster
Step 1: Select the Cluster
Select a Kubernetes cluster that displays the Update Available tag.
Step 2: Start the Update
On the Kubernetes cluster pane, click Update in the Kubernetes Version field.
Step 3: Select the Kubernetes Version
In the Update window:
- Select the Kubernetes version you want to update to.
- Follow the provided link to review API resources that are deprecated or obsolete in the selected version.
- Click Next.
Step 4: Select the Update Type
Choose one of the following options:
Update All
Select Update All to update all node groups in the Kubernetes cluster.
Custom Update
Select Custom Update to update only specific node groups.
The master node group is automatically selected and is required for the update.
Step 5: Confirm the Update
Click Confirm.
The Kubernetes cluster update process will begin.
If different node groups are running different Kubernetes versions, the cluster status will change to Partially Updated.
In this state, new worker groups will use the same Kubernetes version as the master node group.
To complete the cluster update, repeat the update process for any worker groups that are still running an older Kubernetes version.