Migrate Wasabi to CMP S3 Storage for WindowsOS Using Rclone
Introduction
This guide walks you through migrating data from Wasabi cloud storage to CMP S3-compatible storage using rclone, a powerful command-line tool for managing files across cloud storage providers. Whether you are consolidating storage, switching providers, or setting up a backup strategy, rclone makes the process straightforward and reliable.
Migrating between S3-compatible storage platforms requires correctly configuring source and destination remotes, ensuring credentials and endpoints are accurate, and verifying the transfer. This article covers every step – from installing rclone on Windows to confirming your data has arrived safely in CMP.
Prerequisites
Before you begin, ensure you have the following:
• Windows 10 or later with administrative access
• Windows Package Manager (winget) installed (included by default in Windows 10 1709+ and Windows 11)
• Wasabi account credentials:
o Access Key ID
o Secret Access Key
o Your Wasabi region and service URL (refer to Wasabi’s Service URLs documentation)
• CMP account credentials:
o Access Key ID (User ID)
o Secret Access Key
o Your CMP region and S3 endpoint (available from the CMP portal under Object Storage → Access)
• An existing bucket in CMP where the migrated data will be stored
Note: Keep your Access Key IDs and Secret Access Keys secure. Never share them in public repositories or unencrypted communications.
Installing Rclone on Windows
The fastest way to install rclone on Windows is through the Windows Package Manager (winget).
1. Open PowerShell as Administrator (right-click → Run as administrator).
2. Run the following command:
winget install Rclone.Rclone3. Wait for the download and installation to complete. You should see output confirming the installation was successful.
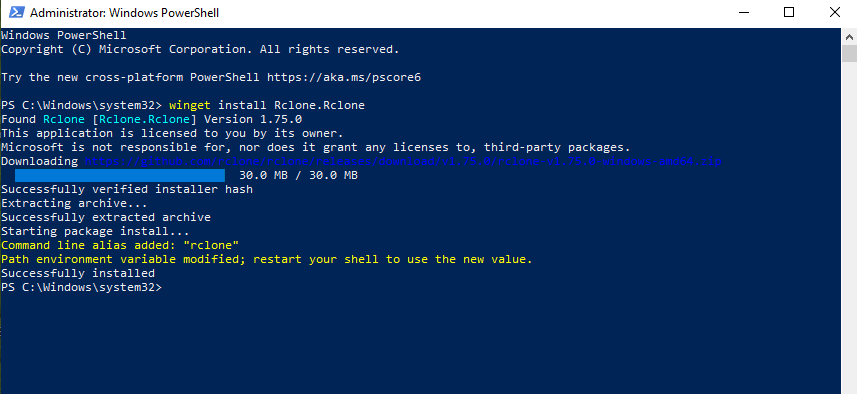
Figure 1: Rclone installed successfully via winget. Note the message to restart your shell to use the new PATH.
4. Close and reopen PowerShell to ensure the updated PATH environment variable is loaded.
5. Verify the installation by running:
rclone version
Configuring the Wasabi Source Remote
The first step is to configure rclone with your Wasabi storage as the source remote. This tells rclone how to connect to your Wasabi account and access your buckets.
Step 1 — Launch Rclone Configuration
1. Open PowerShell (Administrator is not required for configuration).
2. Run:
rclone config3. If this is your first time running rclone, you will see a message that no remotes are found. Select n to create a new remote.
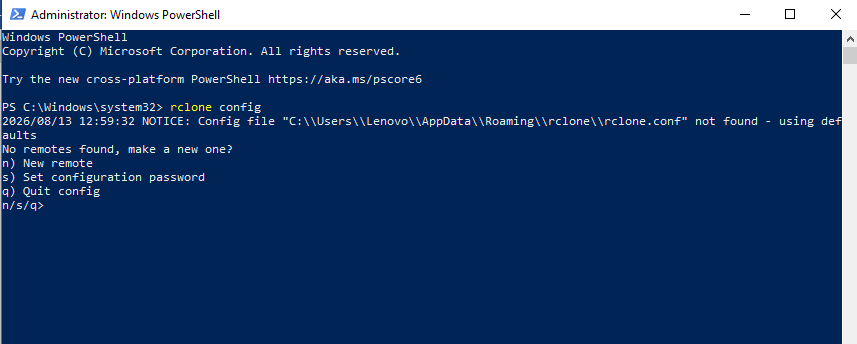
Figure 2: Rclone configuration menu — no remotes found. Select n to create a new remote.
Step 2 — Name the Remote and Select Storage Type
1. When prompted for a name, enter wasabi-src (or any descriptive name for your Wasabi source).
2. For Option Storage (type of storage to configure), type s3 and press Enter.
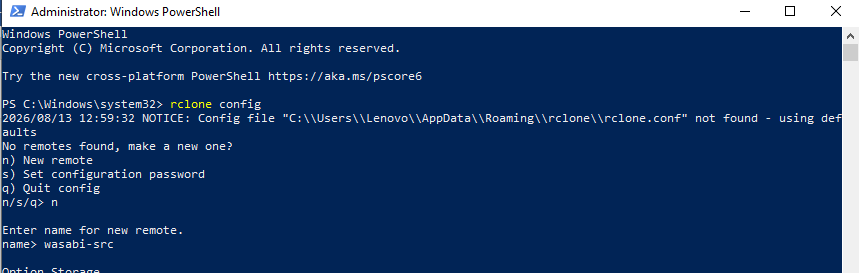
Figure 3: Enter the remote name wasabi-src and select s3 as the storage type.
3. For Option provider (Choose your S3 provider), you will see a numbered list of S3-compatible providers. Type 53 to select “Any other S3 compatible provider” (Other) and press Enter.

Figure 4: The S3 provider selection prompt appears after choosing s3 storage.
Step 3 — Enter Authentication Credentials
1. For Option env_auth, press Enter to accept the default (false). This tells rclone you will enter credentials manually in the next step.
2. For Option access_key_id, enter your Wasabi Access Key ID and press Enter.
3. For Option secret_access_key, enter your Wasabi Secret Access Key and press Enter.
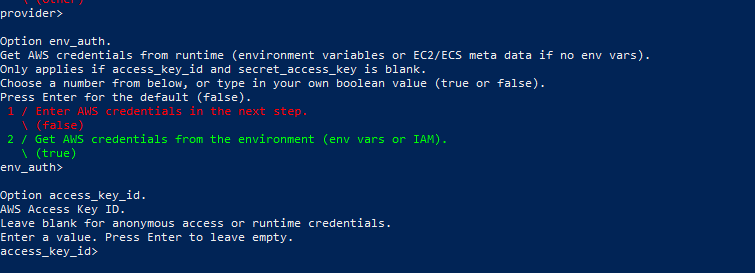
Figure 5: Select false for env_auth, then enter your Wasabi Access Key ID and Secret Access Key when prompted.
Warning: The credentials shown in the screenshots are from a test environment. Always use your own Wasabi Access Key ID and Secret Access Key. Never share these credentials publicly.
Step 4 — Set Region and Endpoint
Before entering the region and endpoint, you need to know which Wasabi region your bucket is hosted in. Refer to the Wasabi Service URLs documentation to find the correct service URL for your region.
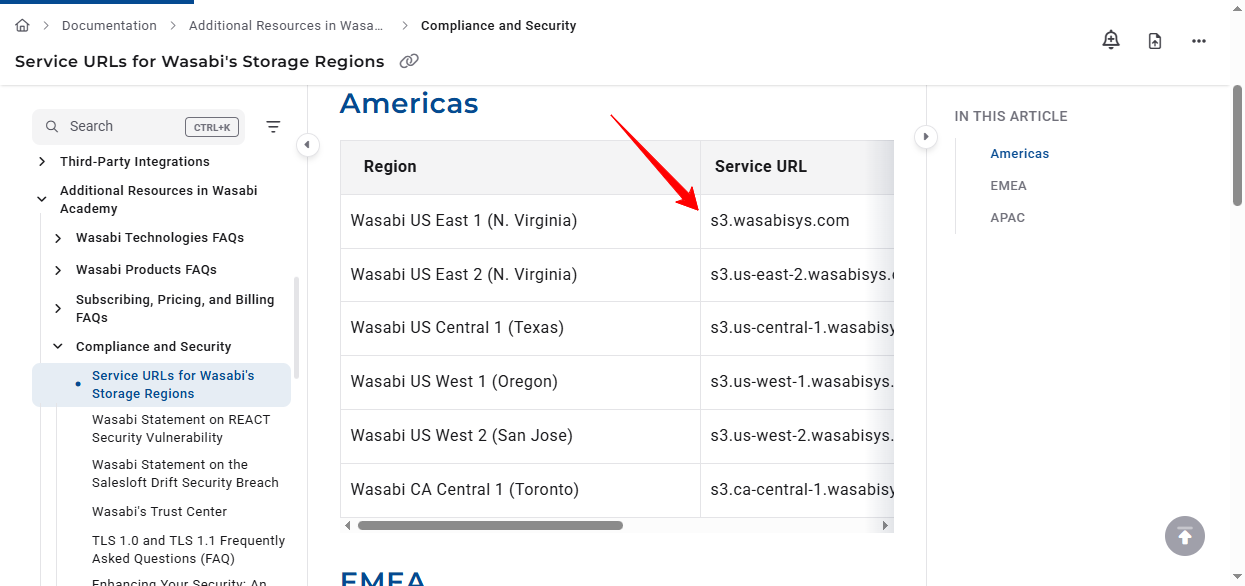
Figure 6: Wasabi’s Service URLs page — find the service URL that corresponds to your storage region.
The table below lists commonly used Wasabi regions and their service URLs:
Region Service URL
Wasabi US East 1 (N. Virginia) s3.wasabisys.com
Wasabi US East 2 (N. Virginia) s3.us-east-2.wasabisys.com
Wasabi US Central 1 (Texas) s3.us-central-1.wasabisys.com
Wasabi US West 1 (Oregon) s3.us-west-1.wasabisys.com
Wasabi CA Central 1 (Toronto) s3.ca-central-1.wasabisys.com
1. For Option region, enter your Wasabi region (e.g., us-east-1).
2. For Option endpoint, enter the corresponding Wasabi service URL (e.g., s3.wasabisys.com).
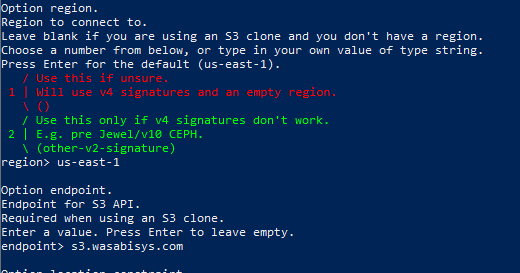
Figure 7: Enter the region (e.g., us-east-1) and endpoint (e.g., s3.wasabisys.com) for your Wasabi storage.
Step 5 — Skip Advanced Options and Confirm
1. For the remaining options (location_constraint, acl, server_side_encryption, sse_kms_key_id, etc.), press Enter to accept the defaults unless you have specific requirements.
2. When you reach object_lock_set_after_upload, object_lock_supported, and description, press Enter to skip each one.
3. When prompted “Edit advanced config?”, select n (No).
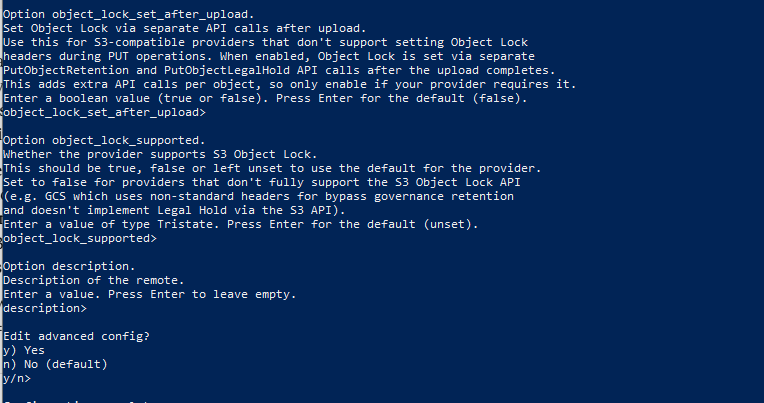
Figure 8: Press Enter to skip advanced options like object_lock and description. Select n for “Edit advanced config?”.
4. Rclone will display a summary of your configuration. Review it carefully and select y (Yes this is OK) to confirm.
Step 6 — Verify the Wasabi Source Remote
After confirming the configuration, verify that rclone can connect to your Wasabi storage:
1. Quit the configuration menu by pressing q.
2. List your Wasabi buckets:
rclone lsd wasabi-src3. List the contents of a specific bucket:
rclone ls wasabi-src:<bucket-name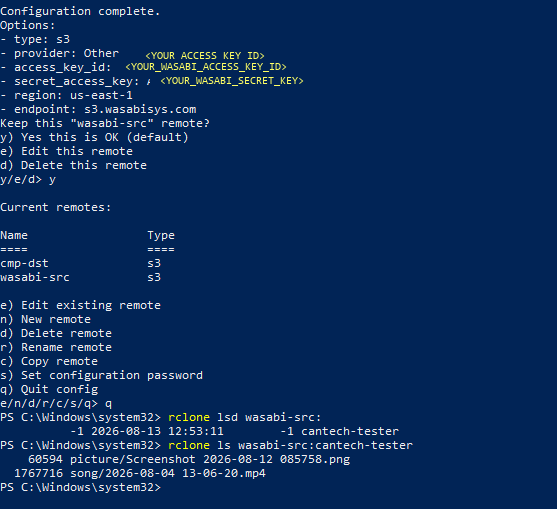
Figure 9: The Wasabi source remote configuration is confirmed. The rclone lsd command lists the bucket, and rclone ls shows the files inside it.
Tip: If the rclone lsd command returns an error, double-check your Access Key ID, Secret Access Key, region, and endpoint values. Re-run rclone config to edit the remote if needed.
Configuring the CMP Destination Remote
Next, configure rclone with your CMP S3-compatible storage as the destination remote.
Step 1 — Create a New Remote
1. Run rclone config again (or if you are still in the configuration menu, select n for a new remote).
2. Enter cmp-dst as the name for your CMP destination remote.
3. For Option Storage, select s3.
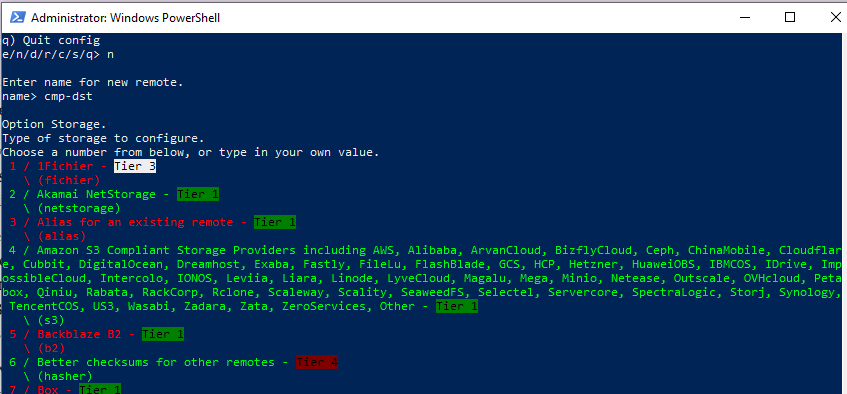
Figure 10: Create a new remote named cmp-dst and select s3 (option 4 — Amazon S3 Compliant Storage Providers).
Step 2 — Select the Provider
1. For Option provider, scroll through the list or type 53 to select “Any other S3 compatible provider” (Other).
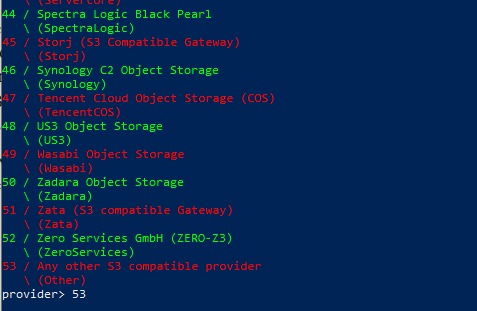
Figure 11: Select provider 53 — “Any other S3 compatible provider” — since CMP uses an S3-compatible API.
Step 3 — Enter Authentication Credentials
1. For Option env_auth, press Enter to accept the default (false).
2. For Option access_key_id, enter your CMP Access Key ID (User ID).
3. For Option secret_access_key, enter your CMP Secret Access Key.
You can find your CMP credentials in the CMP portal under Object Storage → Access.
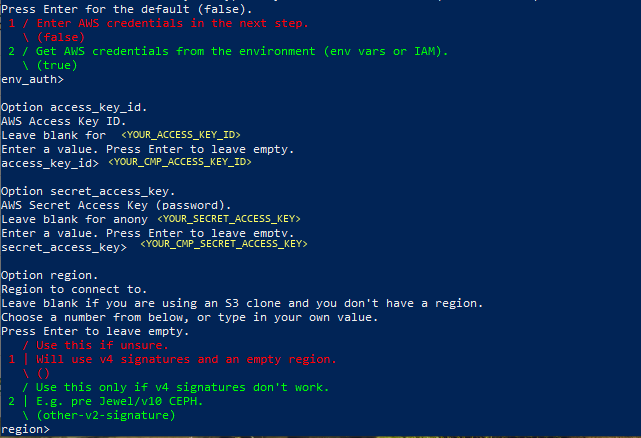
Figure 12: Enter your CMP Access Key ID and Secret Access Key when prompted.
Warning: The credentials shown in the screenshots are from a test environment. Always use your own CMP credentials.
Step 4 — Find Your CMP Region and Endpoint
Log in to your CMP portal and navigate to Object Storage → Access to find your region and endpoint URL.
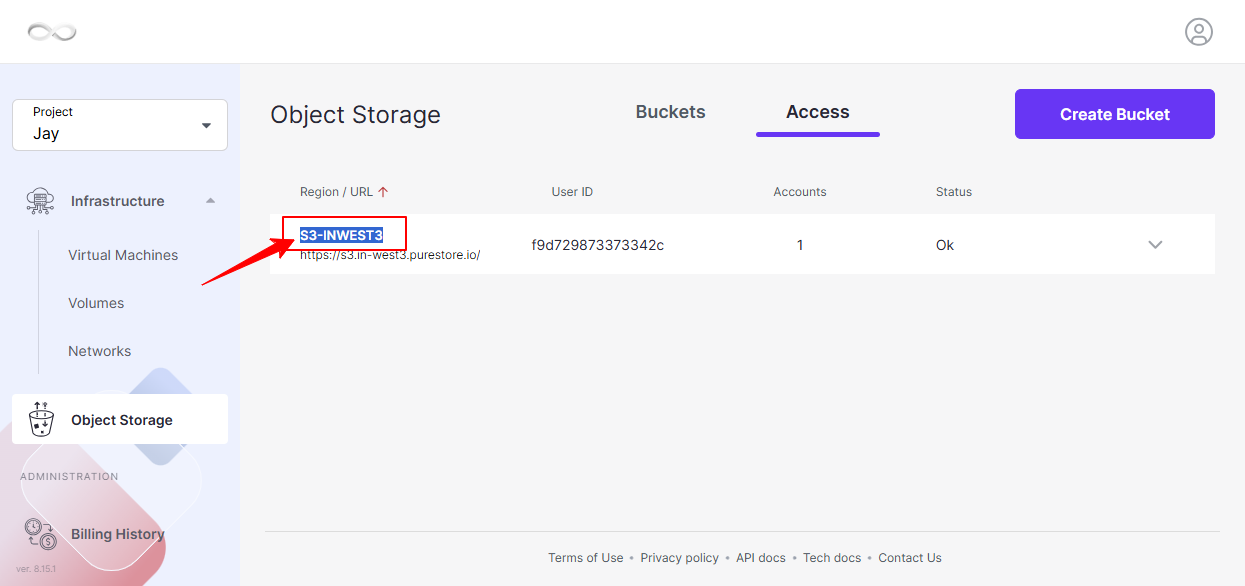
Figure 13: The CMP portal’s Object Storage Access tab displays your region (e.g., S3-INWEST3) and endpoint URL (e.g., s3.in-west3.purestore.io).
Note the following from the CMP portal:
Field Value (Example)
Region S3-INWEST3
Endpoint URL https://s3.in-west3.purestore.io/
User ID Your CMP User ID
Step 5 — Set Region and Endpoint
1. For Option region, enter your CMP region (e.g., S3-INWEST3).
2. For Option endpoint, enter your CMP S3 endpoint without the protocol prefix (e.g., s3.in-west3.purestore.io).
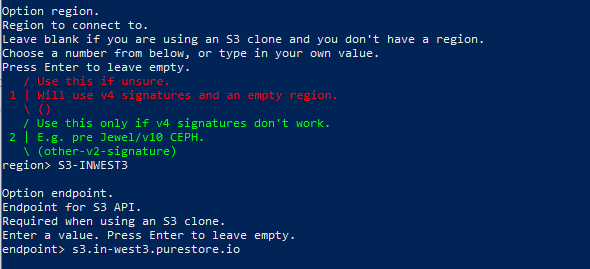
Figure 14: Enter the CMP region (e.g., S3-INWEST3) and endpoint (e.g., s3.in-west3.purestore.io).
3. For the remaining options, press Enter to accept defaults.
4. When prompted “Edit advanced config?”, select n (No).
Step 6 — Confirm and Verify the CMP Destination Remote
1. Review the configuration summary and select y to confirm.
2. Quit the configuration menu by pressing q.
3. Verify the connection by listing your CMP buckets:
rclone lsd cmp-dst: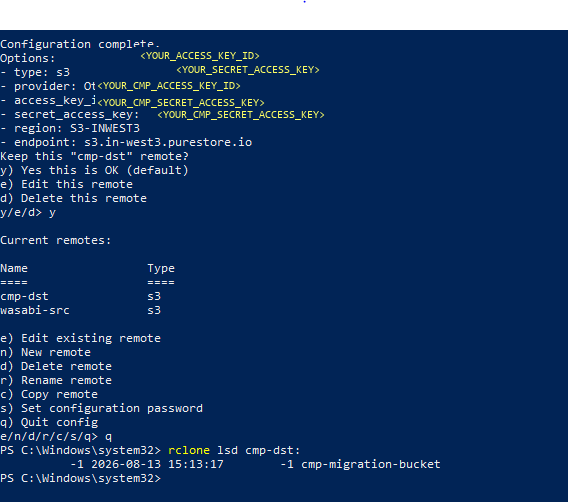
Figure 15: The CMP destination remote is confirmed. Both wasabi-src and cmp-dst remotes are listed. The rclone lsd command shows the destination bucket.
Running the Migration
With both remotes configured, you can now migrate data from Wasabi to CMP.
Copy an Entire Bucket
To copy all data from a Wasabi bucket to a CMP bucket, run:
rclone copy wasabi-src:<wasabi-bucket-name> cmp-dst:<cmp-bucket-name> –progress
Example:
rclone copy wasabi-src:cantech-tester cmp-dst:cmp-migration-bucket –progress
Copy a Specific Folder
To copy only a specific folder within a bucket:
rclone copy wasabi-src:<wasabi-bucket-name>/<folder-name> cmp-dst:<cmp-bucket-name>/<folder-name> –progress
Sync (Mirror) a Bucket
If you want the destination to be an exact mirror of the source (deleting files in the destination that are not in the source), use rclone sync instead:
rclone sync wasabi-src:<wasabi-bucket-name> cmp-dst:<cmp-bucket-name> –progress
Warning: rclone sync will delete files in the destination that do not exist in the source. Use rclone copy if you want to preserve existing files in the destination bucket.
The following table summarizes the key rclone commands for migration:
| Command | Behavior | Use When |
|---|---|---|
| rclone copy | Copies files from source to destination; does not delete destination files | You want to add data without affecting existing files |
| rclone sync | Makes destination identical to source; deletes extra destination files | You want an exact mirror of the source |
| rclone move | Moves files from source to destination; deletes source files after transfer | You want to transfer and remove from the source |
Useful Flags
| Flag | Description |
|---|---|
| --progress | Displays real-time transfer progress |
| --dry-run | Simulates the operation without transferring any files |
| --transfers N | Sets the number of parallel file transfers (default: 4) |
| --checkers N | Sets the number of parallel checkers (default: 8) |
| --log-file | Writes logs to a file for later review |
| --verbose | Increases output verbosity for debugging |
Tip: Always run with –dry-run first to preview what will be transferred before executing the actual migration.
Verifying the Migration
After the migration completes, verify that your data has been successfully transferred.
Verify via Command Line
1. List the contents of the destination bucket:
rclone ls cmp-dst:<cmp-bucket-name>
2. Compare the source and destination to ensure they match:
rclone check wasabi-src:<wasabi-bucket-name> cmp-dst:<cmp-bucket-name>
Verify via CMP Portal
1. Log in to the CMP portal.
2. Navigate to Object Storage and open your destination bucket.
3. Confirm that all expected folders and files are present.
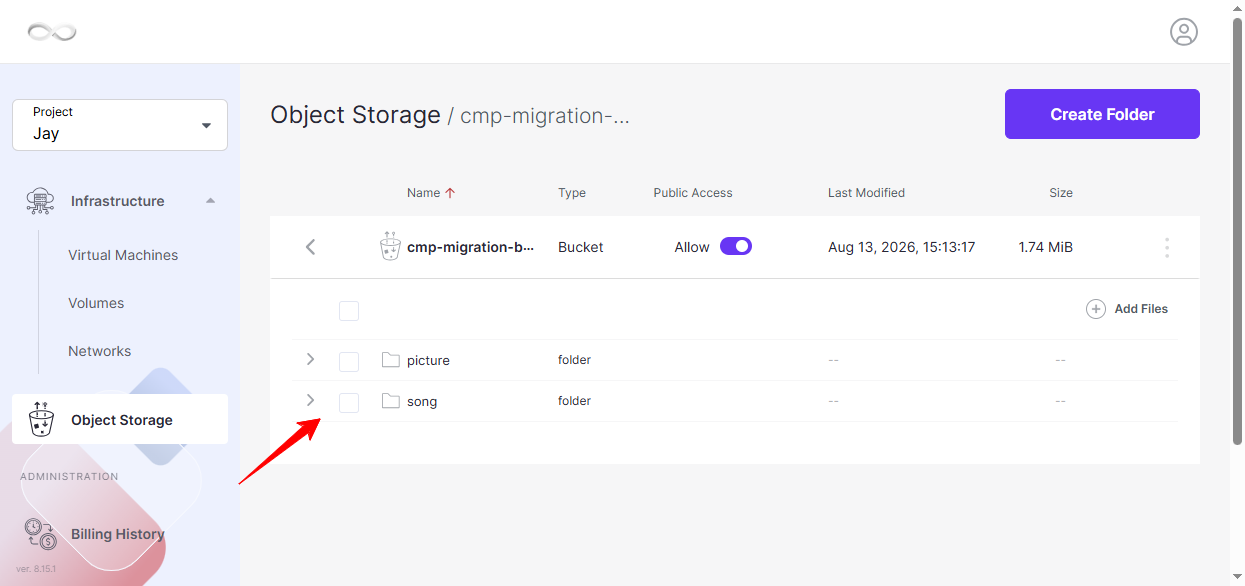
Figure 16: The CMP portal confirms the migration — the picture and song folders are now visible in the cmp-migration-bucket.
Conclusion
Migrating data from Wasabi to CMP S3 storage using rclone is a reliable and efficient process. By configuring two S3-compatible remotes — one for your Wasabi source and one for your CMP destination — you can seamlessly transfer buckets, folders, or individual files between providers.
The most important takeaway is to verify your credentials, region, and endpoint settings for both the source and destination before starting the migration. Incorrect values will cause connection failures that can be easily avoided by referencing the Wasabi service URLs documentation and the CMP portal’s Object Storage Access tab.
For ongoing synchronization needs, consider scheduling rclone sync as a recurring task to keep your CMP storage in sync with Wasabi.
Frequently Asked Questions
Q1: What is rclone and why is it recommended for S3 migrations?
Rclone is an open-source command-line tool designed for managing and transferring files across cloud storage providers. It supports over 70 storage backends, including all S3-compatible services, making it ideal for migrations between providers like Wasabi and CMP.
Q2: Where do I find my Wasabi Access Key ID and Secret Access Key?
Log in to your Wasabi console and navigate to Access Keys under your account settings. You can create a new access key pair if you do not have one.
Q3: Where do I find my CMP Access Key ID, region, and endpoint?
In the CMP portal, navigate to Object Storage → Access. Your User ID serves as the Access Key ID, and the region and endpoint URL are displayed on the same page.
Q4: What is the difference between rclone copy and rclone sync?
rclone copy transfers files from source to destination without modifying or deleting existing files in the destination. rclone sync makes the destination an exact mirror of the source, which means it will delete files in the destination that do not exist in the source.
Q5: Can I migrate only specific folders or files instead of an entire bucket?
Yes. Specify the folder path after the bucket name in the rclone command. For example: rclone copy wasabi-src:my-bucket/my-folder cmp-dst:my-bucket/my-folder.
Q6: Why does rclone ask me to select provider “53 / Any other S3 compatible provider”?
Both Wasabi and CMP use S3-compatible APIs. Selecting provider 53 (Other) allows you to manually enter the region and endpoint for any S3-compatible service, giving you full control over the connection settings.
Q7: The rclone lsd command returns an error. How do I fix it?
Common causes include incorrect Access Key ID or Secret Access Key, wrong region or endpoint values, or network connectivity issues. Run rclone config and select e (Edit existing remote) to review and correct your settings.
Q8: Can I resume a failed or interrupted migration?
Yes. Rclone automatically skips files that already exist in the destination (if they have the same size and modification time). Simply re-run the same rclone copy command to resume from where it left off.