CMP Rescue Mode for Virtual Machines
Introduction
CMP Rescue Mode allows you to boot a Virtual Machine (VM) into a temporary rescue environment to diagnose and repair problems without deleting or affecting the existing data. Instead of starting from the VM’s normal operating system, the VM boots from a rescue image. The original system disk remains attached as a secondary disk so you can access files, repair the operating system, recover data, or fix configuration issues. This guide explains how CMP Rescue Mode works, how to enter and exit rescue mode, how to access the original disk, and how to troubleshoot common rescue-related issues.
Main Content
Overview
Rescue Mode allows you to boot a Virtual Machine (VM) into a temporary rescue environment to diagnose and repair problems without deleting or affecting the existing data.
Instead of starting from the VM’s normal operating system, the VM boots from a rescue image. The original system disk remains attached as a secondary disk so you can access files, repair the operating system, recover data, or fix configuration issues.
Common use cases include:
- Repairing boot loader problems
- Resetting or recovering SSH access
- Fixing file system errors
- Correcting network or system configuration issues
- Recovering important data from an unbootable VM
Prerequisites
Before using Rescue Mode, make sure:
- You have permission to manage the VM.
- The VM is in either Running (Active) or Stopped state.
- A compatible rescue image (Linux or Windows) is available.
- You have basic knowledge of console or SSH access.
Note: Rescue Mode cannot be started while the VM is in a transitional state (such as Starting, Stopping, or Rebooting).
How Rescue Mode Works
- The VM is stopped safely (if it is running).
- The VM boots using a rescue image.
- The original boot disk is attached as a secondary disk (for example, /dev/vdb).
- You can mount the original disk, inspect files, and perform repairs.
- After troubleshooting, the VM can be returned to normal boot mode.
Entering Rescue Mode
- Log in to the Cloud dashboard.
- Go to Compute → Virtual Machines.
- Select the VM that requires troubleshooting.
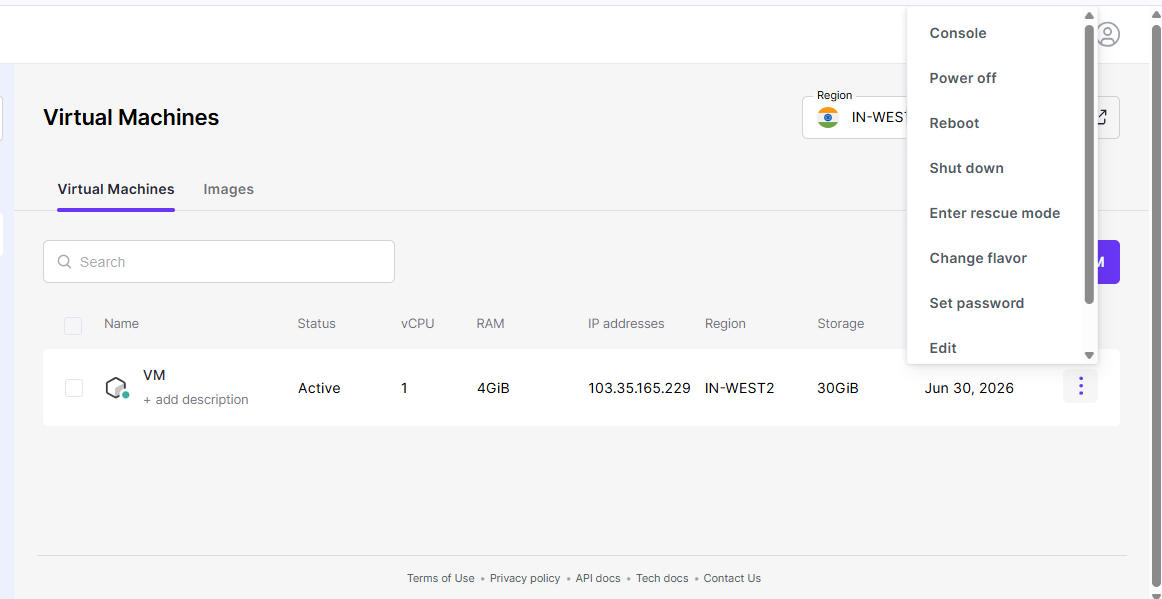
- Open the Actions menu (⋯).
- Select Rescue Mode or Enter Rescue Mode.
- Choose the appropriate rescue image (Linux or Windows).
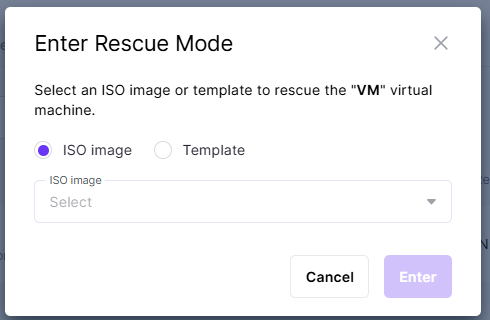
- Click Start or Enter to begin.
The VM status will change to Rescue.
Note: Once the rescue environment is ready, connect using the VM console or SSH.
Using Rescue Mode
Access the Rescue Environment
- Open the VM console from the Cloud dashboard.
- Log in using the credentials provided for the rescue image.
Mount the Original Disk
After logging into the rescue environment, identify the attached disks.
fdisk -l
lsblk
Create a mount point:
mkdir /mnt/originalMount the original system disk:
mount /dev/vdb1 /mnt/originalAfter mounting, you can access the original files:
cd /mnt/originalYou can now inspect logs, modify configuration files, or recover data.
Perform Required Repairs
Common repair tasks include:
- Reset SSH keys or passwords
- Edit SSH configuration
- Correct /etc/fstab
- Repair file systems using fsck
- Restore configuration files
- Copy important data to another location
Exiting Rescue Mode
- Return to the Cloud dashboard.
- Select the rescued VM.
- Click Exit Rescue Mode or Unrescue VM.
- Confirm the action.
The VM will reboot normally using its original boot disk, and its status will return to Running (Active).
Windows VM Notes
- Use a rescue image that supports Windows.
- If the rescue and original disks have conflicting disk identifiers, you may need to update the disk ID using Disk Management so Windows can locate the correct boot disk.
Troubleshooting
VM Cannot Enter Rescue Mode
Possible causes:
- The VM is not in a supported state.
- The selected rescue image is missing or incompatible.
- The rescue image failed to boot.
Try using another compatible rescue image.
Cannot Access the Rescue Console
Check that:
- Console access is available.
- Firewall or security group settings allow SSH (if using SSH).
- Browser-based console access is working.
Original Disk Is Not Visible
Verify that:
- Verify that the original disk is attached as a secondary disk (for example, /dev/vdb).
- If it is missing, attach the disk again using the Cloud management interface.
VM Does Not Boot After Exiting Rescue Mode
Re-enter Rescue Mode and verify:
- Boot loader configuration
- File system integrity
- System configuration files
If necessary, restore the VM from a backup or snapshot.
Best Practices
- Create a snapshot or backup before entering Rescue Mode.
- Use trusted and compatible rescue images.
- Keep the VM in Rescue Mode only for the time required.
- Record all changes made during troubleshooting for future reference.
Related Operations
| Operation | Purpose |
|---|---|
| Snapshot / Backup | Create a backup before making changes. |
| Volume Restore | Restore the boot disk if repairs are unsuccessful. |
| Reset State | Recover a VM that is stuck in an error state before or after rescue. |
Conclusion
CMP Rescue Mode provides a temporary rescue environment for diagnosing and repairing Virtual Machine issues while keeping the original system disk available as a secondary disk. Use a compatible rescue image, mount the original disk carefully, perform only the required repairs, and exit Rescue Mode after troubleshooting is complete. Creating a snapshot or backup before making changes is recommended.
Frequently Asked Questions (FAQ)
Which login credentials should I use?
In most cases, you can use the same username, password, or SSH keys as the original VM. Some rescue images (such as Ubuntu-based images) may generate a temporary password during boot. This password is displayed on the VM console.
How long does Rescue Mode take?
Typical duration:
- Enter Rescue Mode: 1–2 minutes
- Troubleshooting: Depends on the issue
- Exit Rescue Mode: 1–2 minutes
If the VM remains in a transitional state for an extended period, review the console logs or contact support.
Can I access files from my original VM?
Yes. The original system disk is attached as a secondary disk (such as /dev/vda, /dev/vdb, or /dev/vdc). You can mount the disk and access or modify its files as needed.
Will my data be affected?
No. Rescue Mode does not automatically modify the original disk. The VM only boots from a temporary rescue environment, and your original data remains unchanged unless you manually edit or delete files.
What should I do if Rescue Mode fails?
If the VM enters an ERROR state, do not retry multiple times. Contact the support team and provide the VM ID, error message, time the issue occurred, and actions performed before the error.
Is Rescue Mode secure?
Yes. Only authorized users with the required permissions can enable Rescue Mode. Normal access controls and audit logging remain in effect.
Best Practice: Exit Rescue Mode as soon as troubleshooting is complete to return the VM to its normal operating state.
Can I use a custom rescue image?
Yes, provided the rescue image includes the required properties:
hw_rescue_device=disk
hw_rescue_bus=virtio
If these properties are not present, Rescue Mode may fail with a driver-related error.