Category: Compute

  • Automating cPanel Installation on Cloud VMs with Customization Scripts

    Cloud provides a Customization Script option that lets you automatically configure a virtual machine during deployment. Instead of performing manual installation after the VM is created, you can execute a script that installs and configures the required software automatically.

    Cloud supports two types of customization scripts:

    • Shell Script (.sh)
    • Cloud-Init Script (YAML format using #cloud-config)

    This guide demonstrates how to use a Cloud-Init configuration to automatically install cPanel & WHM on a new virtual machine.

    Important: cPanel must be installed on a clean installation of AlmaLinux or CloudLinux. The server should have a minimum of 2 GB RAM and a valid cPanel license.

    Step 1: Verify the Requirements

    Before creating the VM, make sure the following requirements are met.

    • Deploy a supported operating system such as AlmaLinux or CloudLinux.
    • Allocate at least 2 GB RAM.
    • Allocate a minimum of 20 GB storage.
    • Assign a public IP address to the VM.
    • Allow ports 2087 (WHM) and 2083 (cPanel) in the Security Group or Firewall.
    • (Optional but recommended) Point a domain or subdomain such as cpanel.example.com to the VM’s public IP for SSL.

    Step 2: Prepare the Cloud-Init Script

    Create the following Cloud-Init configuration and replace the hostname with your own domain.

    Bash
    #cloud-config
    hostname: cpanel.example.com
    fqdn: cpanel.example.com
    packages:
    – perl
    – curl
    write_files:
    – path: /etc/resolv.conf
    content: |
    nameserver 8.8.8.8
    nameserver 8.8.4.4
    runcmd:
    – curl -o latest -L https://securedownloads.cpanel.net/latest
    – sh latest
    

    Prepare the Cloud-Init Script

    Step 3: Understand What the Script Performs

    When the VM starts for the first time, the Cloud-Init script automatically performs the following tasks:

    • Sets the server hostname.
    • Configures the Fully Qualified Domain Name (FQDN).
    • Installs the required packages (Perl and Curl).
    • Configures Google Public DNS servers.
    • Downloads the latest cPanel installer.
    • Starts the cPanel installation automatically.

    No manual commands are required after the VM boots.

    Step 4: Create a New Virtual Machine

    • Sign in to your Cloud Dashboard.
    • Click Create VM.
    • Select a supported operating system.
    • Choose the required CPU, RAM, storage, and network configuration.
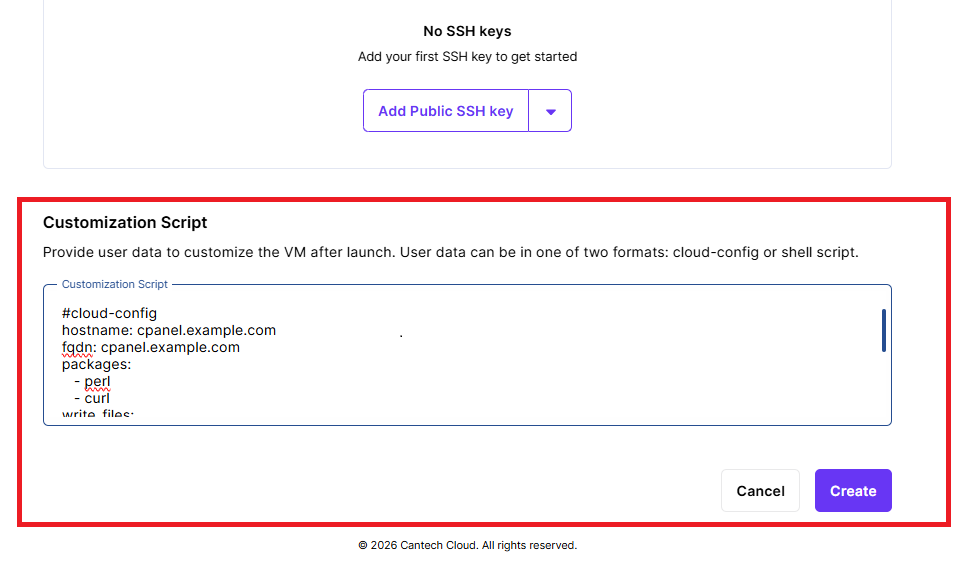
    • Locate the Customization Script section.
    • Select Cloud-Init.
    • Paste the Cloud-Init script into the provided text box.
    • Review the configuration.
    • Click Launch VM.

    The VM will now be created with the customization script attached.

    Step 5: Automatic Installation Process

    After the virtual machine powers on:

    • Cloud-Init executes automatically.
    • The server installs the required packages.
    • DNS configuration is applied.
    • The latest cPanel installation package is downloaded.
    • cPanel installation begins automatically.

    The installation usually completes within 20 to 40 minutes, depending on the server specifications and internet speed.

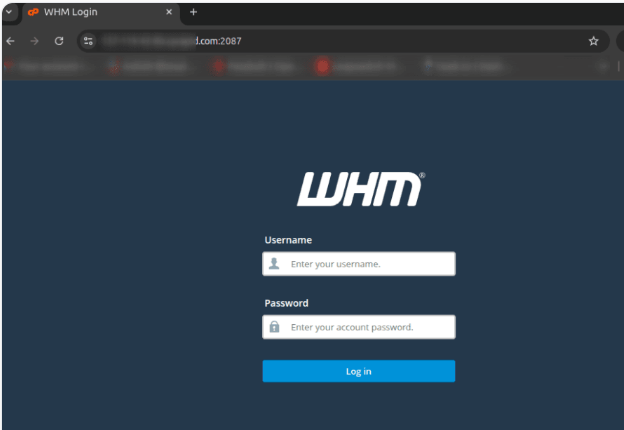
    Step 6: Access WHM

    After installation finishes, open your browser and visit:

    Bash
    https://<VM_Public_IP>:2087

    Access WHM

    Step 7: Log in to WHM

    Use the server’s root credentials.

    Login with:

    Username: root
    Password: your VM’s root password (set during creation)

    After authentication, the WHM interface will open.

    Step 8: Complete the Initial Configuration

    During the first login, WHM will launch its setup wizard.

    Complete the following tasks:

    • Accept the cPanel License Agreement.
    • Verify the server hostname.
    • Configure networking settings.
    • Configure nameservers.
    • Enter your contact email.
    • Activate your cPanel license (Trial or Paid).

    Once finished, the server is ready for hosting.

    Step 9: Begin Using cPanel

    After setup is complete, you can:

    • Create new cPanel hosting accounts.
    • Add websites and domains.
    • Configure email services.
    • Manage DNS zones.
    • Install SSL certificates.
    • Upload website files.
    • Manage databases.

    Troubleshooting Tips

    • If DNS resolution fails, verify that /etc/resolv.conf contains valid nameservers.
    • If cPanel fails to install, check logs at /var/log/cpanel-install.log.
    • Ensure the server has no existing control panel or conflicting services.

    Summary

    By using a cloud-init cloud-config script in the Cloud VM creation wizard, you can automatically:

    • Set system hostname
    • Configure DNS
    • Install cPanel with a single script

    This reduces manual work and ensures consistent deployments.

  • Managing VM Password in Cloud: Complete Step-by-Step Guide

    Steps to Change or Reset a VM Password

    Step 1: Sign in to the Cloud Portal

    Access the Cloud Dashboard using your registered account credentials.

    Step 2: Select Your Virtual Machine

    Go to the Virtual Machines section and locate the VM for which you want to update the password.

    Step 3: Open the Action Menu

    Click the Action drop-down menu available next to the selected VM.

    Step 4: Choose “Set Password”

    Step 5: Enter a Secure Password

    Type the new password that you want to assign to the VM.

    Enter a Secure Password

    Step 6: Save the Changes

    Click the Set button to apply the new password.

    Once the process is completed successfully, use the updated credentials to log in to your virtual machine.

    Strong Password Guidelines:

    To ensure security, use the following best practices when creating a password:

    Minimum Length: At least 12–16 characters.

    Combination of Characters: Include uppercase and lowercase letters, numbers, and special symbols (@, #, $, etc.).

    Avoid Common Words: Do not use easily guessable words like ‘password123’ or your name.

    No Reuse: Avoid reusing old passwords.

    By following these steps and best practices, you can ensure the security of your VM and prevent unauthorised access.

    Verify Login After Resetting the Password

    After changing the password, verify that the new credentials are functioning correctly before closing any active sessions.

    For Linux Virtual Machines

    Open a new terminal window and connect to the server using SSH.

    Bash
    ssh username@<VM_IP>

    Confirm that you can log in successfully using the new password.

    Only close your existing SSH session after confirming that the new login works properly.

    For Windows Virtual Machines

    Launch Remote Desktop Connection (RDP).
    Enter the VM’s IP address.
    Provide the username.
    Enter the newly created password.
    Verify that the remote desktop session opens successfully.

    Account Lockout Situations

    A VM account may become locked if the operating system detects repeated unsuccessful login attempts.

    Common Reasons for Account Lockout

    Account lockout can occur due to the following reasons:

    • Entering the wrong password multiple times while connecting through SSH or RDP.
    • Applications or automation scripts continuing to use an outdated password after it has been changed.
    • Security policies within the operating system detecting possible brute-force login attempts.

    Recovering from an Account Lockout

    Recommended Method: Reset the Password Through Cloud

    Follow these steps:

    Step 1

    Log in to the Cloud Dashboard.

    Step 2

    Open the VM list and select the affected virtual machine.

    Step 3

    Click Action and choose Set Password.

    Step 4

    Enter a new secure password.

    Step 5

    Click Set to save the password.

    Step 6

    Wait approximately 1–2 minutes for the update to take effect.

    Step 7

    Try logging into the VM again using the newly configured password.

    Password Expiration Policy

    The password aging policy is managed by Linux itself.

    To check the current password expiration settings, run:

    Bash
    chage -l username

    To disable password expiration for a user account:

    Bash
    sudo chage -M -1 username

    If the password has already expired, Linux will request that you create a new password during the next SSH login.

    Windows Virtual Machines

    Windows may enforce password expiration via Local Group Policy or Active Directory settings.

    If your session is blocked due to an expired password, use the Cloud Dashboard to reset the VM password using the ‘Set Password’ option (Steps 1–6 above), then log in and update the OS-level policy as needed.

  • How to change flavor of an existing Virtual machine

    A VM flavor defines the compute resources assigned to a Virtual Machine, such as vCPUs, RAM, and storage specifications. If your workload requirements change, you can easily switch to a different flavor without creating a new VM.
    Follow the instructions below to update the flavor of your VM in Cloud.

    Step 1: Sign In to Cloud

    Log in to your Cloud account using your credentials.

    After logging in, navigate to the Virtual Machines section where all your deployed VMs are displayed.

    Step 2: Locate the Target Virtual Machine

    Find the Virtual Machine whose resources you want to modify.

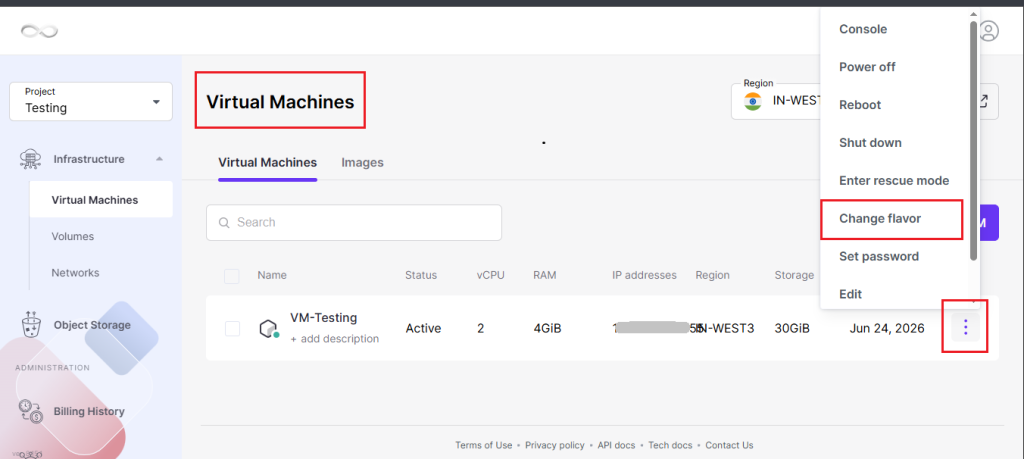
    On the right side of the VM entry, click the three-dot (⋮) action menu to view available management options.

    Step 3: Select “Change Flavor”

    From the list of available actions, click Change Flavor.

    This will open the flavor selection window, displaying all available VM configurations.

    Change Flavor

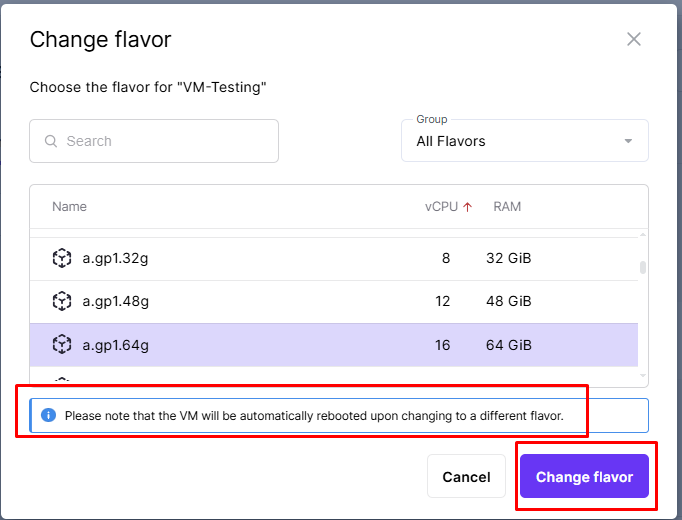
    Step 4: Choose a Suitable Flavor

    Review the available flavor options and select the configuration that best matches your requirements.

    • You can choose to upgrade (increase resources) or downgrade (decrease resources) based on your current requirements.

    Verify the selected configuration before proceeding.

    Step 5: Confirm the Flavor Change

    After selecting the desired flavor, click the Change Flavor button to submit the request.

    Cloud will begin applying the new resource configuration to the VM.

    Confirm the Flavor Change

    Step 6: Wait for the Process to Complete

    The platform will update the VM configuration automatically.

    Once the operation is finished, the updated flavor information will be visible in the VM details section of the dashboard.

    Important Notes :

    • No data loss: Changing the flavor does not affect the data or configuration inside the VM.
    • Downtime: A short reboot may occur while the flavor is being applied.
  • Creating a New Virtual Machine (VM) Using a Snapshot of a Volume

    Volume snapshots provide a reliable way to duplicate or recover an existing virtual machine environment. By creating a new volume or image from a snapshot, you can quickly provision a new VM containing the same operating system, configuration, and data as the original instance.

    Step 1: Locate the Snapshot

    1. Log in to your Cloud Dashboard.
    2. Navigate to Volumes and select the boot volume associated with your VM.
    3. Open the Snapshots tab.
    4. Locate the snapshot you want to use for creating the new virtual machine.
    5. Verify that the snapshot belongs to the correct source volume before proceeding.
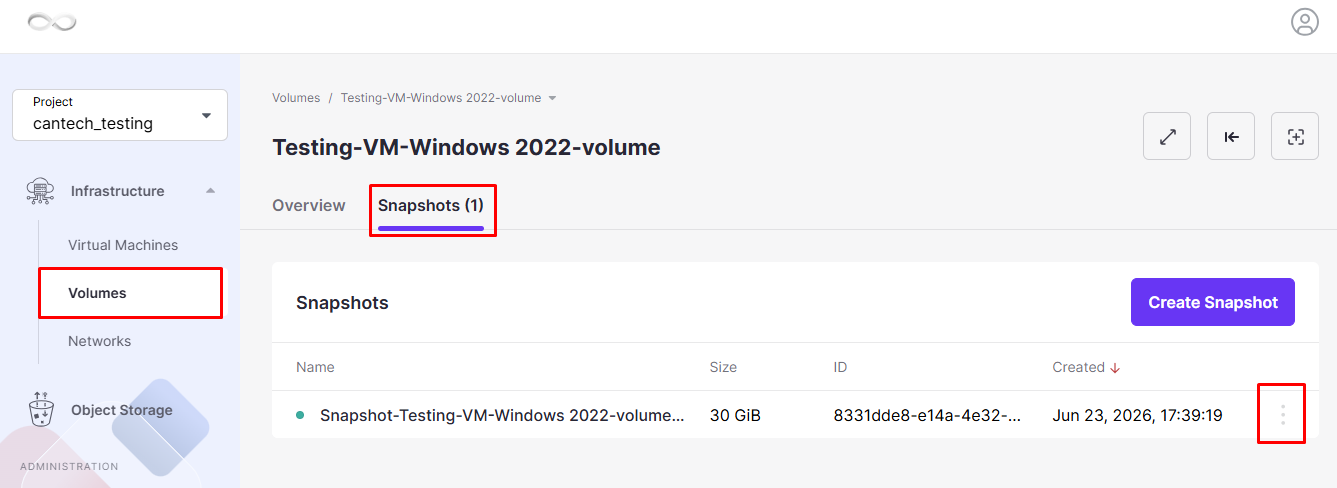
    Snapshots tab

    Step 2: Generate a Volume or Image from the Snapshot

    Option A: Create a New Volume

    1. Select the desired snapshot.
    2. Click Create Volume.
    3. Enter a suitable Volume Name.
    4. Review the details and click Create.
    5. Wait for the process to complete. The newly created volume will be available under the Volumes section.
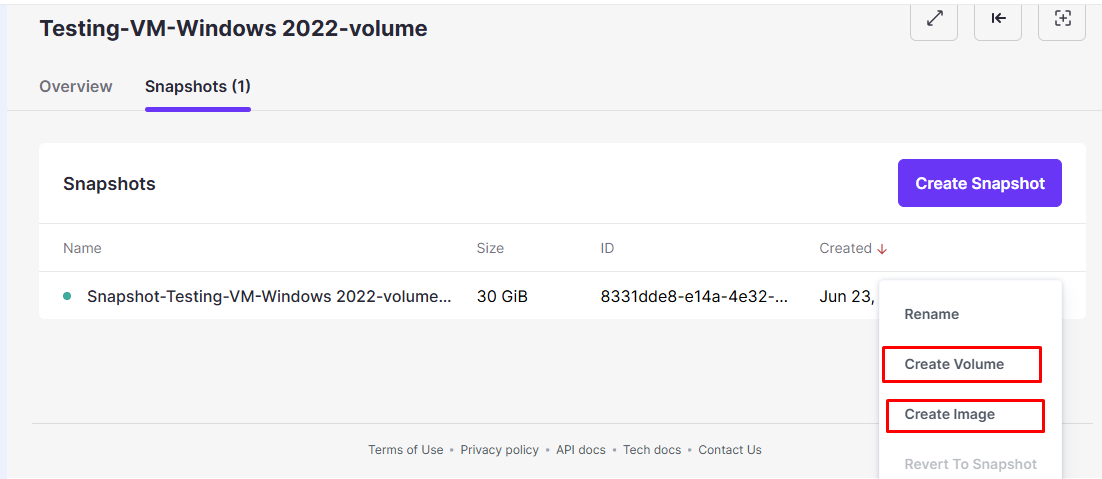
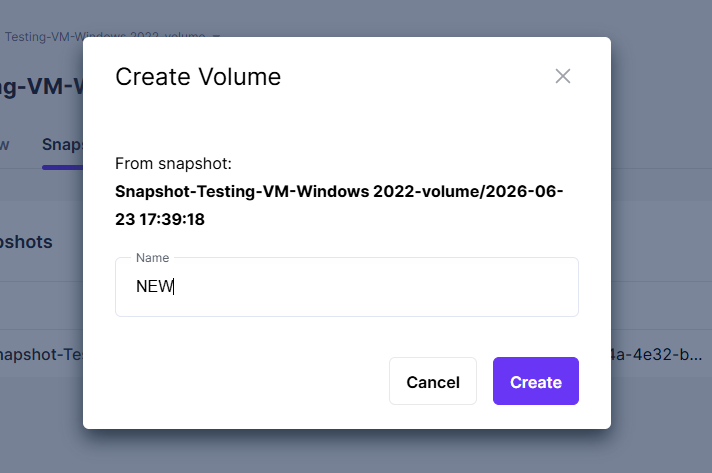
    Create Volume

    suitable Volume Name

    Option B: Create an Image Directly

    1. Select the snapshot.
    2. Click Create Image.
    3. Provide an image name.
    4. Confirm the operation and wait for the image creation process to finish.
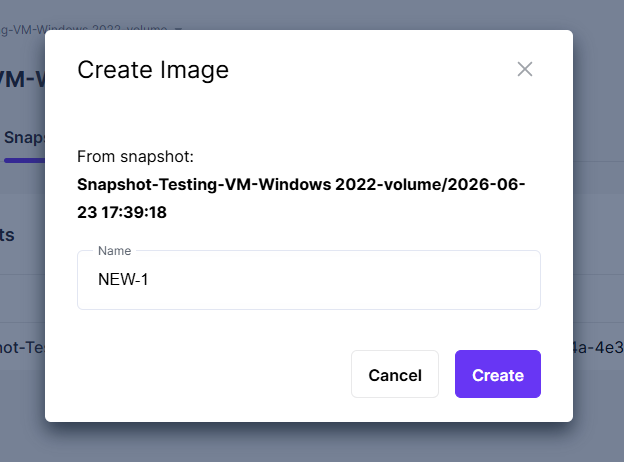
    Create Image

    Step 3: Create an Image from a Volume (Optional)

    If you created a volume from the snapshot or already have an existing boot volume, you can convert it into an image.

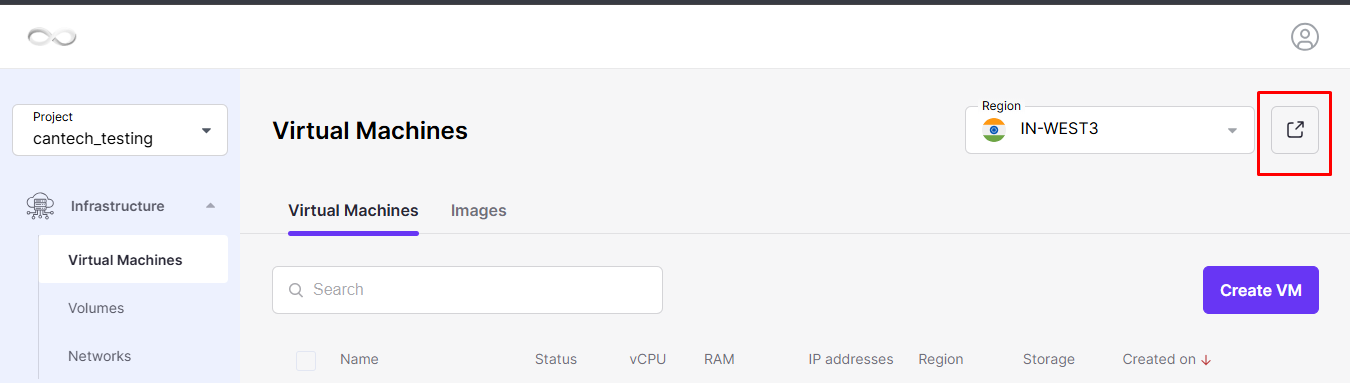
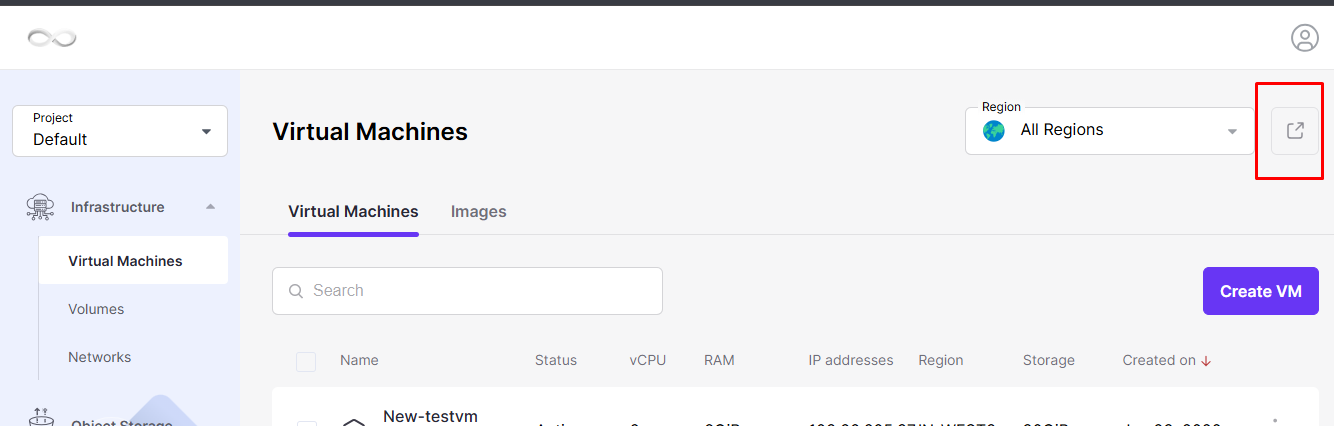
    1. Open the Cloud Region Advanced Dashboard.
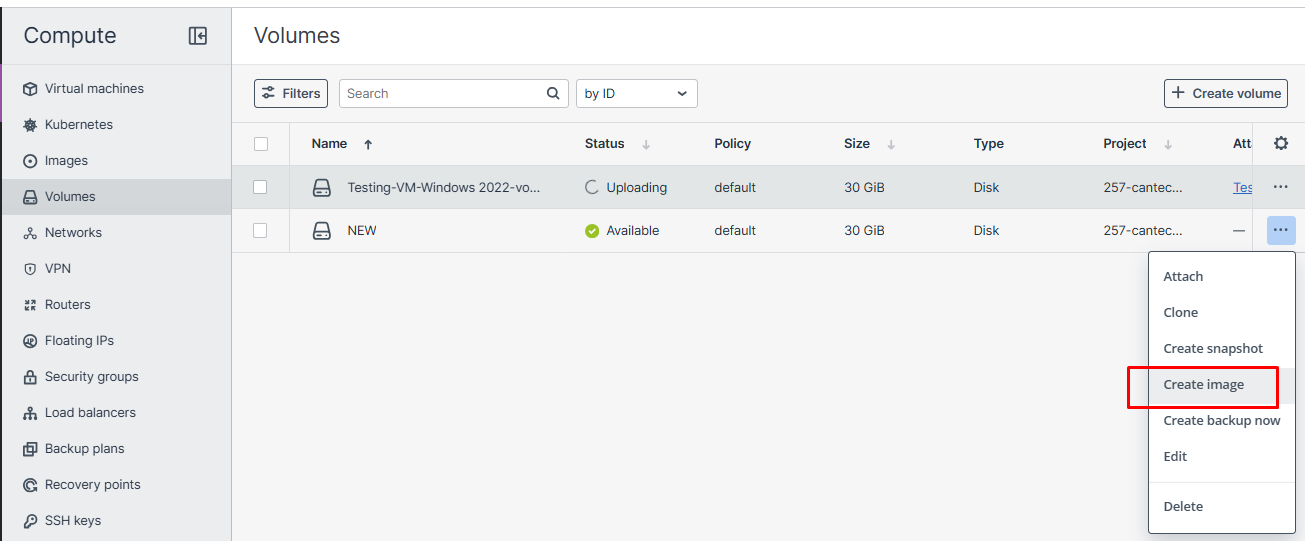
    2. Navigate to Compute → Volumes.
    3. Locate the required boot volume.
    4. Click the Actions Menu (⋮) next to the volume.
    5. Select Create Image.

    Cloud Region Advanced Dashboard

    Create Image

    6. Enter an appropriate image name.
    7. Click Create and wait for the image to become available.

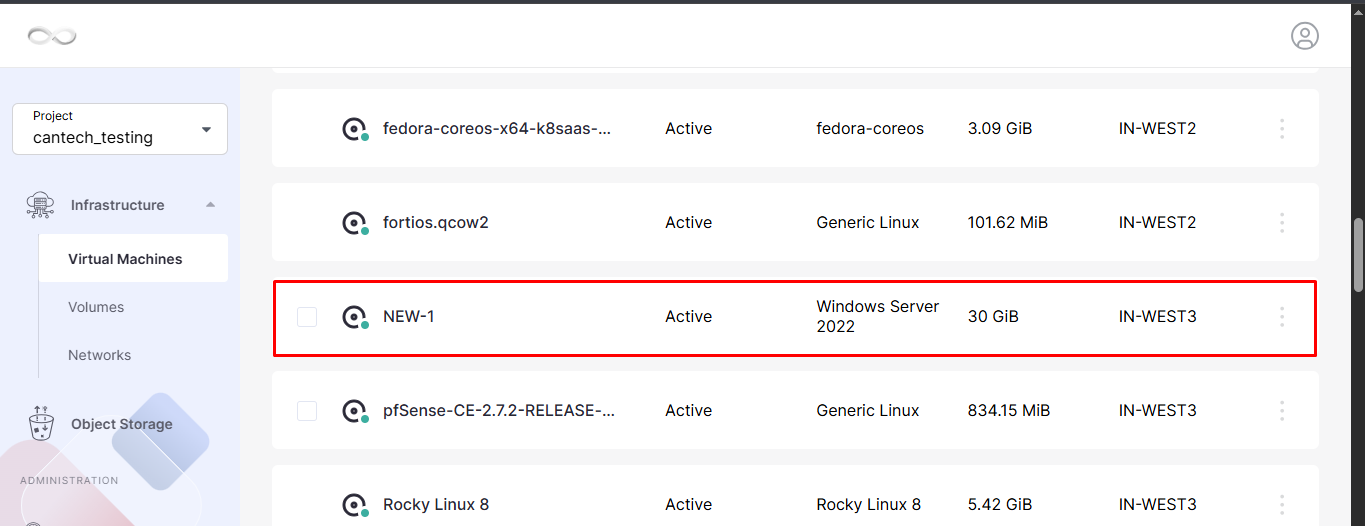
    The newly created image will appear in the Images section.
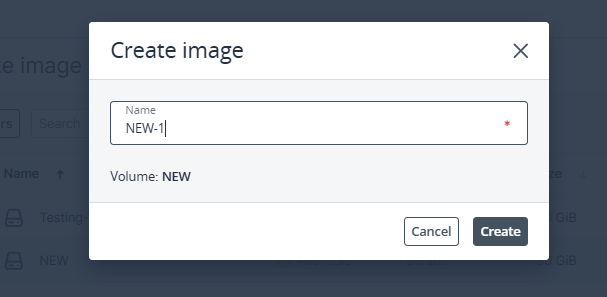
    Enter image name

    Create image to become available

    Step 4: Provision a New Virtual Machine

    Once the image is available, you can deploy a new VM.

    1. Navigate to the Virtual Machines section.
    2. Click Create Virtual Machine.
    3. Select the image created from the snapshot or volume.
    4. Choose the desired Flavor (CPU, RAM, and Storage configuration).
    5. Select the required Network Interface(s).
    6. Enter a Virtual Machine Name.
    7. Configure any additional settings as required.
    8. Click Create or Deploy to start the VM provisioning process.
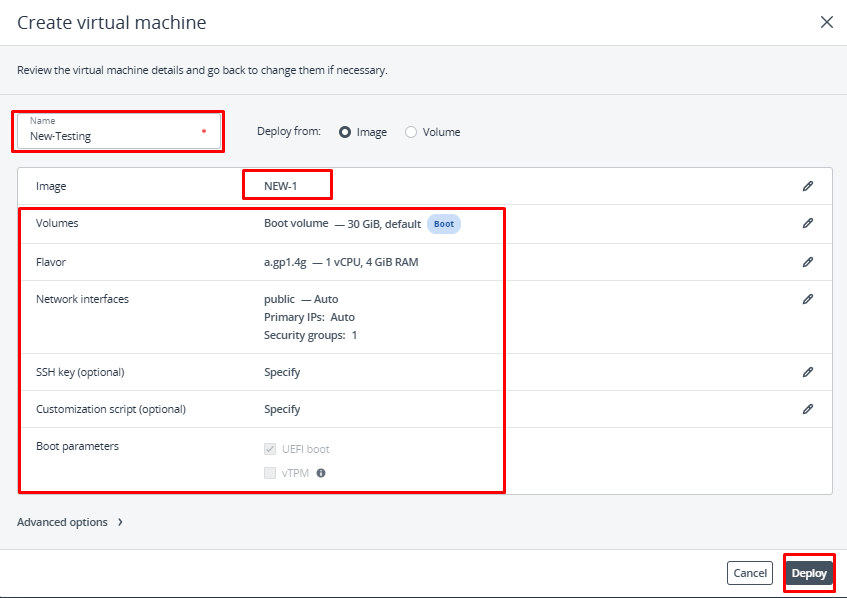
    Choose configuration

    Step 5: Verify the Newly Created VM

    After deployment is complete, perform the following checks:

    Verify VM Status

    • Confirm that the VM status shows Running or Active.

    Test Access

    Connect using one of the available methods:

    • VNC Console
    • SSH (Linux)
    • RDP (Windows)

    Validate Data and Services

    • Ensure all expected files, applications, and configurations are present.
    • Verify that services and applications start correctly.
    • Confirm network connectivity and functionality.
  • Accessing Virtual Machines Using the Console

    This guide explains how to connect to your Linux or Windows Virtual Machine (VM) through the Cloud Console.

    Prerequisites

    Before accessing your VM, make sure a secure password has been configured.

    Password Requirements

    For smooth console access and enhanced security, your password should:

    • Contain at least 12 characters
    • Include uppercase letters (A-Z)
    • Include lowercase letters (a-z)
    • Include numbers (0-9)
    • Include special characters (!, @, #, $, etc.)
    • Be unique and difficult to guess

    Note: Weak passwords may prevent successful login through the console.

    Connecting to a Linux Virtual Machine

    Step 1: Open the Cloud Dashboard

    Log in to your Cloud account and navigate to the Virtual Machines section.

    Step 2: Select the Virtual Machine

    Choose the Linux VM you want to access from the VM list.

    Step 3: Launch the Console

    Click the Console option available in the VM details panel. A new browser window will open displaying the VM console.

    Step 4: Enter Login Credentials

    Click inside the console window and enter your Linux username (for example: root).

    Step 5: Authenticate

    Enter the password configured for the VM.

    Step 6: Access the Server

    After successful authentication, you will be logged in and can start managing your Linux VM directly from the console.

    Connecting to a Windows Virtual Machine

    Step 1: Open the VM Console

    From the Cloud Dashboard, select the Windows VM and click Console.

    Step 2: Configure Regional Settings

    Choose the appropriate:

    • Country or Region
    • Language
    • Keyboard Layout

    Click Next to continue.

    Step 3: Accept License Terms

    Review the Microsoft license agreement and click Accept to proceed.

    Step 4: Set Administrator Password

    Create or enter the password for the Windows Administrator account.

    Step 5: Send Required Key Combinations

    If necessary, use the Send Key Combination feature to send commands such as Ctrl + Alt + Delete to the VM.

    Step 6: Sign In

    Enter the Administrator password and click Sign In.

    Step 7: Start Managing the VM

    Once logged in, you can manage and operate the Windows virtual machine through the browser-based console.

  • Assign a Public IP to Virtual Machine

    Step 1: Open the Cloud Dashboard

    1. Sign in to your Cloud Main Dashboard using your credentials.
    2. From the dashboard, open the Cloud Region Advanced Dashboard.
    3. In the left navigation panel, select Virtual Machines.
    4. A list of all available virtual machines will be displayed.

    Cloud Region Advanced Dashboard

    Step 2: Choose the Target Virtual Machine

    1. Locate the virtual machine that requires a public IP address.
    2. Click on the VM name to access its details page.

    VM name to access its details page

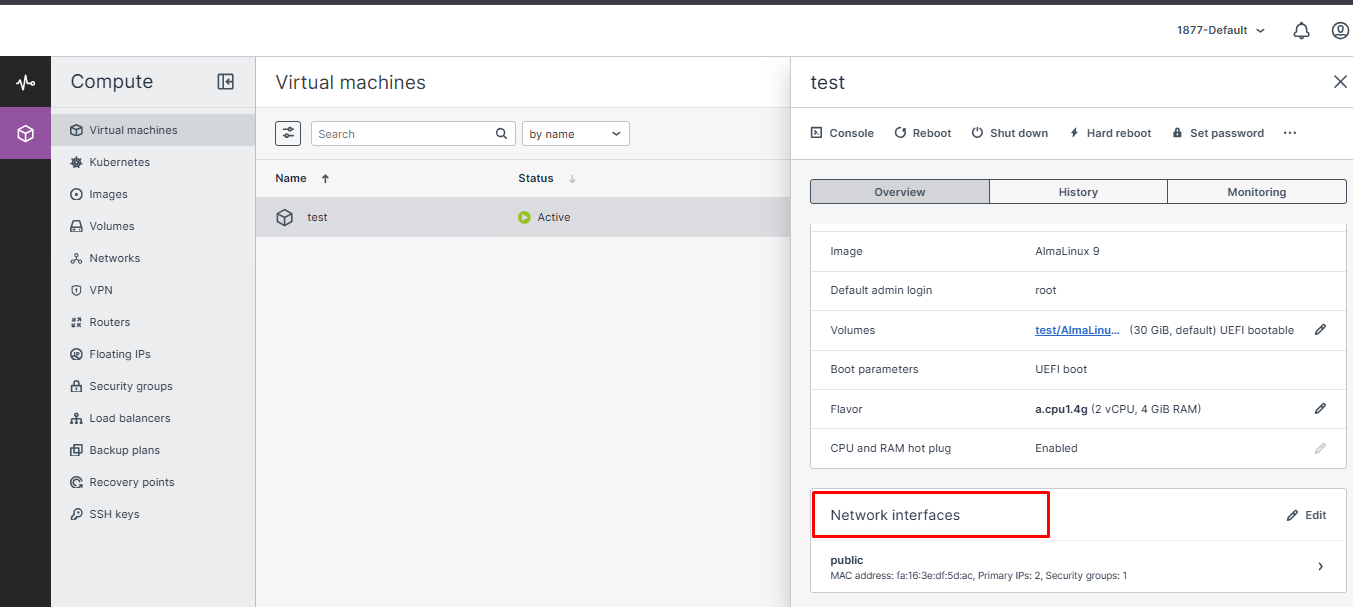
    3. Scroll to the Network Interfaces section.
    4. Click the Edit button to modify the network configuration.

    Network Interfaces section

    Step 3: Add a Network Interface

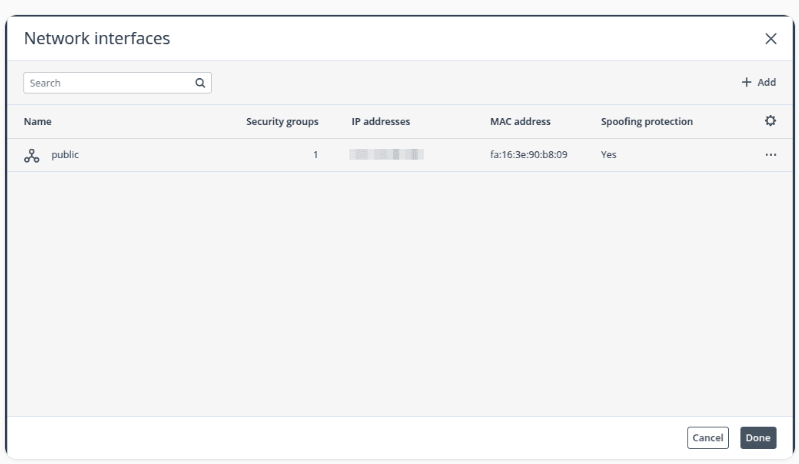
    1. The Network Interfaces configuration window will open.
    2. Review the existing network settings attached to the VM.
    3. To create a new network connection, click + Add.

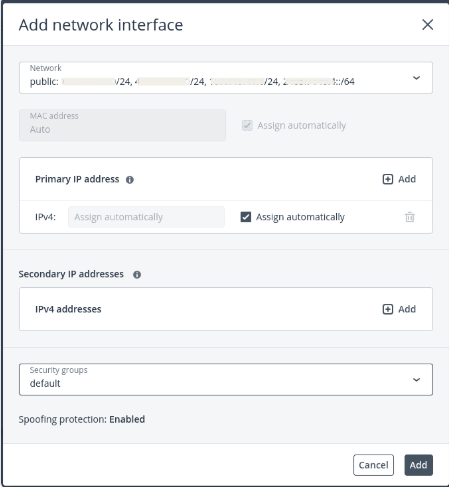
    Step 4: Configure Public Network Settings

    1. Select a Public Network from the available network options.
    2. If additional IP addresses are required, expand the Secondary IPv4 Addresses section.
    3. Use the Add button to assign extra IPv4 addresses.
    4. Use the Delete option to remove any unnecessary addresses.
    5. Choose an existing security group or create a new one according to your project’s security requirements.
    6. Alternatively, you can select the Default Security Group.

    Configure Public Network Settings

    Step 5: Save the Configuration

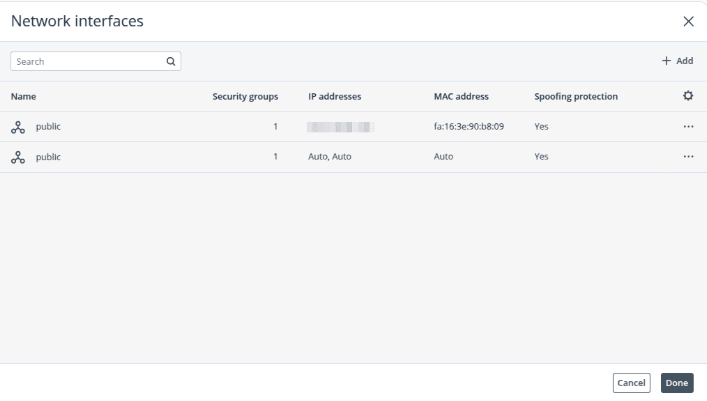
    1. After verifying the network settings, click Add to create and attach the network interface.
    2. The newly added interface will appear in the Network Interfaces list.
    3. Click Done to apply and save the changes.

    Save the Configuration

    Verification

    Once the configuration is completed, the selected public IP address will be associated with the virtual machine. You can verify the assignment from the VM’s overview page under the Network Information section.

    The virtual machine is now accessible through the assigned public IP address.