Category: Compute

  • Persistent Volume Expansion in Kubernetes

    1. Overview

    Kubernetes supports in-place Persistent Volume expansion, allowing you to increase the size of an existing Persistent Volume without losing existing data.

    During the expansion process:

    • Block storage is expanded at the Cloud infrastructure layer.
    • The filesystem is resized to use the newly available storage capacity.
    • Existing data remains unchanged. No data is deleted, moved, or modified.

    2. Prerequisites

    Before expanding a Persistent Volume, verify the following requirements.

    StorageClass Configuration

    The StorageClass must have volume expansion enabled:

    Bash
    allowVolumeExpansion: true

    Volume Expansion

    Only increasing the volume size is supported.

    Example:
    5Gi → 10Gi

    Shrinking an existing volume is not supported and will fail validation.

    Verify the CSI Driver

    Check that the CSI driver is running:

    Bash
    kubectl get pods -n kube-system | grep cinder

    All cinder.csi.openstack.org pods should be in the Running state.

    3. Expand the Persistent Volume

    This procedure uses YAML manifests to perform the volume expansion.

    Step 1: Update the PVC Storage Request

    Open the PersistentVolumeClaim YAML file.

    Example:
    pvc.yaml

    Update the requested storage size:

    spec:
    resources:
    requests:
    storage: 10Gi

    In this example, the volume size is increased from 5Gi to 10Gi.

    Apply the updated configuration:

    Bash
    kubectl apply -f pvc.yaml

    Step 2: Resize the Filesystem

    After the volume has been expanded, the filesystem must also be resized to use the additional capacity.

    Note: In this environment using ext4/xfs, a pod restart is required.

    If Using a Deployment

    Run:

    Bash
    kubectl rollout restart deployment <deployment-name>

    If Using a Standalone Pod

    Run:

    Bash
    kubectl apply -f pod.yml

    Kubernetes will:

    • Re-attach the expanded volume.
    • Automatically expand the filesystem when the volume is mounted.

    4. Verify the Volume Expansion

    After completing the expansion, verify that the new storage size is available.

    Check the PVC Status

    Run:

    Bash
    kubectl get pvc <pvc-name>

    Verify that:

    • The PVC status is Bound.
    • The new storage size is displayed.

    Verify the Storage Inside the Pod

    Run:

    Bash
    kubectl exec <pod-name> — df -h /data

    Check the Size column and confirm that the updated storage capacity is displayed.

    5. Safety and Recovery

    Data Integrity

    During volume expansion:

    • The expansion occurs at the end of the partition.
    • Existing data remains unchanged and safe.

    Expansion Failure

    If the expansion fails, for example because of insufficient quota:

    • The PVC status will remain Expanding.
    • The pod will continue operating with the original storage size.
    • After the issue is resolved, the expansion process will automatically continue.

    Best Practice

    • Perform Persistent Volume expansion during a low-traffic period.
    • This helps reduce the impact of any required pod restarts.

    6. Summary

    Kubernetes supports safe, in-place Persistent Volume expansion without affecting existing data.

    The expansion process requires:

    • A StorageClass with volume expansion enabled.
    • Updating the requested storage size in the YAML file.
    • Restarting the pod.
    • Verifying the new storage size after expansion.
  • Managing Kubernetes Clusters

    1. Overview

    Users can deploy ready-to-use Kubernetes clusters with persistent storage for managing containerized applications.
    Only users who have access to the related Project can create and manage Kubernetes clusters.

    2. Create a Kubernetes Cluster

    Step 1: Start Cluster Creation

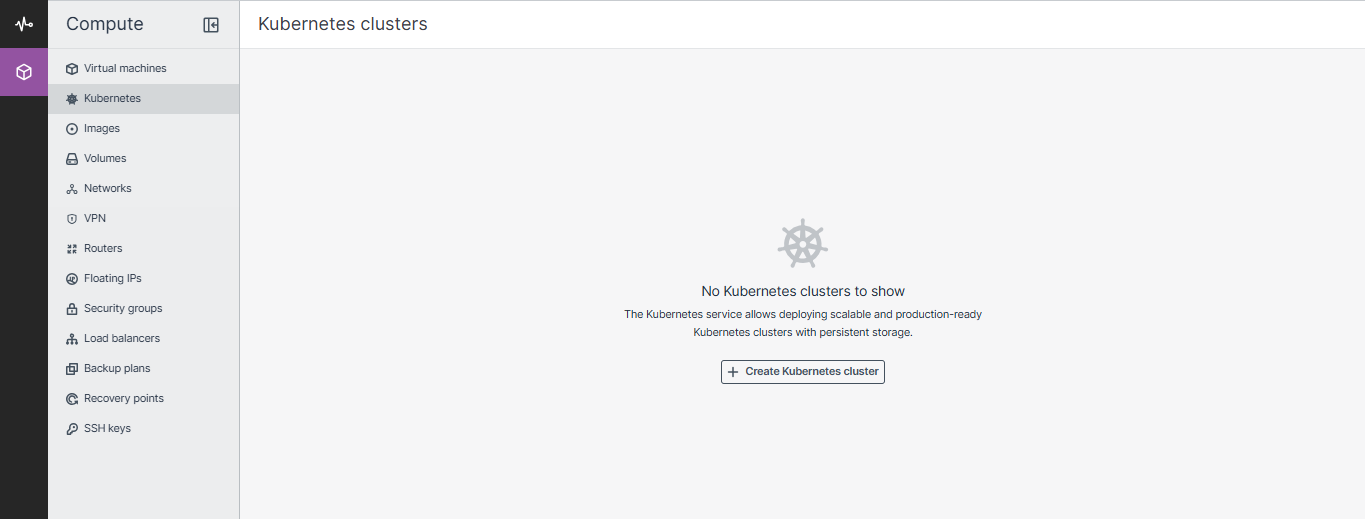
    1. Go to the Kubernetes Clusters screen.
    2. Click Create.
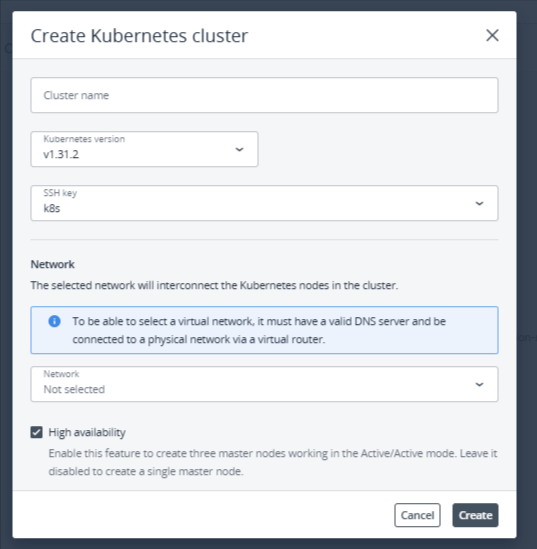
    3. A window will open where you can configure the Kubernetes cluster.

    K8S

    Step 2: Configure Basic Settings

    Enter or select the following:

    • Cluster Name
    • Kubernetes Version
    • SSH Key

    cluster

    Step 3: Configure the Network

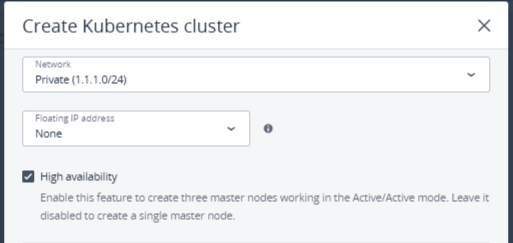
    In the Network section, select the network that will connect the Kubernetes nodes.

    If you select a virtual network, choose the required floating IP configuration.

    Network

    None

    If you select None, you will not have access to the Kubernetes API.

    For Kubernetes API

    A floating IP address will be assigned to:

    • The master node, or
    • The load balancer if the master node uses High Availability.

    For Kubernetes API and Nodes

    Floating IP addresses will be assigned to:

    • The Kubernetes API.
    • Master nodes.
    • Worker nodes.

    You can also choose whether to enable High Availability for the master node.

    If High Availability is enabled, three master node instances will be created and will operate in Active/Active mode.

    Step 4: Configure the Master Node

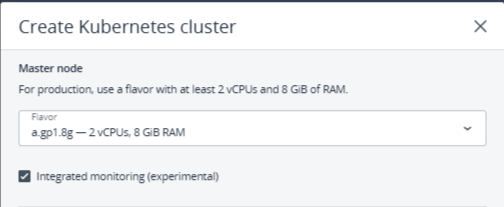
    In the Master Node section, select a flavor for the master node.

    For production Kubernetes clusters, it is strongly recommended to use a flavor with at least:

    • 2 vCPUs
    • 8 GiB RAM

    master

    You can also enable Integrated Monitoring.

    When enabled, the following monitoring components are automatically deployed:

    • Prometheus
    • Alertmanager
    • Grafana

    Step 5: Configure Container Volumes

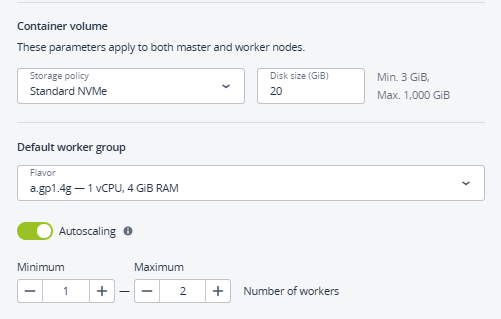
    In the Container Volume section:

    1. Select a storage policy.
    2. Enter the required volume size for the master and worker nodes.

    volume

    Step 6: Configure the Default Worker Group

    In the Default Worker Group section:

    1. Select a flavor for each worker node.
    2. Configure the required number of worker nodes.
    3. Choose whether to enable Autoscaling.

    Autoscaling Enabled

    When Autoscaling is enabled:

    • Worker nodes are automatically added if pods remain in a pending state because of insufficient resources.
    • Worker nodes are automatically removed when they have no pods running.
    • Configure the minimum and maximum number of workers.

    Autoscaling Disabled

    When Autoscaling is disabled, the configured number of worker nodes remains fixed.

    Step 7: Configure Labels

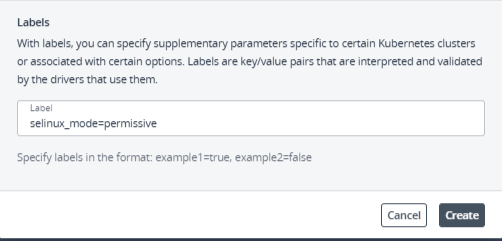
    In the Labels section, enter additional Kubernetes cluster parameters using the following format:

    key=value

    Example:

    selinux_mode=permissive

    Currently supported labels are:

    • selinux
    • flannel_network_cidr

    Labels

    Step 8: Create the Cluster

    Click Create.

    The Kubernetes cluster creation process will begin.

    After creation:

    • Master and worker nodes will appear on the Virtual Machines screen.
    • Their storage volumes will appear on the Volumes screen.

    After the cluster is ready, click Kubernetes Access to view instructions for accessing the Kubernetes dashboard.

    You can also access the master and worker nodes through SSH using the assigned SSH key and the username core.

    3. Access Kubernetes Nodes Using SSH

    To access a Kubernetes node, run:

    Bash
    ssh -i <private-key> core@<IP-address>

    Replace:

    <private-key> with the path to your private key file.
    <IP-address> with the public IP address of the VM.

    Note: Verify the required port accessibility from your network or firewall if needed.

    4. Delete a Kubernetes Cluster

    To delete a Kubernetes cluster:

    1. Go to the Kubernetes Clusters screen.
    2. Select the required Kubernetes cluster.
    3. Click Delete.

    The master and worker Virtual Machines will be deleted along with their volumes.

    delete

    5. Managing Kubernetes Worker Groups

    Kubernetes worker groups allow you to use worker nodes with different CPU and RAM configurations based on application requirements.

    When creating a Kubernetes cluster, you can configure only one worker group called the Default Worker Group.

    After the cluster is created, you can:

    • Add additional worker groups.
    • Use different configurations for each worker group.
    • Change the number of workers in each group.

    Note: The Default Worker Group cannot be deleted.

    6. Add a Worker Group

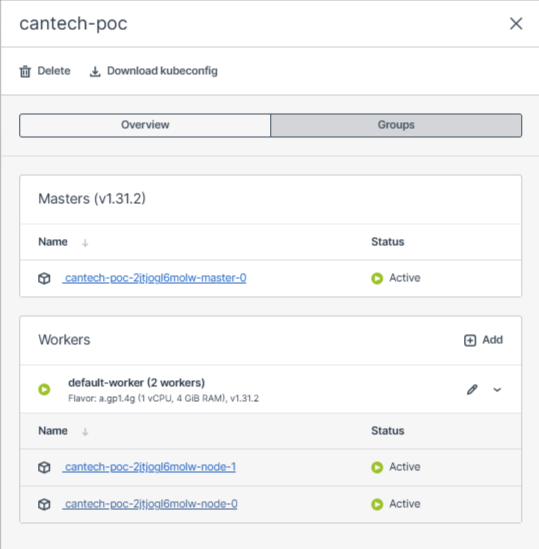
    Step 1: Open the Worker Groups

    1. Go to the Kubernetes Clusters screen.
    2. Select the required Kubernetes cluster.
    3. Open the Groups tab.
    4. In the Workers section, click Add.

    worker node

    Step 2: Configure the Worker Group

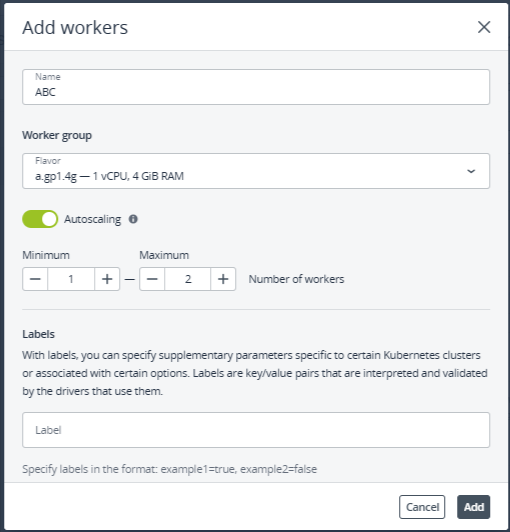
    In the Add Worker Group window, enter a name for the group.

    Workers

    In the Worker Group section:

    1. Select a flavor for each worker.
    2. Choose whether to enable Autoscaling.

    Autoscaling Enabled

    The number of workers will automatically increase when pods remain pending because of insufficient resources.

    Workers will be reduced when there are worker nodes with no pods running.

    Configure the minimum and maximum worker group size.

    Autoscaling Disabled

    The number of worker nodes you configure will remain fixed.

    Step 3: Configure Labels

    Enter additional parameters using the following format:
    key=value

    Example:
    selinux_mode=permissive

    Currently supported labels are:

    • selinux
    • flannel_network_cidr

    Other labels can be used at your own risk. Refer to the OpenStack documentation for the complete list of supported labels.

    Step 4: Add the Worker Group

    Click Add.

    After the worker group is created, pods can be assigned to these worker nodes as explained in Assigning Kubernetes Pods to Specific Nodes.

    7. Change the Number of Workers

    To modify the number of worker nodes:

    1. Open the Kubernetes cluster.
    2. Go to the Groups tab.
    3. In the Workers section:
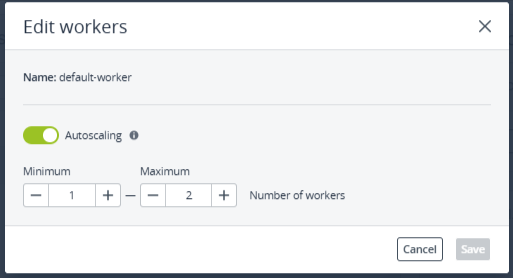
      • Click the pencil icon for the Default Worker Group.
      • For other worker groups, click the ellipsis (⋯) and select Edit.
    4. In the Edit Workers window:
      • Enable or disable Autoscaling, or
      • Change the number of worker nodes.
    5. Click Save.

    Edit worker

    8. Delete a Worker Group

    To delete a worker group:

    1. Click the ellipsis (⋯) next to the required worker group.
    2. Select Delete.

    The worker group and all of its worker nodes will be deleted.

    Note: After deletion, the worker group data will be lost.

    9. Updating Kubernetes Clusters

    When a new Kubernetes version becomes available, you can update the cluster.

    Worker nodes are updated one at a time to maintain data availability.
    The Kubernetes API will be unavailable during the update unless High Availability is enabled for the master node.
    Before starting the update, ensure that the compute cluster has enough resources and quota for at least one additional VM using the largest flavor configured in the Kubernetes cluster.

    If the master and worker nodes use different flavors, consider the largest flavor when checking available resources.

    10. Kubernetes Update Limitations

    The following limitations apply:

    • Kubernetes clusters running versions 1.15.x to 1.17.x cannot be updated to newer versions.
    • Kubernetes can be updated only one minor version at a time.
      Example:
      1.28 → 1.29 → 1.30
    • Node groups can have only a one-minor-version difference.
      Example:
      1.29 and 1.30
    • Kubernetes 1.29 clusters can be updated to 1.30 only if they were created using the Cilium network plugin.
    • Kubernetes clusters cannot be managed through the self-service panel while an update is in progress.

    11. Update a Kubernetes Cluster

    Step 1: Select the Cluster

    Select a Kubernetes cluster that displays the Update Available tag.

    Step 2: Start the Update

    On the Kubernetes cluster pane, click Update in the Kubernetes Version field.

    Step 3: Select the Kubernetes Version

    In the Update window:

    1. Select the Kubernetes version you want to update to.
    2. Follow the provided link to review API resources that are deprecated or obsolete in the selected version.
    3. Click Next.

    Step 4: Select the Update Type

    Choose one of the following options:

    Update All

    Select Update All to update all node groups in the Kubernetes cluster.

    Custom Update

    Select Custom Update to update only specific node groups.

    The master node group is automatically selected and is required for the update.

    Step 5: Confirm the Update

    Click Confirm.

    The Kubernetes cluster update process will begin.

    If different node groups are running different Kubernetes versions, the cluster status will change to Partially Updated.

    In this state, new worker groups will use the same Kubernetes version as the master node group.

    To complete the cluster update, repeat the update process for any worker groups that are still running an older Kubernetes version.

  • How to access Linux VM from Windows and Linux

    Accessing a Linux VM from Windows

    You can connect to a Linux virtual machine from a Windows system using SSH (Secure Shell) or Remote Desktop Protocol (RDP) if a graphical interface is installed.

    Requirements

    Before connecting, ensure you have the following:

    • The IP address of the Linux virtual machine.
    • The SSH service is installed and running on the VM (default SSH port: 22).
    • A valid username and password, or an SSH private key if key-based authentication is configured.

    Method 1: Connect Using PuTTY (SSH Client)

    Step 1: Install PuTTY

    Download the latest version of PuTTY from the official website and install it on your Windows computer.

    Step 2: Launch PuTTY

    Open the PuTTY application.

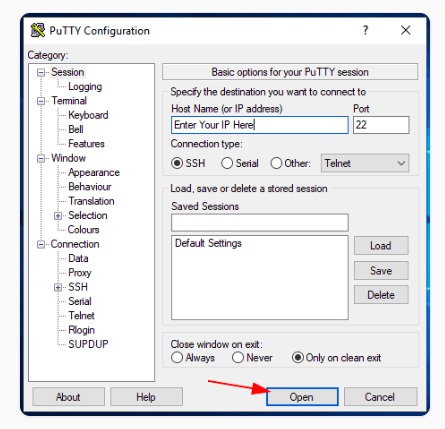
    • Enter the IP address of your Linux VM in the Host Name (or IP address) field.
    • Verify that the Port is set to 22.
    • Keep the connection type as SSH.

    Launch PuTTY

    Step 3: Establish the Connection

    Click Open.

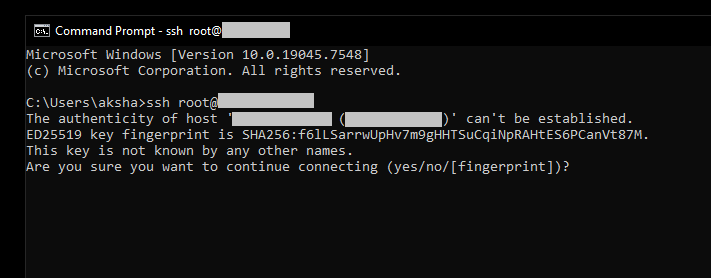
    The first time you connect, PuTTY will display the server’s SSH fingerprint.

    Click Accept (or Yes) to continue.

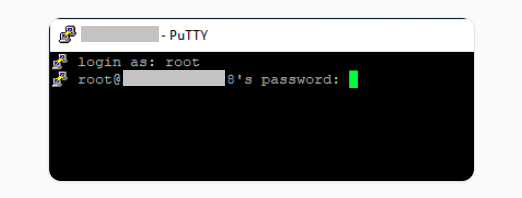
    Step 4: Authenticate

    When prompted:

    • Enter the Linux username (for example, root or another user).
    • Enter the corresponding password.

    If you are using SSH key authentication, configure your private key by navigating to:

    Connection → SSH → Auth

    Then browse and select your .ppk private key file.

    Establish the Connection

    Method 2: Connect Using Windows Terminal or PowerShell

    Step 1: Open Windows Terminal

    Launch Windows Terminal, PowerShell, or Command Prompt.

    Step 2: Connect Using SSH

    Execute the following command:

    Bash
    ssh username@<Linux_VM_IP>

    Replace:

    • username with your Linux account name.
    • <Linux_VM_IP> with the IP address of the virtual machine.

    Example:

    Bash
    ssh root@192.168.1.1

    Step 3: Login

    Enter the password when prompted.

    If SSH key authentication is configured, ensure your private key is located in the default Windows SSH directory:

    Bash
    C:\Users\<username>\.ssh\

    Login SSH

    Method 3: Connect Using Remote Desktop (GUI Access)

    If your Linux VM has a desktop environment installed, you can connect through Remote Desktop.

    Step 1: Install XRDP on the Linux VM

    Update the package list and install XRDP

    Bash
    sudo apt update
    sudo apt install xrdp

    Step 2: Enable the XRDP Service

    Start the service and enable it to launch automatically after reboot.

    Bash
    sudo systemctl enable –now xrdp

    Step 3: Open Remote Desktop Connection

    On your Windows machine:

    • Open Remote Desktop Connection.
    • Enter the Linux VM IP address.
    • Click Connect.

    Step 4: Sign In

    Provide your Linux username and password to access the graphical desktop.

    Connecting from one Linux system to another is simple using SSH. You can also use SCP for secure file transfers.

    Requirements

    Before connecting, verify that:

    • You know the Linux VM’s IP address.
    • SSH is installed and active on the VM.
    • You have valid login credentials or an SSH key.

    Method 1: Connect Using SSH

    Step 1: Open the Terminal

    Launch the Terminal application on your Linux computer.

    Step 2: Run the SSH Command

    Use the following command:

    Bash
    ssh username@<Linux_VM_IP>

    Example:

    Bash
    ssh ubuntu@192.168.1.100

    Step 3: Authenticate

    Enter your password when prompted.

    If you are using an SSH key, verify that the key exists in your local SSH directory.

    Example:

    Bash
    ~/.ssh/id_rsa

    Ensure the private key has the correct permissions.

    Bash
    chmod 600 ~/.ssh/id_rsa

    Method 2: Access Using Cockpit (Web Interface)

    Cockpit provides a browser-based interface for managing Linux systems.

    Step 1: Install Cockpit

    Log in to your Linux VM using SSH and install Cockpit.

    For Ubuntu/Debian:

    Bash
    sudo apt update
    sudo apt install cockpit -y

    For RHEL, Rocky Linux, AlmaLinux, or CentOS:

    Bash
    sudo dnf install cockpit -y

    Step 2: Enable and Start the Cockpit Service

    Enable the Cockpit socket so that it starts automatically during system boot, and then start the service.

    Bash
    sudo systemctl enable cockpit.socket
    sudo systemctl start cockpit.socket

    Verify that the Cockpit socket is running.

    Bash
    sudo systemctl status cockpit.socket

    Step 3: Allow Port 9090 Through the Firewall (Optional)

    If your firewall is enabled, allow access to TCP port 9090.

    Ubuntu (UFW):

    Bash
    sudo ufw allow 9090/tcp
    sudo ufw reload

    RHEL/Rocky/AlmaLinux:

    Bash
    sudo firewall-cmd –permanent –add-service=cockpit
    sudo firewall-cmd –reload

    Step 4: Verify Cockpit is Listening

    Run the following command to verify that Cockpit is listening on port 9090.

    Bash
    sudo ss -tulnp | grep 9090

    Expected output:

    Bash
    LISTEN 0 4096 *:9090

    Step 5: Open Cockpit in a Web Browser

    On your Windows or Linux computer, open your preferred web browser and enter the following URL:

    Bash
    https://<Linux_VM_IP>:9090

    Step 6: Log In to Cockpit

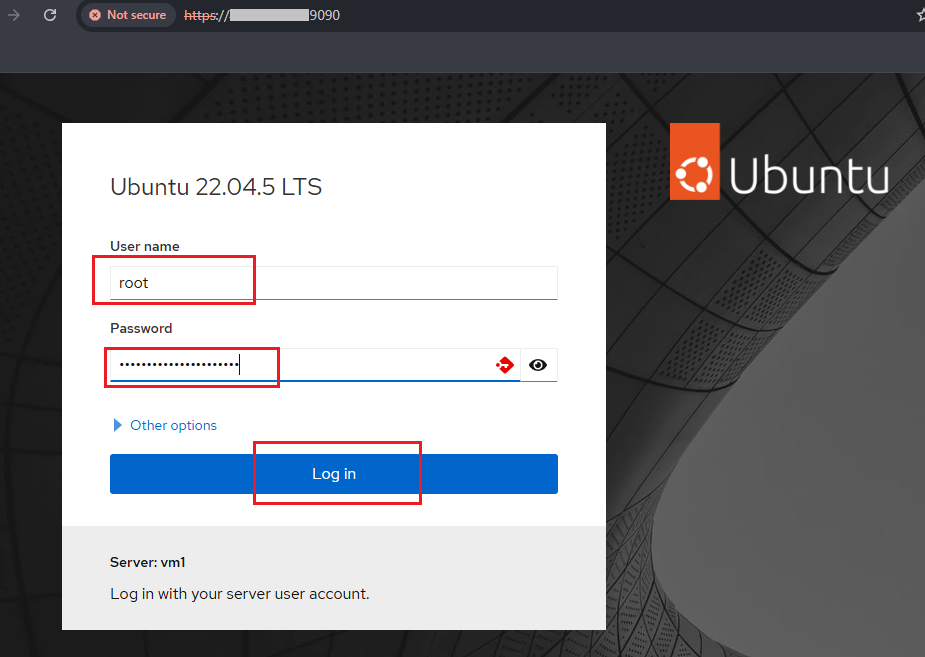
    On the Cockpit login page, enter your Linux VM credentials.

    Log In to Cockpit

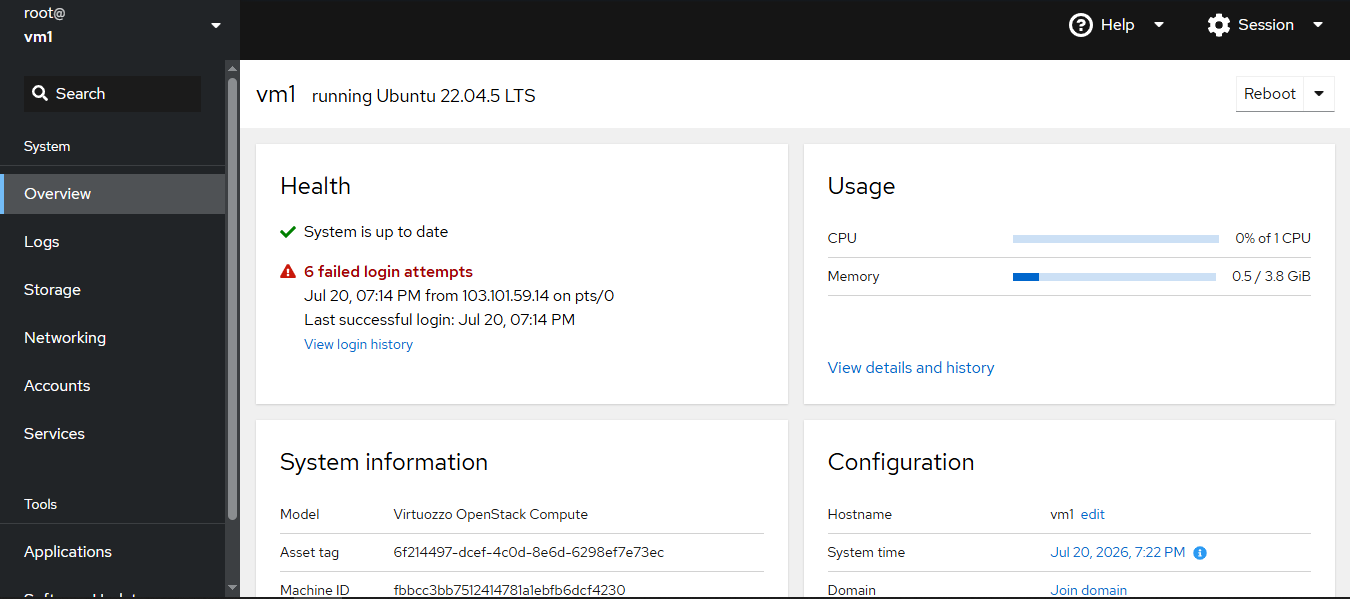
    Cockpit Login Successfully

    Troubleshooting

    Connection Refused

    If you cannot establish an SSH connection:

    Check whether the SSH service is running.

    Bash
    sudo systemctl status ssh

    If necessary, start the service.

    Bash
    sudo systemctl start ssh

    Ensure the firewall permits SSH traffic.

    Bash
    sudo ufw allow ssh

    Authentication Failed

    If login fails:

    • Verify the username and password.
    • If using an SSH key, confirm the correct private key is selected.
    • Make sure the private key permissions are set properly.
    Bash
    chmod 600 ~/.ssh/id_rsa

    Timeout Issues:

    • Verify the Linux VM is running and accessible via the network.
    • Check network configurations and routes.
  • How to create Virtual Machines from Advance Panel

    Cloud delivers a flexible and scalable cloud infrastructure that helps you deploy virtual machines based on your workload requirements. Whether you’re hosting applications, building development environments, or performing testing and data analysis, you can quickly create and manage Windows virtual machines through the Cloud platform.

    If you want to create a Windows Virtual Machine using the standard Cloud Dashboard, refer to the relevant documentation.

    To deploy a Windows Virtual Machine using the Cloud Advanced Dashboard, follow these instructions.

    Step 1: Open the Advanced Dashboard

    Log in to your Cloud account.

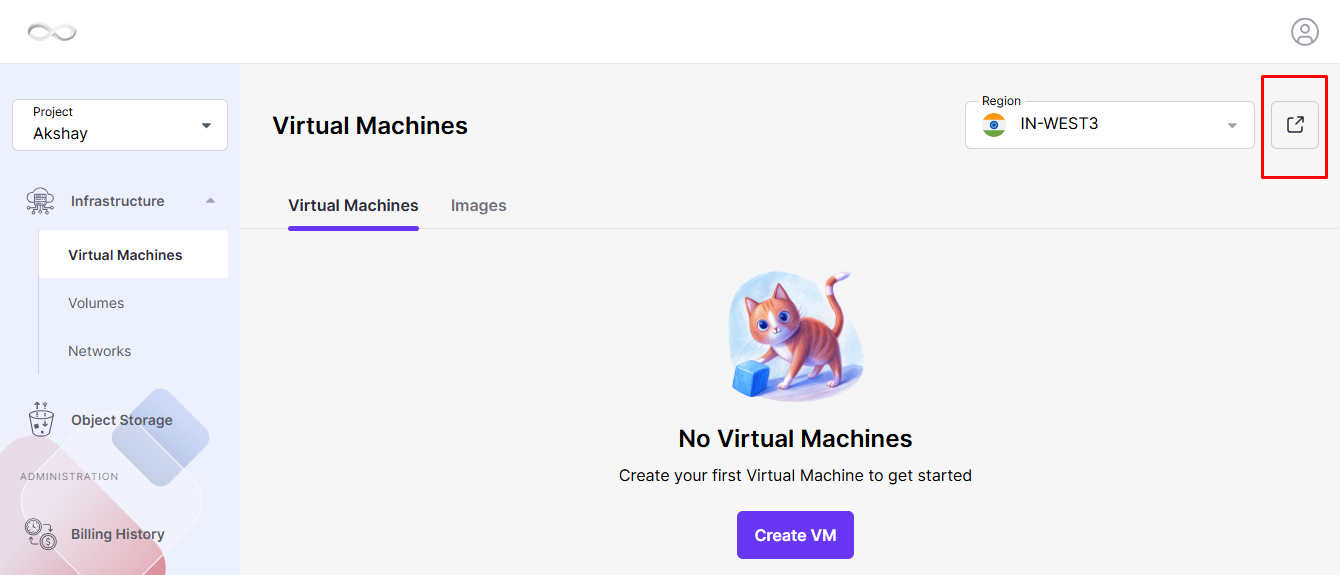
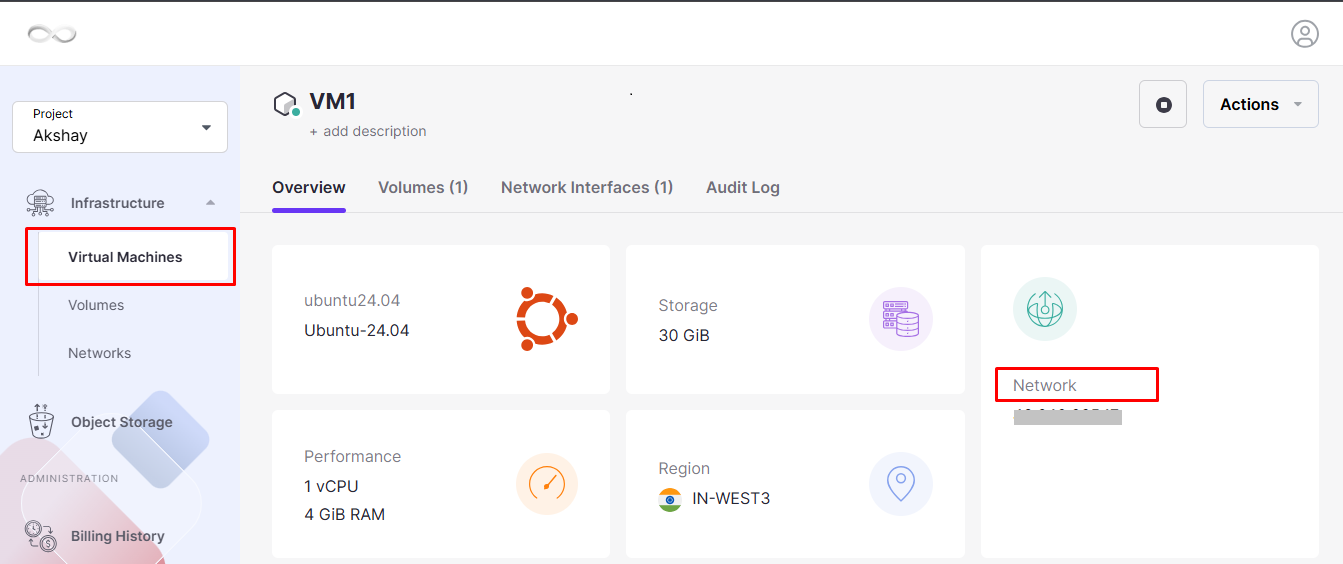
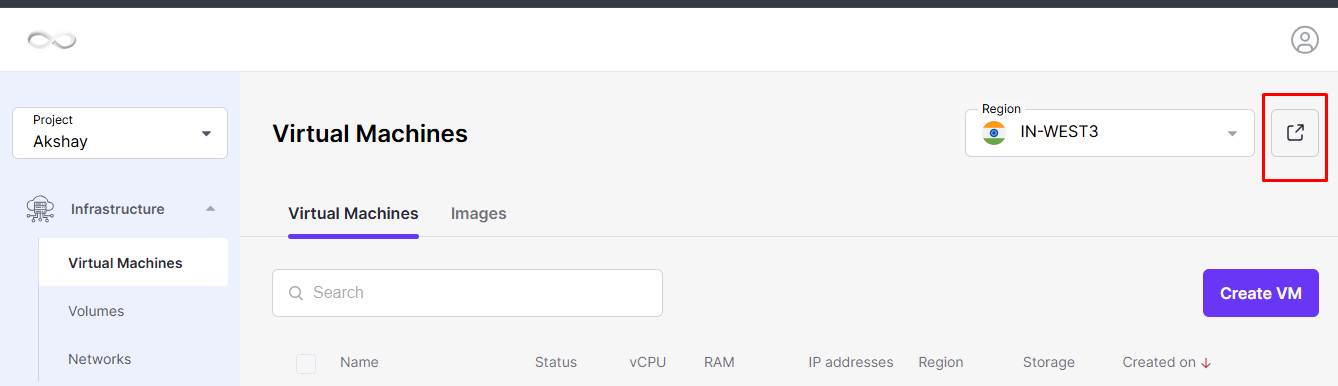
    Navigate to the required region and click the arrow icon to open the Region Advanced Dashboard. From this dashboard, you can deploy, configure, and manage your virtual machines.

    Open the Advanced Dashboard

    Step 2: Start Creating a Virtual Machine

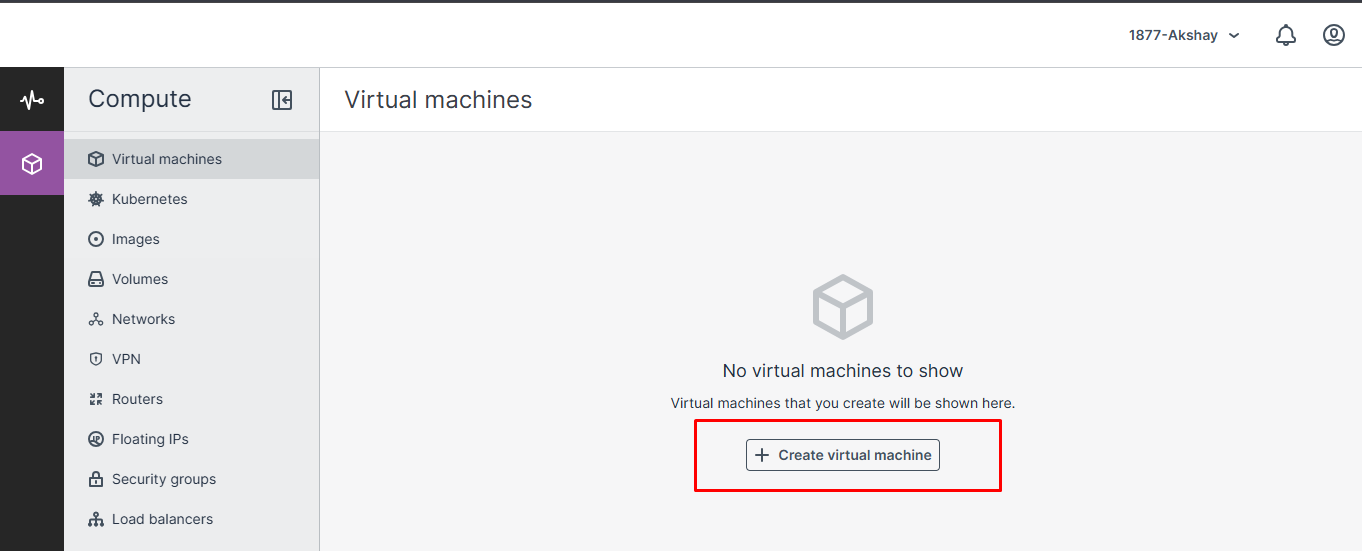
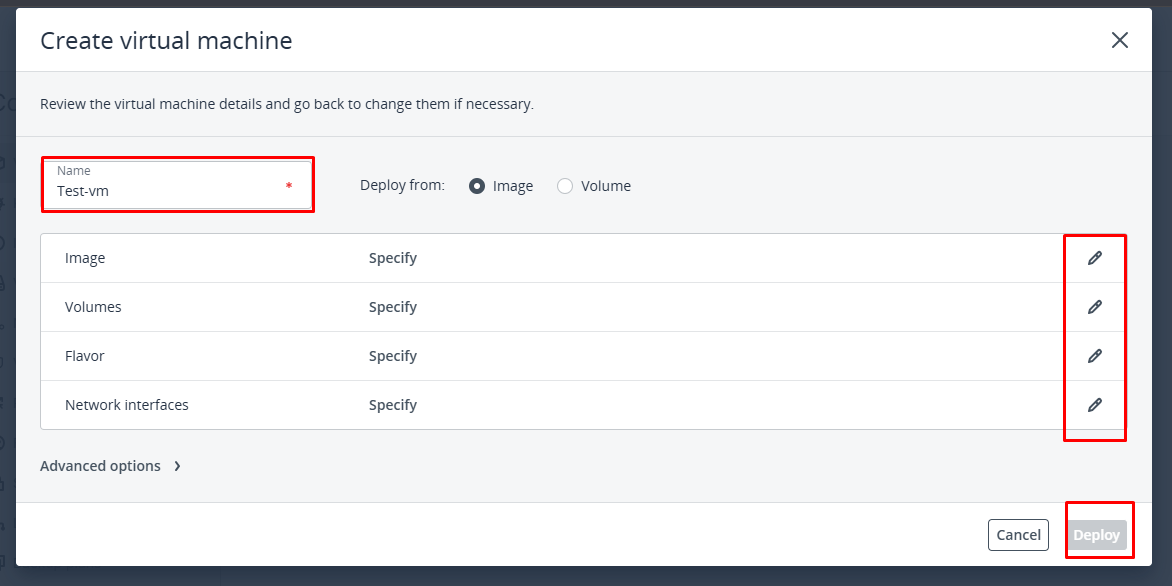
    Click the + Create Virtual Machine button.

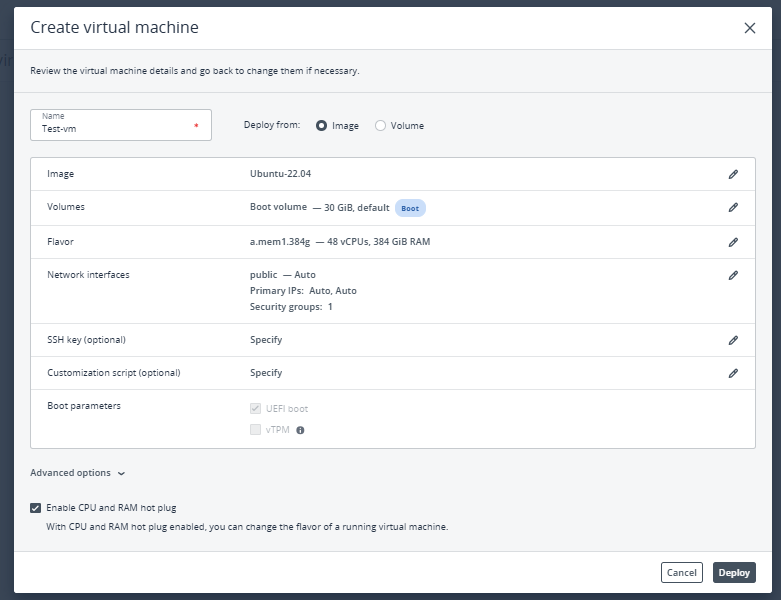
    This opens the virtual machine deployment wizard where you can configure all required settings before launching the instance.

    Start Creating a Virtual Machine

    Step 3: Configure the Virtual Machine

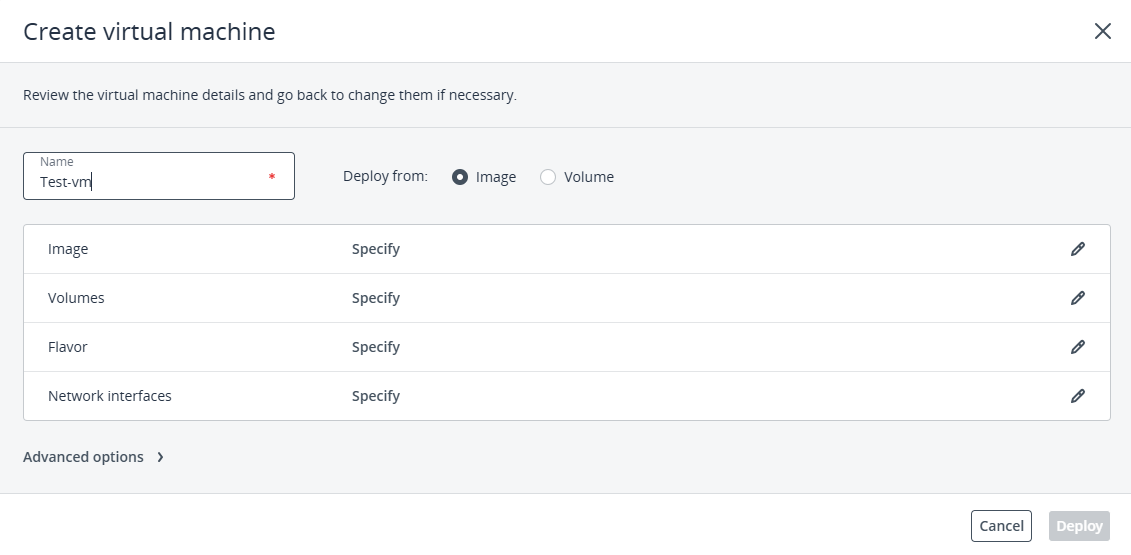
    Enter the Virtual Machine Name

    Provide a unique and meaningful name for your virtual machine.

    You can customize additional settings such as:

    • Image
    • Boot Volume
    • Flavor
    • Network Interface

    To modify any of these options, click the Edit (Pencil) icon next to the respective section.

    Configure the Virtual Machine

    Option 1: Deploy Using an Existing Volume

    Deploying from a volume allows you to launch a virtual machine using an existing boot volume that already contains an operating system, installed software, and stored data.

    This option is useful when you want to:

    • Restore a previously used virtual machine.
    • Move an existing operating system to another VM.
    • Keep all current applications, configurations, and data intact.

    Steps

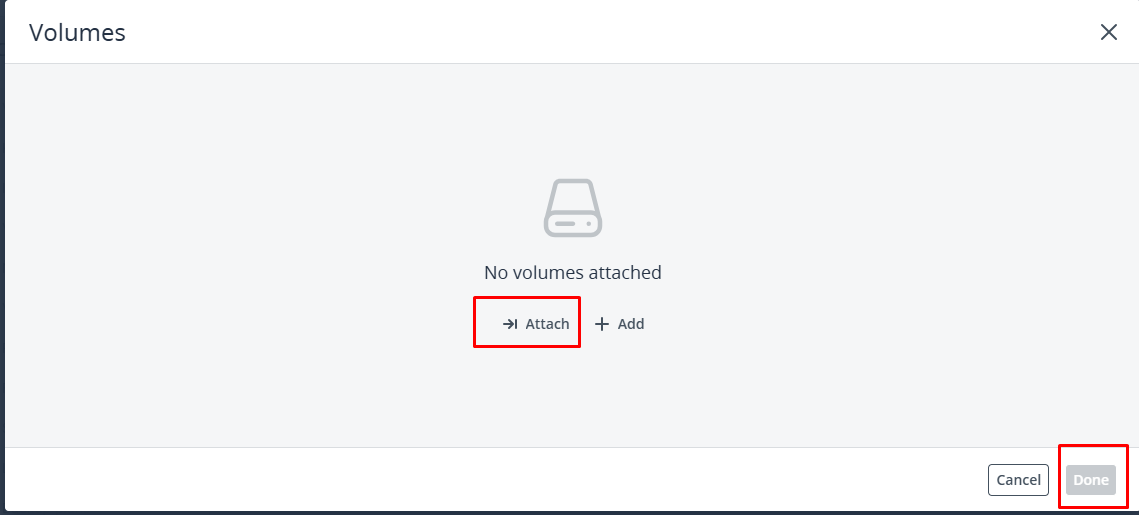
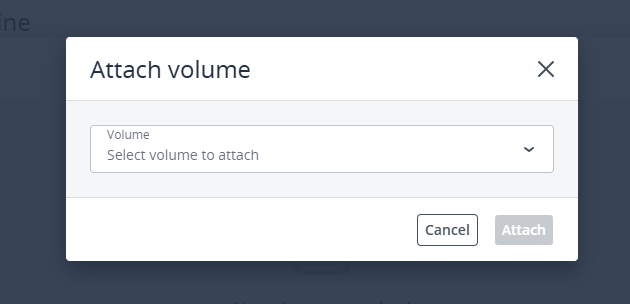
    • Click the Pencil icon beside the boot source.
    • Select Attach Boot Volume.
    • Choose the required boot volume from the list.
    • Click Attach.

    The selected volume will now become the boot disk for the virtual machine.

    Deploy Using an Existing Volume

    Option 2: Deploy Using an Image

    Creating a virtual machine from an image installs a fresh operating system using a predefined image, similar to installing Windows on a new computer.

    This method is recommended when creating a completely new virtual machine.

    Deploy Using an Image

    Select the Operating System Image

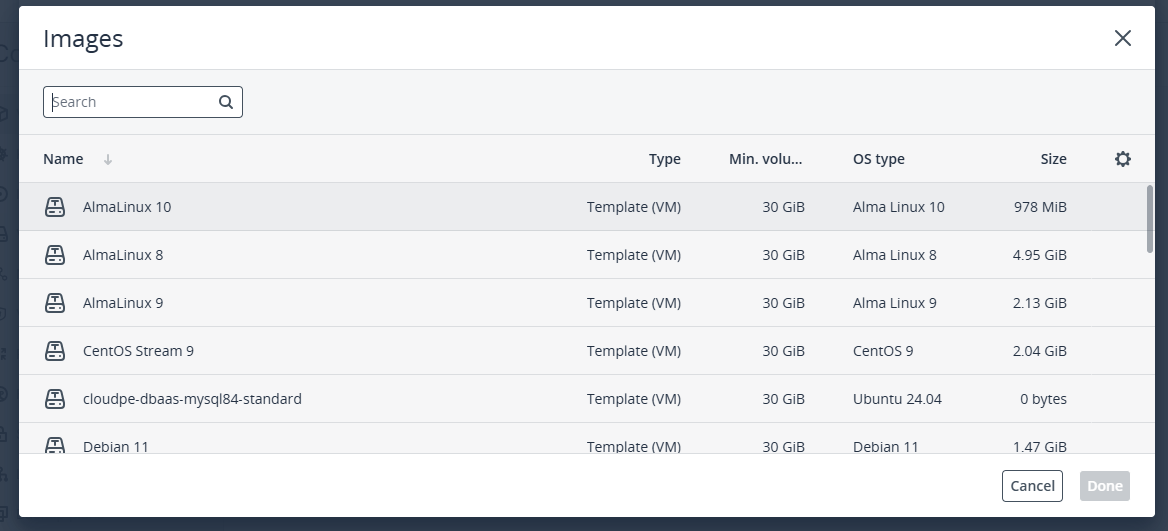
    Choose the operating system image you want to use from the available image library.

    If you have previously uploaded a custom image, you can select it from the Custom Images section.

    After selecting the image, click Done.

    Note

    If you want to use your own ISO image, you can upload it.

    For more information about uploading images, refer to the Image Management documentation.

    Select the Operating System Image

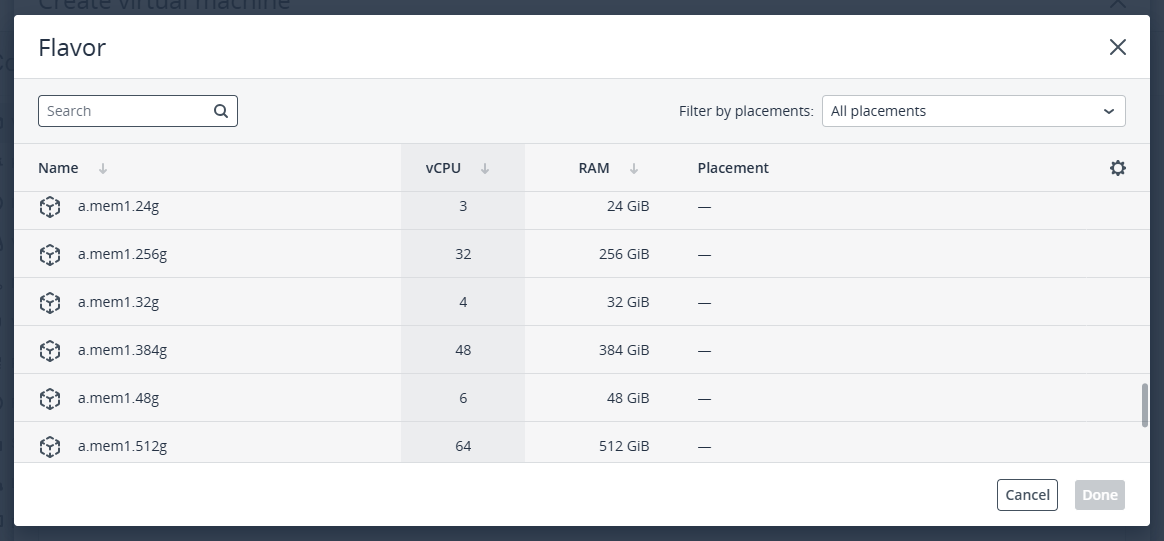
    Select the Virtual Machine Flavor

    Choose a flavor based on the amount of computing resources your virtual machine requires.

    The selected flavor determines:

    • Number of vCPUs
    • RAM allocation
    • Other hardware resources

    Ensure that the selected flavor satisfies the minimum hardware requirements of the operating system you selected.

    Once you’ve chosen the appropriate flavor, click Done.

    Example

    Certain Windows Server editions require additional CPU cores and memory. Always verify that your selected flavor provides enough resources for smooth operation.

    Select the Virtual Machine Flavor

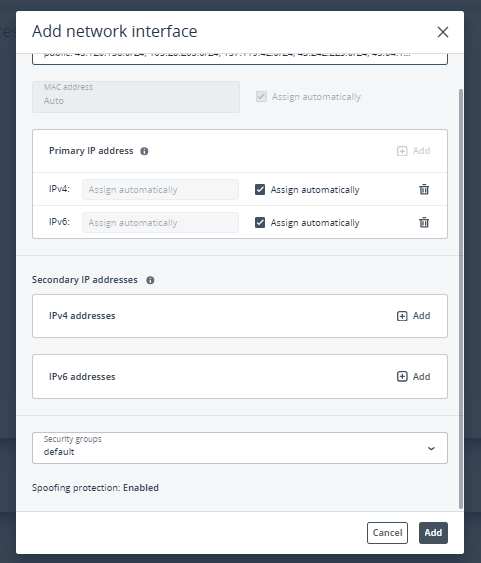
    Configure the Network Interface

    Inside the Add Network Interface window, select the compute network that the virtual machine should connect to.

    By default, a primary Public IP address is assigned automatically.

    If you prefer assigning a specific Public IPv4 address manually:

    • Uncheck Assign Automatically.
    • Enter the preferred Public IPv4 address.
    • Select the desired Public IP from the dropdown list.
    • Click Add.

    Recommendation

    Assign a Public IP address during the initial deployment to simplify remote access and avoid future connectivity issues.

    Configure the Network Interface

    Add Secondary IP Addresses (Optional)

    You can also configure additional IP addresses if required.

    Unlike the primary IP address, secondary IP addresses are not configured automatically inside the Windows operating system.

    After deployment, you must configure these additional addresses manually within the guest operating system.

    Configure Private Networking (Optional)

    If your virtual machine requires a Private IP address, you must first create a Virtual Private Network (VPN).

    Once the VPN is available, you can attach the virtual machine to the private network.

    Refer to the VPN documentation for complete setup instructions.

    Security Group Configuration

    If the selected network has IP Address Management enabled:

    • Spoofing Protection is enabled automatically.
    • The Default Security Group is applied automatically.

    The default security group permits both inbound and outbound traffic to the virtual machine.

    After reviewing the settings, click Done.

    Add an SSH Public Key

    Click Add SSH Key if you want to use SSH key-based authentication.

    Select or upload the public SSH key that was generated on the computer from which you plan to access the virtual machine.

    For additional information, refer to the SSH Key Authentication guide.

    Add an SSH Public Key

    Step 4: Advanced Configuration (Optional)

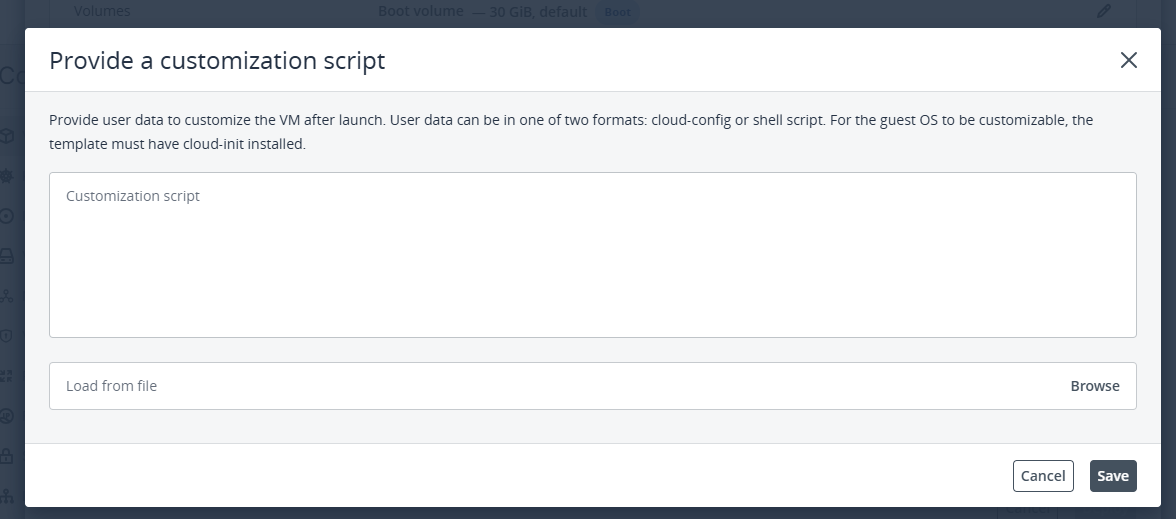
    Add a Customization Script (User Data)

    You can provide User Data to perform automatic configuration tasks immediately after the virtual machine starts.

    User Data may be supplied as:

    • A cloud-init YAML configuration file
    • A shell script containing commands to execute during the first boot

    This feature is useful for installing software packages, configuring services, or applying system settings automatically.

    Add a Customization Script

    Enable CPU and RAM Hot Plug

    The CPU and RAM Hot Plug feature allows you to increase or modify CPU and memory resources while the virtual machine is running.

    Because these changes can be applied without restarting the virtual machine, you can scale resources with minimal disruption and avoid downtime.

    Step 5: Deploy the Virtual Machine

    After reviewing all configuration settings, click Deploy.

    Cloud will begin provisioning your Windows virtual machine.

    Once deployment is complete, the virtual machine is created successfully and is ready for use.

    Deploy the Virtual Machine

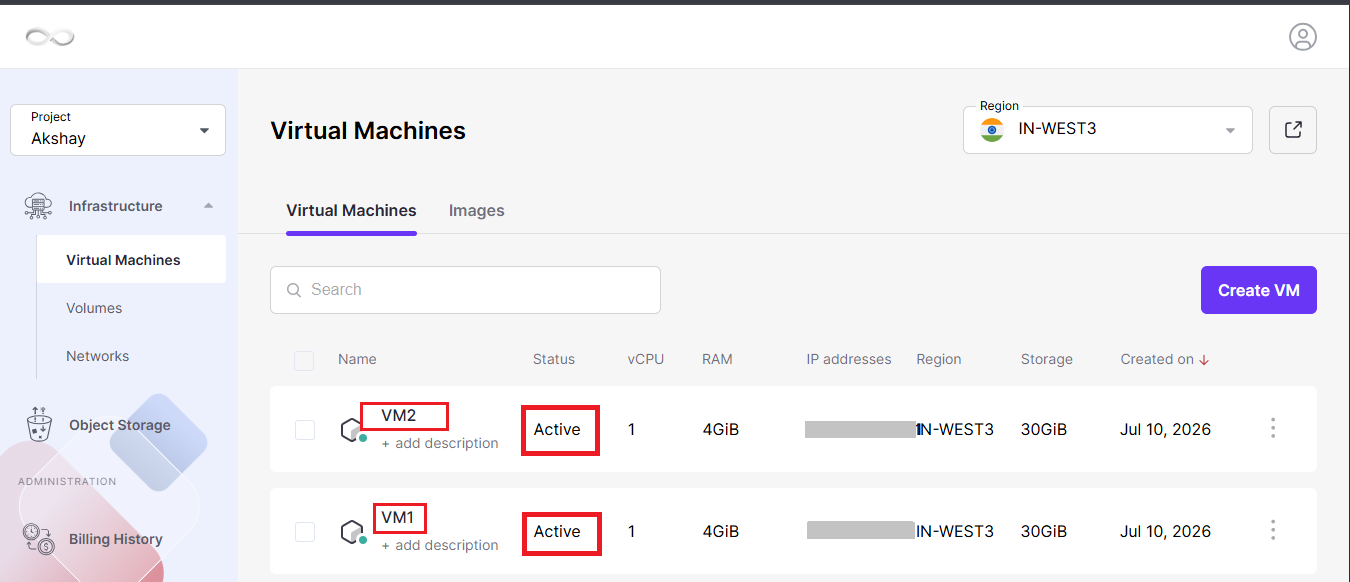
    Manage the Virtual Machine

    To view or manage the virtual machine:

    • Navigate to the Virtual Machines section.
    • Click the name of the newly created virtual machine.

    From the VM details page, you can monitor its status, manage resources, configure networking, and perform other administrative tasks.

  • How to create Windows Virtual Machines from Advance Panel?

    Cloud delivers a flexible and scalable cloud infrastructure that helps you deploy virtual machines based on your workload requirements. Whether you’re hosting applications, building development environments, or performing testing and data analysis, you can quickly create and manage Windows virtual machines through the Cloud platform.

    If you want to create a Windows Virtual Machine using the standard Cloud Dashboard, refer to the relevant documentation.

    To deploy a Windows Virtual Machine using the Cloud Advanced Dashboard, follow these instructions.

    Step 1: Open the Advanced Dashboard

    Log in to your Cloud account.

    Navigate to the required region and click the arrow icon to open the Region Advanced Dashboard. From this dashboard, you can deploy, configure, and manage your virtual machines.

    Open the Advanced Dashboard

    Step 2: Start Creating a Virtual Machine

    Click the + Create Virtual Machine button.

    This opens the virtual machine deployment wizard where you can configure all required settings before launching the instance.

    Start Creating a Virtual Machine

    Step 3: Configure the Virtual Machine

    Enter the Virtual Machine Name

    Provide a unique and meaningful name for your virtual machine.

    You can customize additional settings such as:

    • Image
    • Boot Volume
    • Flavor
    • Network Interface

    To modify any of these options, click the Edit (Pencil) icon next to the respective section.

    Configure the Virtual Machine

    Option 1: Deploy Using an Existing Volume

    Deploying from a volume allows you to launch a virtual machine using an existing boot volume that already contains an operating system, installed software, and stored data.

    This option is useful when you want to:

    • Restore a previously used virtual machine.
    • Move an existing operating system to another VM.
    • Keep all current applications, configurations, and data intact.

    Steps

    • Click the Pencil icon beside the boot source.
    • Select Attach Boot Volume.
    • Choose the required boot volume from the list.
    • Click Attach.

    The selected volume will now become the boot disk for the virtual machine.

    Deploy Using an Existing Volume

    Attach Boot Volume

    Option 2: Deploy Using an Image

    Creating a virtual machine from an image installs a fresh operating system using a predefined image, similar to installing Windows on a new computer.

    This method is recommended when creating a completely new virtual machine.

    Deploy Using an Image

    Select the Operating System Image

    Choose the operating system image you want to use from the available image library.

    If you have previously uploaded a custom image, you can select it from the Custom Images section.

    After selecting the image, click Done.

    Note

    If you want to use your own ISO image, you can upload it.

    For more information about uploading images, refer to the Image Management documentation.

    Select the Operating System Image

    Select the Virtual Machine Flavor

    Choose a flavor based on the amount of computing resources your virtual machine requires.

    The selected flavor determines:

    • Number of vCPUs
    • RAM allocation
    • Other hardware resources

    Ensure that the selected flavor satisfies the minimum hardware requirements of the operating system you selected.

    Once you’ve chosen the appropriate flavor, click Done.

    Example

    Certain Windows Server editions require additional CPU cores and memory. Always verify that your selected flavor provides enough resources for smooth operation.

    Select the Virtual Machine Flavor

    Configure the Network Interface

    Inside the Add Network Interface window, select the compute network that the virtual machine should connect to.

    By default, a primary Public IP address is assigned automatically.

    If you prefer assigning a specific Public IPv4 address manually:

    • Uncheck Assign Automatically.
    • Enter the preferred Public IPv4 address.
    • Select the desired Public IP from the dropdown list.
    • Click Add.

    Recommendation

    Assign a Public IP address during the initial deployment to simplify remote access and avoid future connectivity issues.

    Configure the Network Interface

    Add Secondary IP Addresses (Optional)

    You can also configure additional IP addresses if required.

    Unlike the primary IP address, secondary IP addresses are not configured automatically inside the Windows operating system.

    After deployment, you must configure these additional addresses manually within the guest operating system.

    Configure Private Networking (Optional)

    If your virtual machine requires a Private IP address, you must first create a Virtual Private Network (VPN).

    Once the VPN is available, you can attach the virtual machine to the private network.

    Refer to the VPN documentation for complete setup instructions.

    Security Group Configuration

    If the selected network has IP Address Management enabled:

    • Spoofing Protection is enabled automatically.
    • The Default Security Group is applied automatically.

    The default security group permits both inbound and outbound traffic to the virtual machine.

    After reviewing the settings, click Done.

    Add an SSH Public Key

    Click Add SSH Key if you want to use SSH key-based authentication.

    Select or upload the public SSH key that was generated on the computer from which you plan to access the virtual machine.

    For additional information, refer to the SSH Key Authentication guide.

    Add an SSH Public Key

    Step 4: Advanced Configuration (Optional)

    Add a Customization Script (User Data)

    You can provide User Data to perform automatic configuration tasks immediately after the virtual machine starts.

    User Data may be supplied as:

    • A cloud-init YAML configuration file
    • A shell script containing commands to execute during the first boot

    This feature is useful for installing software packages, configuring services, or applying system settings automatically.

    Add a Customization Script

    Enable CPU and RAM Hot Plug

    The CPU and RAM Hot Plug feature allows you to increase or modify CPU and memory resources while the virtual machine is running.

    Because these changes can be applied without restarting the virtual machine, you can scale resources with minimal disruption and avoid downtime.

    Step 5: Deploy the Virtual Machine

    After reviewing all configuration settings, click Deploy.

    Cloud will begin provisioning your Windows virtual machine.

    Once deployment is complete, the virtual machine is created successfully and is ready for use.

    Deploy the Virtual Machine

    Manage the Virtual Machine

    To view or manage the virtual machine:

    • Navigate to the Virtual Machines section.
    • Click the name of the newly created virtual machine.

    From the VM details page, you can monitor its status, manage resources, configure networking, and perform other administrative tasks.

    Reset the Windows Administrator Password

    If you need to change or recover the Windows administrator password, you can perform a password reset using the VM Console.

    Refer to the Reset Windows VM Password documentation for detailed instructions.

    Connect to the Windows Virtual Machine Using RDP

    Windows virtual machines can be accessed remotely using Remote Desktop Protocol (RDP).

    If you’re connecting from a Linux machine, you can use xFreeRDP, which is a lightweight and efficient Remote Desktop client.

    For complete connection instructions, refer to the Connect to Windows VM via RDP guide.

  • How to troubleshoot a Linux VM which is not reachable

    Step 1: Verify the VM Status in the Cloud Dashboard

    • Log in to your Cloud Dashboard.
    • Navigate to Virtual Machines.
    • Locate the affected virtual machine.
    • Check whether the VM is in the Running state.
    • If the VM is stopped, start it.
    • If it is already running but inaccessible, perform a reboot and wait for the VM to come back online.

    Verify the VM Status

    Step 2: Connect Using the Console

    • Open the Console from the Cloud Dashboard.
    • Check whether the console opens successfully.
    • If the console is accessible, the operating system is most likely running.
    • If the console opens but responds very slowly or does not accept commands:
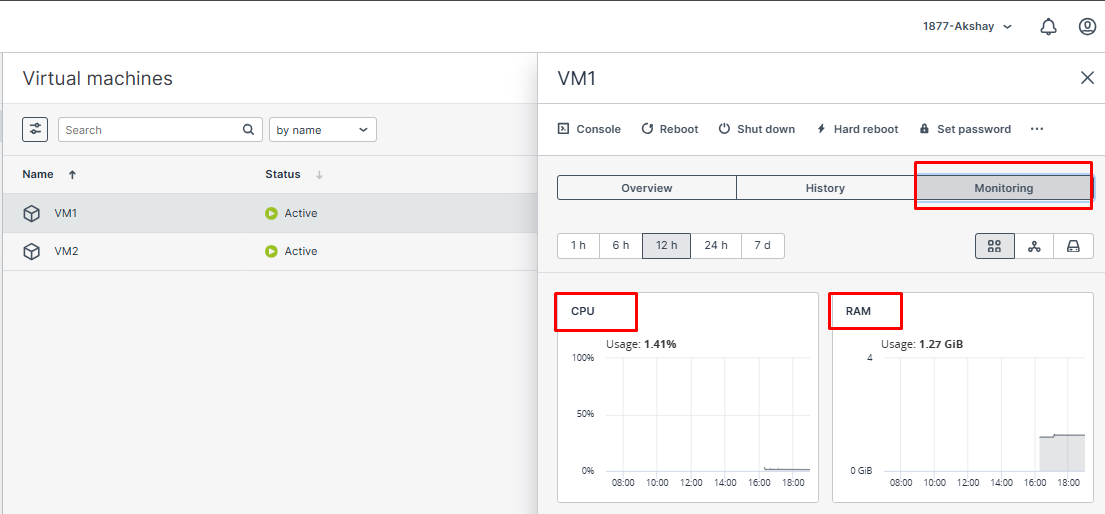
    • Open the CMP Advanced Panel.
    • Review the CPU and RAM utilization of the VPS.
    • If CPU or memory usage is unusually high:
    • Reboot the VPS.
    • Wait a few minutes and try accessing the console again.
    • If the console does not load or remains completely unresponsive, escalate the issue to the support team.

    Connect Using the Console

    Step 3: Validate Network Connectivity

    • Confirm that the VM has a Public IP Address assigned if remote access is required.
    • From your local computer, test network connectivity by pinging the VM’s public IP.
    Bash
    ping <Public-IP>
    • If the VM does not respond to ping even though a public IP is attached, contact the support team for further investigation.
    • Verify that the required Security Group or firewall rules allow inbound traffic.
    • Ensure that the necessary ports are open and listening.

    Validate Network Connectivity

    Step 4: Check the Operating System Firewall

    A firewall configured inside the VM may block incoming connections.

    Ubuntu/Debian

    Bash
    sudo ufw status

    AlmaLinux/CentOS/RHEL

    Bash
    sudo firewall-cmd –list-all
    • Review the active firewall rules.
    • Confirm that the SSH port (or any required service port) is allowed.
    • If necessary, temporarily disable or adjust the firewall rules to verify whether the firewall is causing the connectivity issue.

    Step 5: Verify the SSH Service

    If the VM is accessible through the console but SSH connections fail, verify that the SSH daemon is running correctly.

    Check SSH Service Status

    Bash
    sudo systemctl status sshd

    or on Ubuntu:

    Bash
    sudo systemctl status ssh

    Restart the SSH Service (if required)

    Bash
    sudo systemctl restart sshd

    or

    Bash
    sudo systemctl restart ssh

    Confirm SSH Is Listening on Port 22

    Bash
    ss -tlnp | grep 22
    • If output is displayed, SSH is listening normally.
    • If no output is returned, SSH is not listening on the expected port.

    Review the SSH configuration file for incorrect settings.

    Bash
    sudo nano /etc/ssh/sshd_config

    After making changes, restart the SSH service.

    Step 6: Check Disk Usage

    A filesystem that is completely full can prevent services from functioning correctly and may make the VM inaccessible.

    Run the following command:

    Bash
    df -h

    Review the output carefully.

    • If the root (/) partition is close to or at 100% usage, free up disk space by deleting unnecessary files, clearing logs, or expanding the disk if required.
    • After reclaiming space, restart any affected services or reboot the VM if necessary.
  • Managing SSH Keys

    SSH keys offer a secure and reliable way to access your Virtual Machines (VMs) over SSH. Instead of using passwords, SSH key authentication ensures that only users with the matching private key can log in. The Cloud Region Advanced Dashboard allows you to create, manage, and delete SSH public keys for your infrastructure.

    Click the arrow to open the Region Advanced Dashboard, where you can manage your SSH keys.

    open the Region Advanced Dashboard

    Creating and Adding an SSH Public Key

    You can add an SSH public key either while creating a new virtual machine or by using the SSH Keys section in the Cloud Region Advanced Dashboard.

    Method 1: Add an SSH Key During VM Creation

    While creating a new virtual machine, choose SSH Key Authentication as the login method, as described in Section – How to Create Virtual Machines.

    Method 2: Add an SSH Key from the Dashboard

    Step 1: Generate an SSH Key Pair

    On your local computer or client machine, generate a new SSH key pair by running the following command:

    Bash
    ssh-keygen -t rsa

    After executing the command, two files will be created:

    • Private Key: Stored securely on your system (for example, /root/.ssh/id_rsa). Keep this file private and never share it.
    • Public Key: Stored as /root/.ssh/id_rsa.pub. This key is uploaded to the CloudPe platform.

    Step 2: Open the SSH Keys Page

    Log in to the Cloud Region Advanced Dashboard.

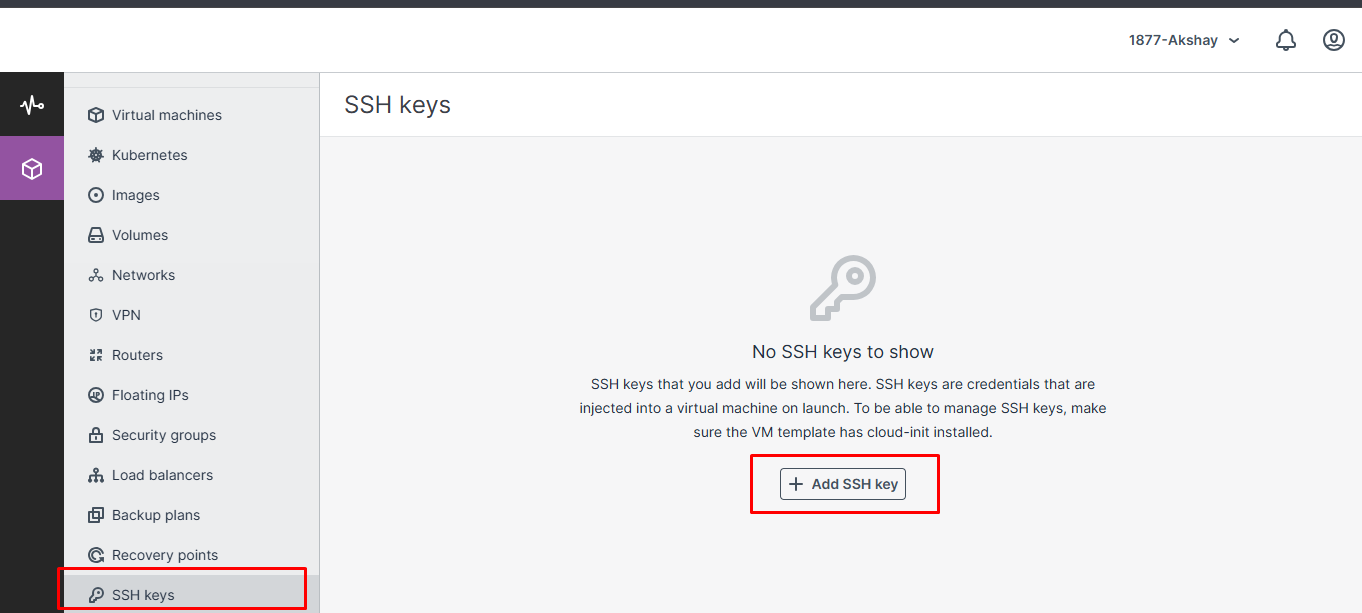
    From the left navigation menu, open the SSH Keys section.

    Step 3: Add a New SSH Key

    Click the Add Key button.

    Add a New SSH Key

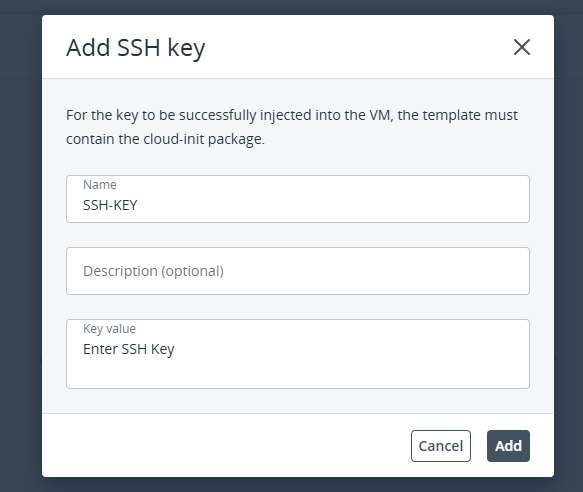
    Step 4: Enter the SSH Key Details

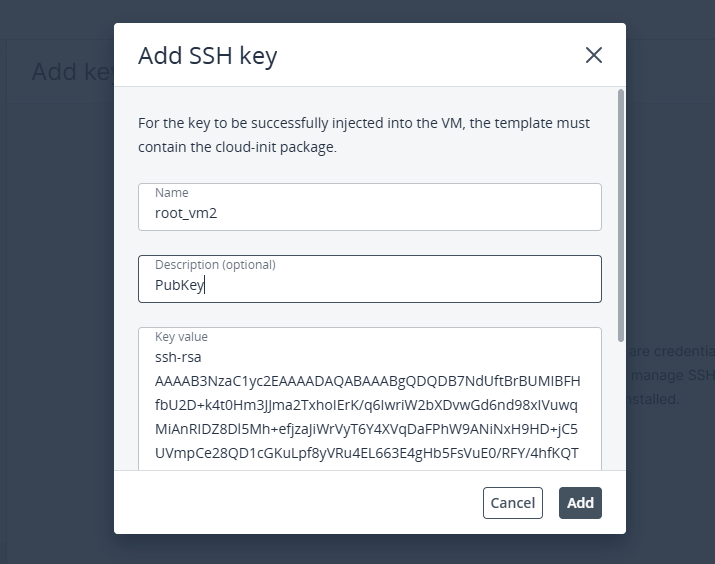
    In the Add SSH Key window:

    • Enter a meaningful Name for the SSH key.
    • Open the public key file (/root/.ssh/id_rsa.pub) using any text editor.
    • Copy the complete contents of the public key.
    • Paste the copied key into the Key Value field.
    • (Optional) Enter a Description to help identify the key. Avoid including confidential or personal information.

    Add SSH Key window

    Step 5: Save the SSH Key

    After verifying the information, click Save.

    The SSH public key will now be available and can be selected when creating new virtual machines.

    Deleting an SSH Public Key

    If an SSH key is no longer required, you can remove it from the dashboard.

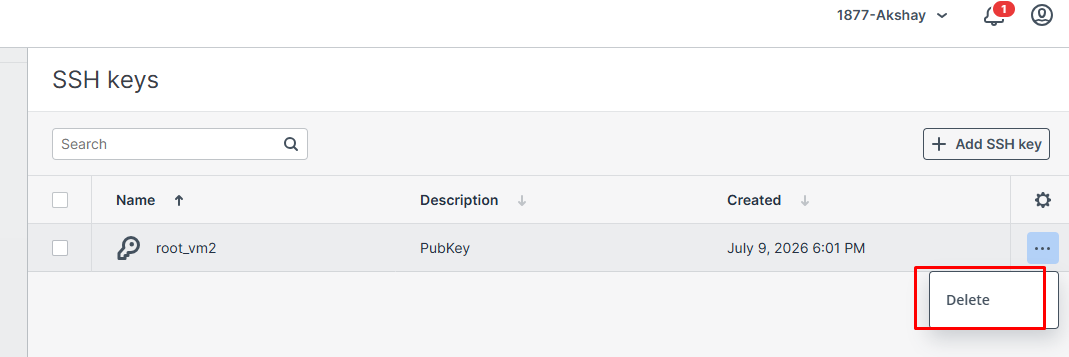
    Deleting an SSH Public Key

    Step 1: Open the SSH Keys Section

    Navigate to the SSH Keys page in the Cloud Region Advanced Dashboard.

    Step 2: Select the SSH Key

    Locate the SSH key that you want to remove.

    Click the Delete button corresponding to that key.

    Step 3: Confirm the Deletion

    A confirmation dialog will appear.

    Click Confirm to permanently remove the SSH key from the dashboard.

    Note: If the deleted key has already been injected into any VM, it will remain accessible within those VMs.

  • Managing Virtual Machine

    Step 1: Create a Virtual Machine

    Create a new virtual machine by following the instructions provided in the How to Create Virtual Machines guide.

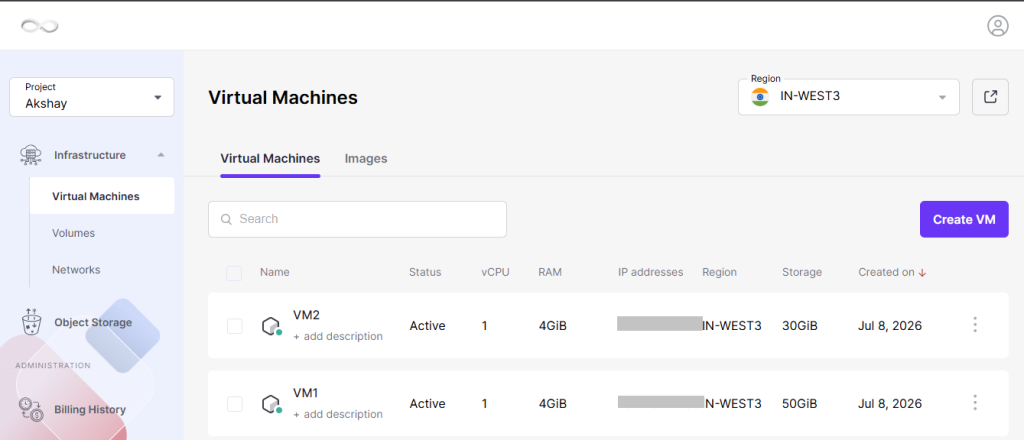
    After the deployment is complete, the newly created virtual machine will be displayed in the Virtual Machines list.

    Create a Virtual Machine

    Step 2: Open the Virtual Machine Details

    From the list of available virtual machines, click on the name of the required VM to open its management and configuration page.

    Open the Virtual Machine Details

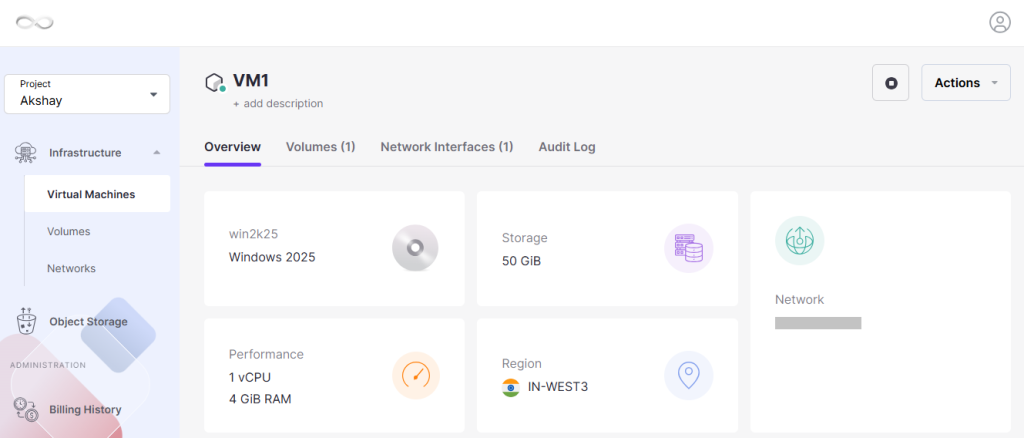
    Virtual Machine Overview

    The Overview section provides important information about the selected virtual machine.

    Basic Information

    Name
    Displays the unique name assigned to the virtual machine.

    Operating System
    Shows the operating system currently installed on the VM.

    Resource Configuration

    The Resource Allocation section displays the hardware resources assigned to the virtual machine.

    vCPU
    Shows the number of virtual processors allocated to the VM.

    RAM
    Displays the total memory assigned to the virtual machine.

    Storage
    Indicates the total disk capacity available for the VM.

    Network Details

    The Networking section contains information related to the VM’s network connectivity.

    IP Address
    Displays the private or public IP address assigned to the virtual machine for network communication.

    Region
    Shows the data center location where the virtual machine is currently hosted.

    Virtual Machine Overview

    VM Management Actions

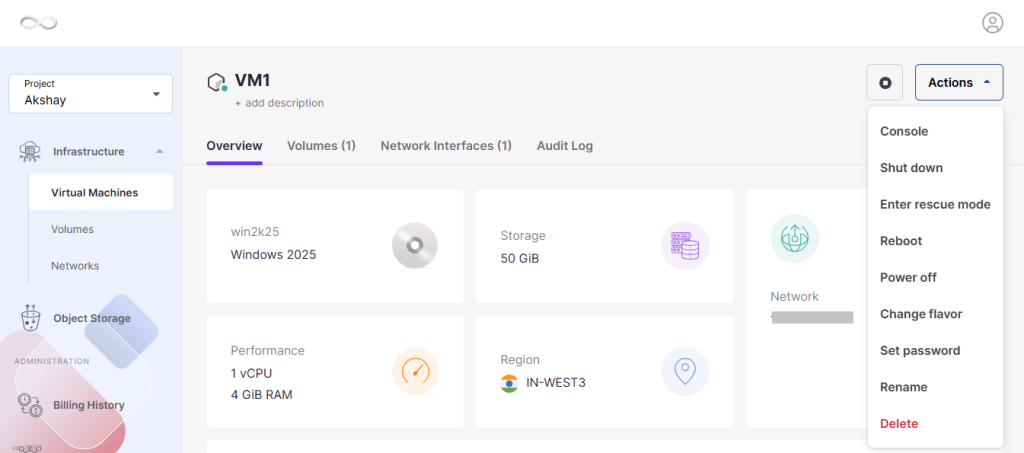
    Click the Actions dropdown menu to access the available management options for the virtual machine.

    Console

    Launch the VM console to directly access and manage the operating system.

    Shut Down / Power Off

    Gracefully stop the virtual machine and power it off safely.

    Reboot

    Restart the virtual machine without removing or recreating it.

    Change Flavor

    Update the VM’s hardware profile by increasing or decreasing resources such as vCPU and RAM.

    Set Password

    Assign a new login password for accessing the virtual machine.

    Rename

    Modify the display name of the virtual machine.

    Delete

    Permanently remove the virtual machine along with all of its associated resources.

    Managing Volumes

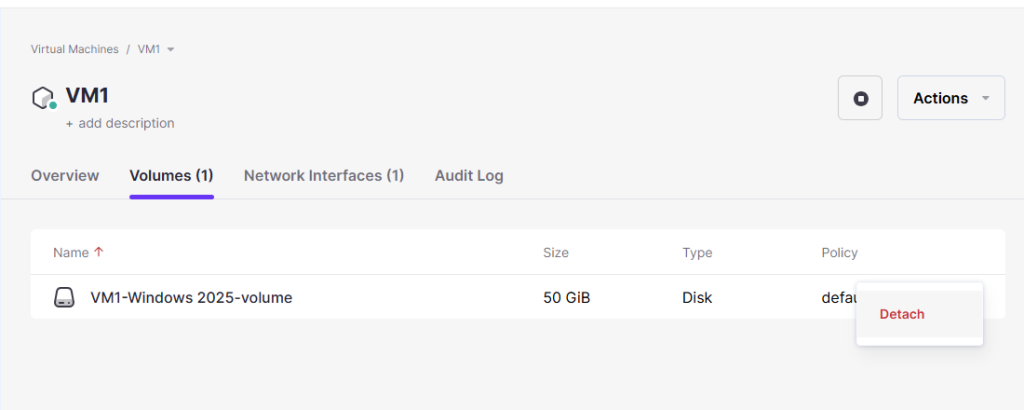
    Open the Volumes section to view all storage volumes currently attached to the virtual machine.

    If required, you can safely detach an attached volume from the VM.

    Managing Volumes

    Network Interface

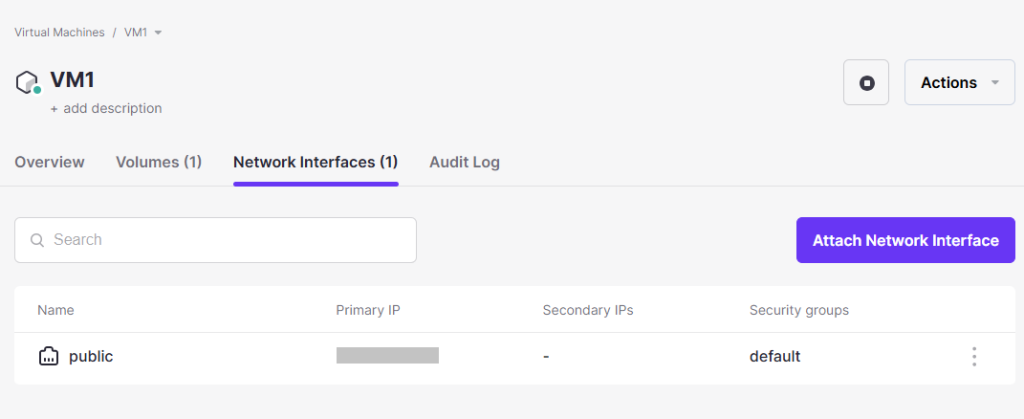
    Go to the Network Interface section to review the virtual machine’s networking details.

    This section displays the available network interfaces, IP configuration, and connectivity information.

    Network Interface

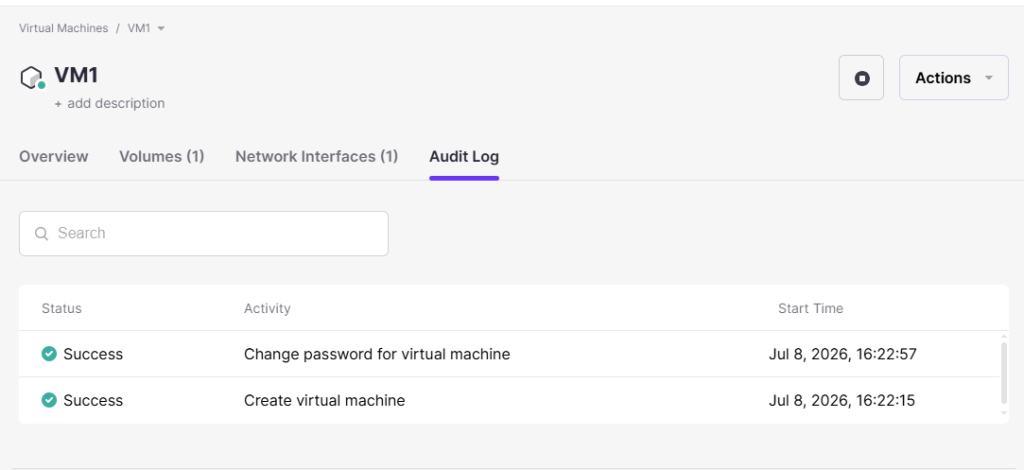
    Audit Log

    The Audit Log records every activity performed on the virtual machine.

    It helps administrators monitor configuration changes, user actions, and system events for troubleshooting and auditing purposes.

    Audit Log

  • How to create Virtual Machines

    Cloud provides a flexible and scalable cloud platform that allows you to deploy virtual machines (VMs) quickly for hosting applications, development, testing, or other workloads.

    If you want to create a Virtual Machine using the Advanced Panel, refer to the Advanced Panel documentation.

    Follow the steps below to create a Virtual Machine from the Cloud Dashboard.

    Step 1: Log in to the Cloud Dashboard

    Sign in to your Cloud account using your registered credentials.

    Step 2: Open the Virtual Machines Section

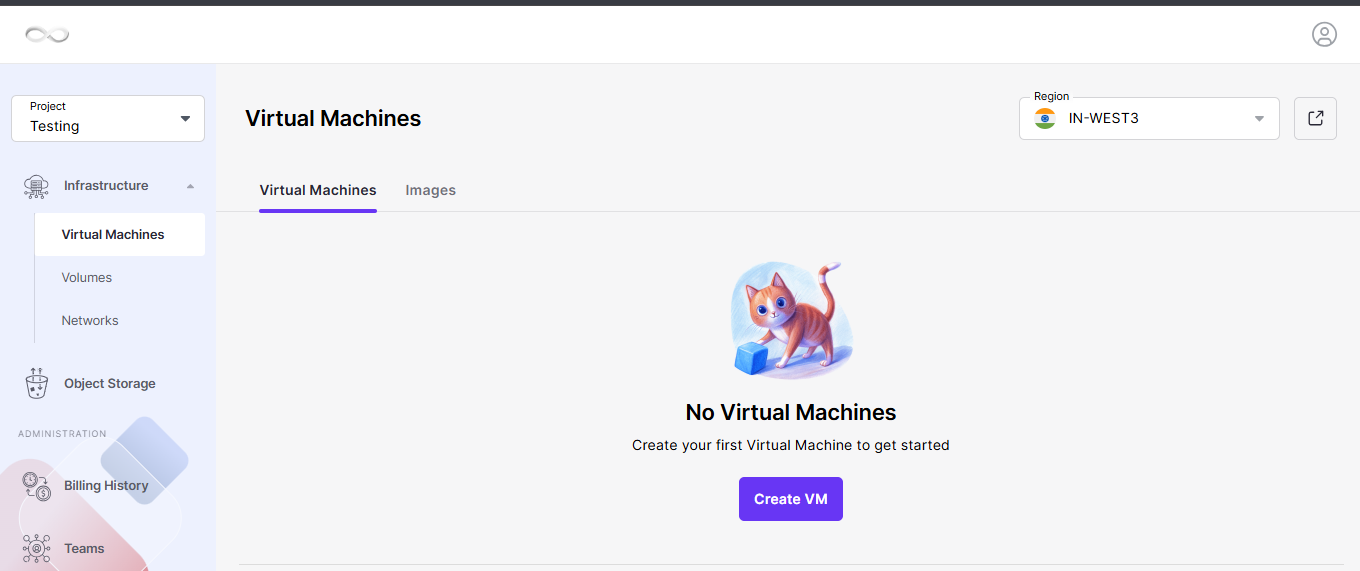
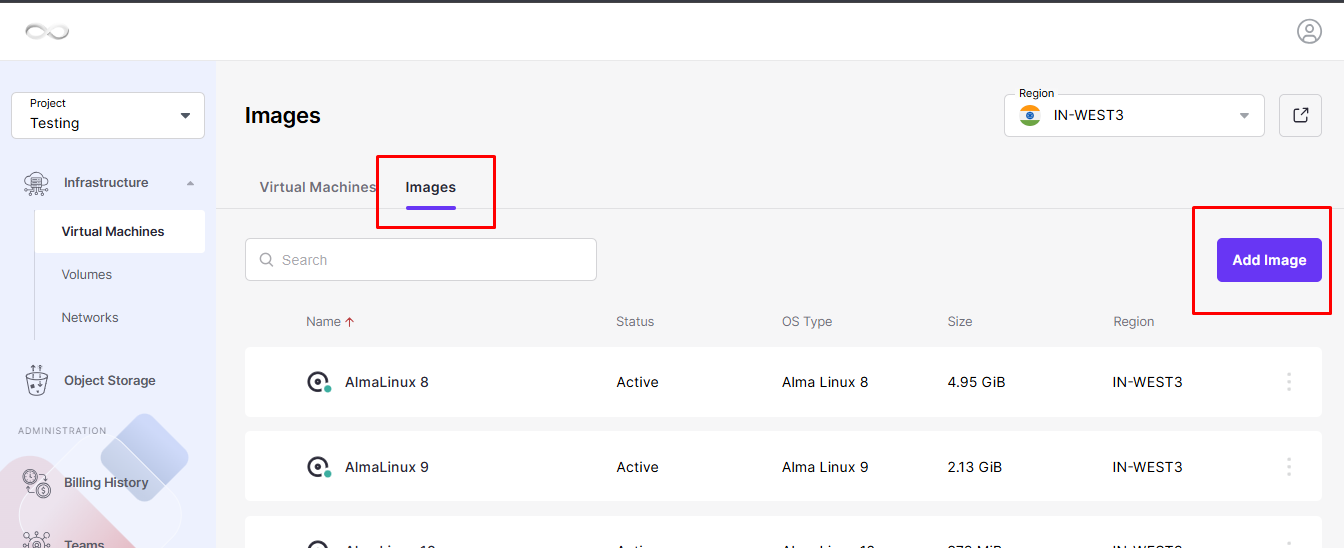
    After logging in, navigate to the main dashboard and click Virtual Machines to open the VM management page.

    Open the Virtual Machines Section

    Step 3: Select a Project

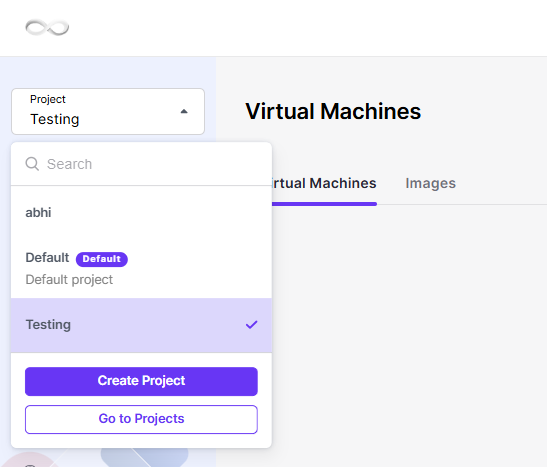
    From the Project dropdown menu, choose the project where you want to deploy the new virtual machine.

    If you haven’t created a project yet, create one first before proceeding.

    Select a Project

    Step 4: Choose the Deployment Location

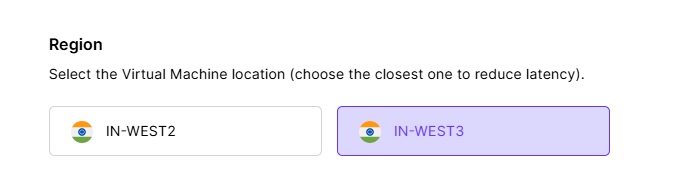
    The default deployment region is IN-WEST3, which is automatically selected.


    Choose the Deployment Location

    As Cloud expands its infrastructure, additional regions will become available, allowing you to deploy your virtual machines closer to your users or applications.

    Step 5: Select the Operating System Image

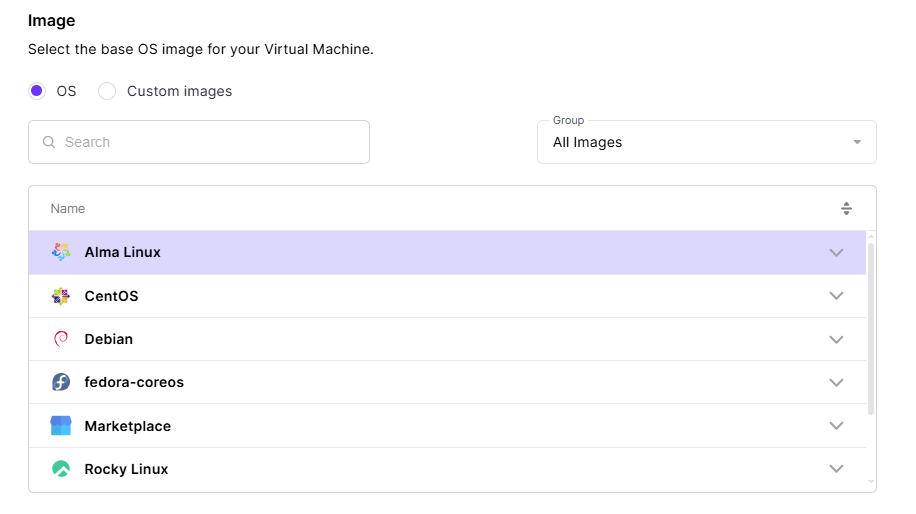
    Choose the operating system image that you want to install on your virtual machine from the list of available images.

    Supported operating systems include multiple Linux and Windows distributions.

    Select the Operating System Image

    Using a Custom Image

    Custom Image: If you want to use your own custom image, you can upload it and create a virtual machine (VM) using that image.

    Step 6: Select the Virtual Machine Flavor

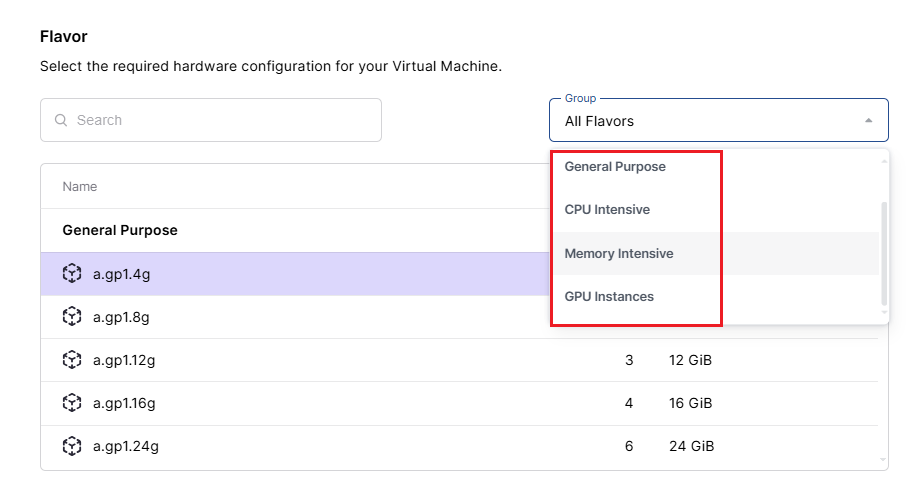
    Click the Flavor dropdown menu and select the hardware configuration that matches your workload.

    Each flavor defines the available:

    • General Purpose
    • CPU Intensive
    • Memory Intensive
    • GPU Instances


    Select the Virtual Machine Flavor

    Choose a flavor that satisfies the minimum hardware requirements of the operating system you selected earlier. More demanding operating systems may require additional CPU and memory resources.

    Step 7: Configure Storage Volumes

    The Volumes section contains the boot disk that will store the operating system and system files.

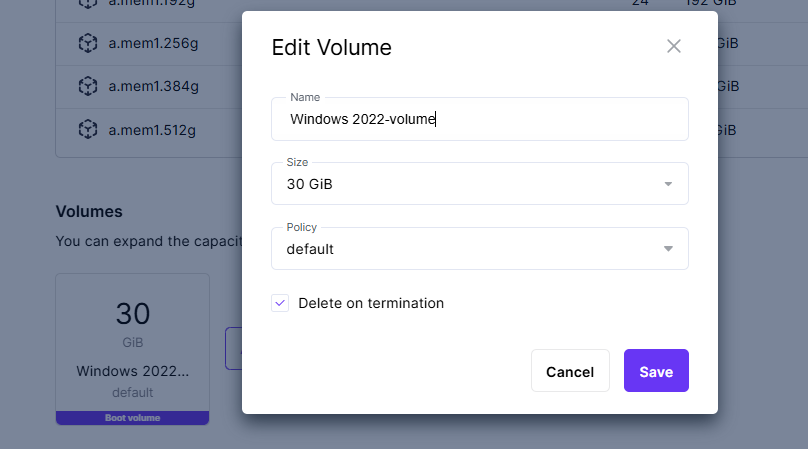
    Modify the Boot Volume

    Verify that the default boot disk provides enough storage.

    If additional capacity is required:

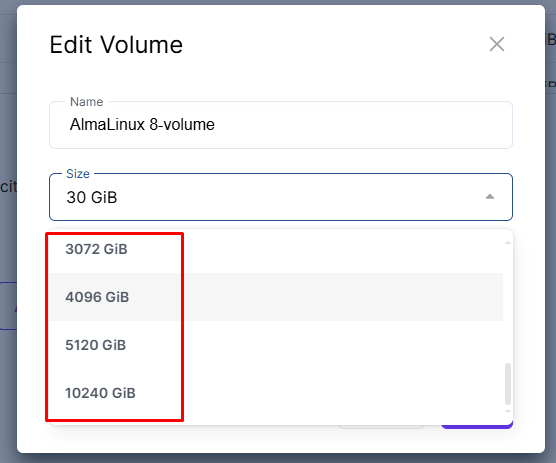
    • Click Edit Volume
    • Enter the desired disk size
    • Click Save

    Configure Storage Volumes

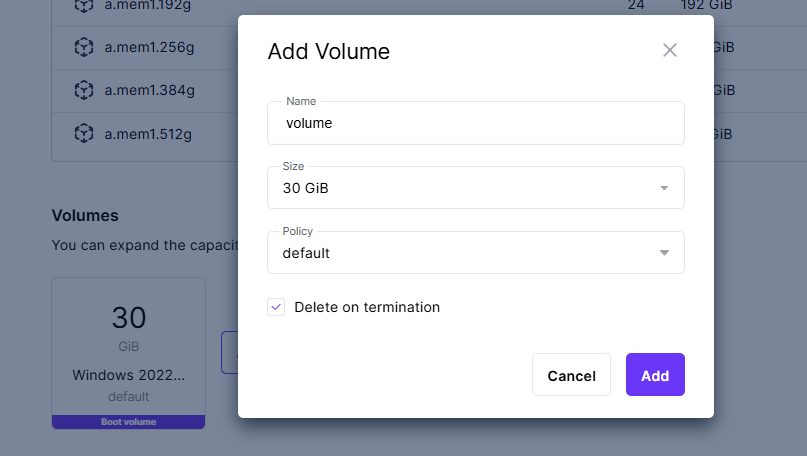
    Add Additional Volumes

    If your workload requires extra storage:

    • Click Add Volume
    • Specify the required size
    • Click Save
    • Attach the volume using the available dropdown option


    Add Additional Volumes

    Custom Volume Sizes

    If you require a custom-sized disk such as:

    • 30 GiB
    • 50 GiB
    • 100 GiB

    Custom Volume Sizes

    You can first create the volume from the Cloud Advanced Dashboard and attach it while creating the virtual machine.

    After deployment, you can resize volumes or attach additional non-boot disks whenever needed.

    Step 8: Configure Network Interfaces

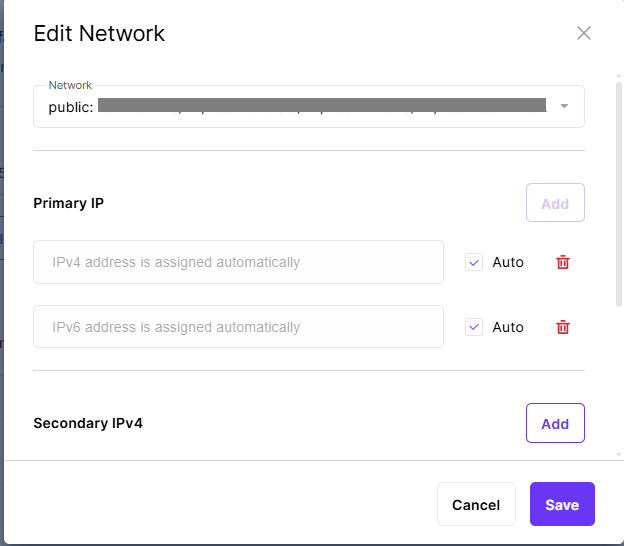
    Click Add Network Interface and select the network that your virtual machine will use.

    Public Network

    A public network allows external access to your VM, making it suitable for hosting web servers, APIs, or any services requiring internet connectivity.

    To configure a public IP:

    • Click Add Network Interface
    • Select a Public IP Pool
    • Enable Assign Automatically
    • Click Add

    Cloud can automatically assign either:

    • IPv4
    • IPv6

    Configure Network Interfaces

    You may also remove assigned addresses using the Delete icon whenever necessary.

    Secondary IP Addresses

    If your application requires multiple IP addresses, you can add secondary IPv4 or IPv6 addresses.

    Unlike the primary IP address, secondary IPs are not automatically configured inside the operating system. You must configure them manually after the virtual machine is deployed.

    Security Groups

    If the selected network includes IP Address Management (IPAM), the following settings are automatically enabled:

    • Spoofing Protection
    • Default Security Group

    The default security group allows inbound and outbound communication for the virtual machine.

    Step 9: Enter the Virtual Machine Name

    Provide a unique and meaningful name for the virtual machine.

    Using descriptive names makes future management easier, especially when multiple virtual machines are deployed.

    Enter the Virtual Machine Name

    Step 10: Configure Advanced Settings

    Set the Administrator Password

    Create a strong password that will be used to access the virtual machine after deployment.

    A secure password should contain:

    • Uppercase letters
    • Lowercase letters
    • Numbers
    • Special characters

    If preferred, you may skip this step and configure or reset the password later from the Cloud Dashboard.

    Configure SSH Authentication

    SSH keys provide a secure way to access Linux virtual machines.

    You can either:

    • Use an existing SSH key pair
    • Generate a new SSH key

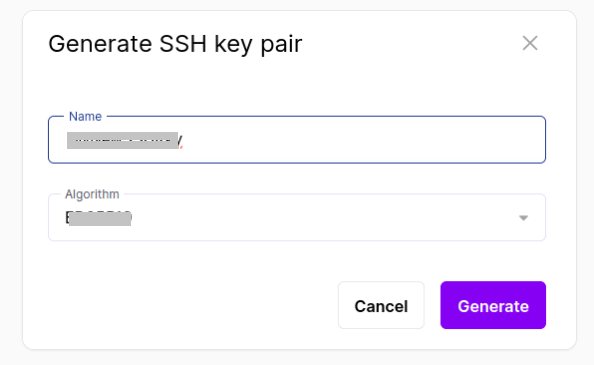
    Generate a New SSH Key:

    Select one of the supported algorithms:

    Click Generate.

    Generate a New SSH Key:

    Cloud automatically creates the key pair and downloads the private .pem key file to your computer.

    Upload an Existing Public Key

    If you already have an SSH key pair, click Add Public SSH Key and paste your existing public key.

    This allows secure passwordless authentication when connecting to the virtual machine.

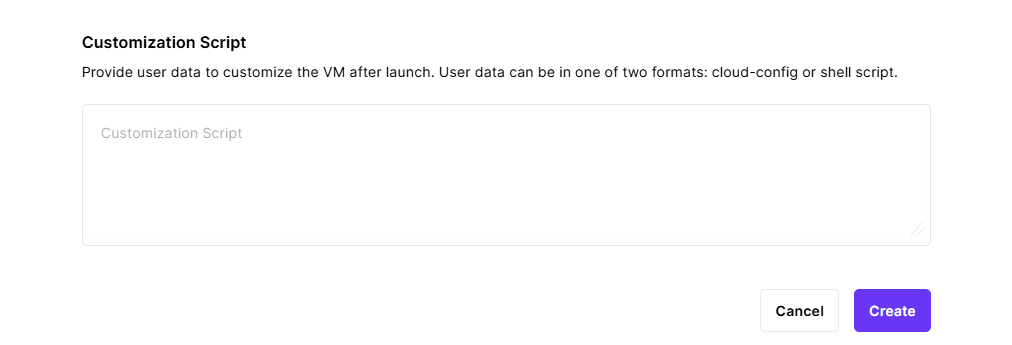
    Add a Customization Script (Optional)

    Provide user data to customize the VM after launch. User data can be in a YAML-based configuration file or a shell script that runs commands on the VM upon launch.


    Add a Customization Script

    After configuring all of the VM parameters, click on the Create Button to create your Virtual Machine.

  • How rDNS (Reverse DNS) works in Cloud

    Overview

    This Knowledge Base explains how rDNS (Reverse DNS) works on Cloud, how it is automatically created, and clarifies common doubts faced by customers and internal teams.

    Cloud follows a fully automated rDNS creation process. Customers do not need to manually add or manage rDNS entries after creating a Virtual Machine (VM).

    What is rDNS?

    Reverse DNS (rDNS) maps an IP address back to a hostname.

    • Forward DNS: hostname → IP address
    • Reverse DNS (rDNS): IP address → hostname

    rDNS is commonly used for:

    • Email server reputation and spam checks
    • Network identification
    • Compliance with hosting and email best practices

    How rDNS Works in Cloud

    1. Client creates a VM from the Cloud CMP.
    2. Client provides or updates the hostname for the VM in the CMP.
    3. Cloud backend rDNS automation runs every 1 hour.
    4. The automation reads VM IP and hostname details from the CMP.
    5. rDNS entry is automatically created in DNS.

    No manual action is required from the client or support team.

    rDNS Creation Schedule

    • rDNS is not created instantly.
    • The backend automation runs on an hourly interval.
    • rDNS entries are usually visible within 1 hour after VM creation or hostname update.

    If rDNS is checked immediately after VM creation, it may not appear yet. This is expected behavior.

    Backend Automation Details

    Cloud runs an automated rDNS creation in the backend.

    • Scans newly created or updated VMs
    • Fetches IP address and hostname from the CMP
    • Automatically adds or updates rDNS records in DNS

    Key Points

    • Automation runs hourly
    • Fully automated
    • Prevents manual errors
    • Ensures consistency across the platform

    Do Clients Need to Add rDNS Manually?

    Cloud automatically handles rDNS creation.

    Clients should NOT:

    • Raise requests for manual rDNS creation
    • Try to configure rDNS outside Cloud
    • Expect instant rDNS creation

    Clients SHOULD:

    • Ensure the correct hostname is set in the Cloud CMP
    • Wait up to 1 hour for rDNS propagation