Steps to Change or Reset a VM Password
Step 1: Sign in to the Cloud Portal
Access the Cloud Dashboard using your registered account credentials.
Step 2: Select Your Virtual Machine
Go to the Virtual Machines section and locate the VM for which you want to update the password.
Step 3: Open the Action Menu
Click the Action drop-down menu available next to the selected VM.
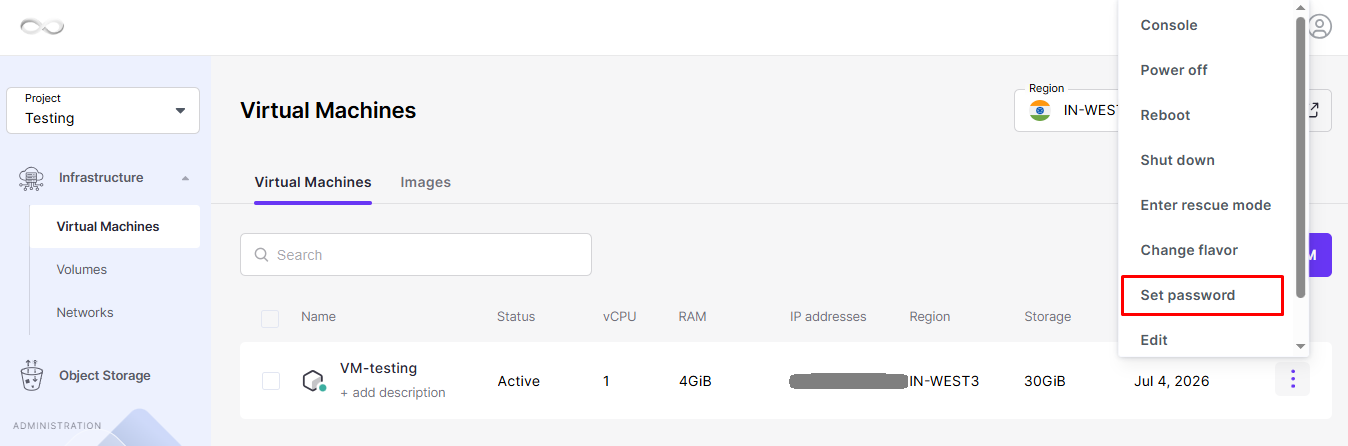
Step 4: Choose “Set Password”
Step 5: Enter a Secure Password
Type the new password that you want to assign to the VM.
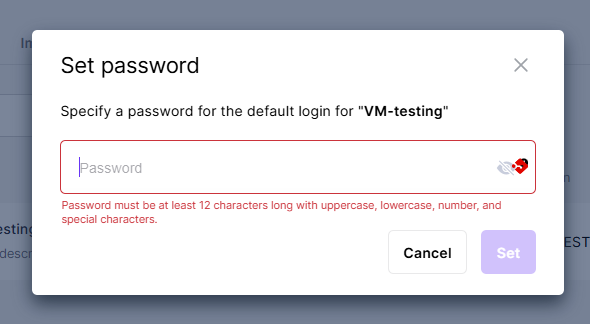
Step 6: Save the Changes
Click the Set button to apply the new password.
Once the process is completed successfully, use the updated credentials to log in to your virtual machine.
Strong Password Guidelines:
To ensure security, use the following best practices when creating a password:
Minimum Length: At least 12–16 characters.
Combination of Characters: Include uppercase and lowercase letters, numbers, and special symbols (@, #, $, etc.).
Avoid Common Words: Do not use easily guessable words like ‘password123’ or your name.
No Reuse: Avoid reusing old passwords.
By following these steps and best practices, you can ensure the security of your VM and prevent unauthorised access.
Verify Login After Resetting the Password
After changing the password, verify that the new credentials are functioning correctly before closing any active sessions.
For Linux Virtual Machines
Open a new terminal window and connect to the server using SSH.
ssh username@<VM_IP>Confirm that you can log in successfully using the new password.
Only close your existing SSH session after confirming that the new login works properly.
For Windows Virtual Machines
Launch Remote Desktop Connection (RDP).
Enter the VM’s IP address.
Provide the username.
Enter the newly created password.
Verify that the remote desktop session opens successfully.
Account Lockout Situations
A VM account may become locked if the operating system detects repeated unsuccessful login attempts.
Common Reasons for Account Lockout
Account lockout can occur due to the following reasons:
- Entering the wrong password multiple times while connecting through SSH or RDP.
- Applications or automation scripts continuing to use an outdated password after it has been changed.
- Security policies within the operating system detecting possible brute-force login attempts.
Recovering from an Account Lockout
Recommended Method: Reset the Password Through Cloud
Follow these steps:
Step 1
Log in to the Cloud Dashboard.
Step 2
Open the VM list and select the affected virtual machine.
Step 3
Click Action and choose Set Password.
Step 4
Enter a new secure password.
Step 5
Click Set to save the password.
Step 6
Wait approximately 1–2 minutes for the update to take effect.
Step 7
Try logging into the VM again using the newly configured password.
Password Expiration Policy
The password aging policy is managed by Linux itself.
To check the current password expiration settings, run:
chage -l usernameTo disable password expiration for a user account:
sudo chage -M -1 usernameIf the password has already expired, Linux will request that you create a new password during the next SSH login.
Windows Virtual Machines
Windows may enforce password expiration via Local Group Policy or Active Directory settings.
If your session is blocked due to an expired password, use the Cloud Dashboard to reset the VM password using the ‘Set Password’ option (Steps 1–6 above), then log in and update the OS-level policy as needed.