Blog

  • How to Change the Default RDP Port

    1. Overview

    RDP (Remote Desktop Protocol) is a Microsoft protocol that allows you to remotely access and control a Windows computer over a network or the internet.

    By default, RDP uses port 3389.

    When you connect using the Remote Desktop Connection (mstsc.exe) application, your keyboard, mouse, and screen are transmitted to the remote computer, allowing you to control it through a graphical interface.

    2. Enable RDP on a New Windows Server VM

    Step 1: Enable Remote Desktop

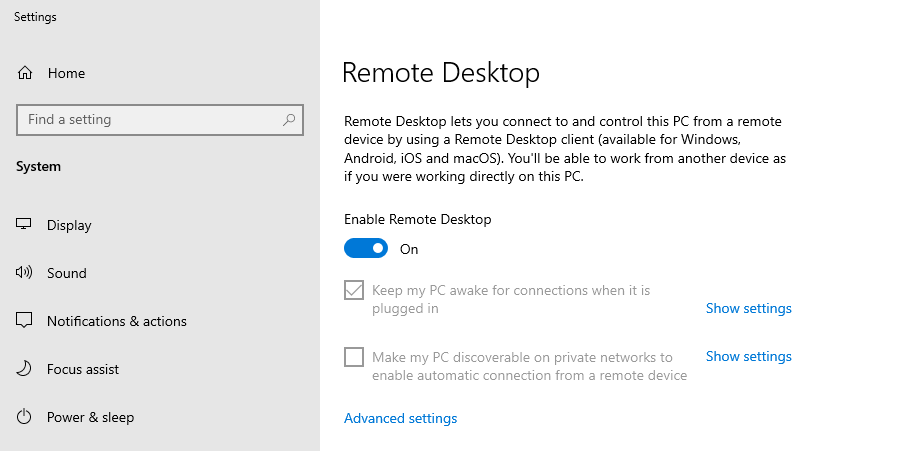
    1. Open Start → Settings → System → Remote Desktop.
    2. Turn Enable Remote Desktop to On.
    3. Click Confirm when prompted.

    RDP

    Step 2: Allow RDP Through Windows Firewall

    1. Open Windows Defender Firewall.
    2. Click Allow an app or feature through Windows Defender Firewall.
    3. Make sure Remote Desktop is enabled for the required network profiles (Private and/or Public).

    Step 3: Configure User Access

    1. Right-click This PC and select Properties.
    2. Click Remote Settings.
    3. Under Remote Desktop, click Select Users.
    4. Add the user accounts that should be allowed to connect through RDP.

    3. Change the Default RDP Port

    Step 1: Open Registry Editor

    1. Press Windows + R.
    2. Type regedit and press Enter.
    3. If prompted by User Account Control (UAC), click Yes.

    Step 2: Locate the RDP Port Setting

    Navigate to the following registry path:
    HKEY_LOCAL_MACHINE
    └─ System
    └─ CurrentControlSet
    └─ Control
    └─ Terminal Server
    └─ WinStations
    └─ RDP-Tcp

    Step 3: Change the Port Number

    1. In the right pane, locate PortNumber.
    2. Double-click PortNumber.
    3. Select Decimal under Base.
    4. Enter the new port number (for example, 3390 or 5000).
    5. Click OK.

    Tip: Choose a port number between 1025 and 65535 that is not already in use.

    Step 4: Allow the New Port Through Windows Firewall

    1. Open Windows Defender Firewall with Advanced Security.
    2. Select Inbound Rules.
    3. Click New Rule.
    4. Select Port, then click Next.
    5. Choose TCP and enter the new port number.
    6. Click Next.
    7. Select Allow the connection.
    8. Click Next.
    9. Select the required network profiles (Domain, Private, and/or Public).
    10. Click Next.
    11. Enter a name for the rule (for example, Custom RDP Port).
    12. Click Finish.

    Step 5: Apply the Changes

    Restart the server.

    Or restart the Remote Desktop service using Command Prompt with administrative privileges:

    Command Prompt
    net stop termservice
    net start termservice

    Tip: Record the new RDP port number and verify that you can connect successfully before ending your current remote session. This helps prevent accidental loss of access to the server.
  • CMP Rescue Mode for Virtual Machines

    Introduction

    CMP Rescue Mode allows you to boot a Virtual Machine (VM) into a temporary rescue environment to diagnose and repair problems without deleting or affecting the existing data. Instead of starting from the VM’s normal operating system, the VM boots from a rescue image. The original system disk remains attached as a secondary disk so you can access files, repair the operating system, recover data, or fix configuration issues. This guide explains how CMP Rescue Mode works, how to enter and exit rescue mode, how to access the original disk, and how to troubleshoot common rescue-related issues.

    Main Content

    Overview

    Rescue Mode allows you to boot a Virtual Machine (VM) into a temporary rescue environment to diagnose and repair problems without deleting or affecting the existing data.

    Instead of starting from the VM’s normal operating system, the VM boots from a rescue image. The original system disk remains attached as a secondary disk so you can access files, repair the operating system, recover data, or fix configuration issues.

    Common use cases include:

    • Repairing boot loader problems
    • Resetting or recovering SSH access
    • Fixing file system errors
    • Correcting network or system configuration issues
    • Recovering important data from an unbootable VM

    Prerequisites

    Before using Rescue Mode, make sure:

    • You have permission to manage the VM.
    • The VM is in either Running (Active) or Stopped state.
    • A compatible rescue image (Linux or Windows) is available.
    • You have basic knowledge of console or SSH access.

    Note: Rescue Mode cannot be started while the VM is in a transitional state (such as Starting, Stopping, or Rebooting).

    How Rescue Mode Works

    1. The VM is stopped safely (if it is running).
    2. The VM boots using a rescue image.
    3. The original boot disk is attached as a secondary disk (for example, /dev/vdb).
    4. You can mount the original disk, inspect files, and perform repairs.
    5. After troubleshooting, the VM can be returned to normal boot mode.

    Entering Rescue Mode

    1. Log in to the Cloud dashboard.
    2. Go to Compute → Virtual Machines.
    3. Select the VM that requires troubleshooting.
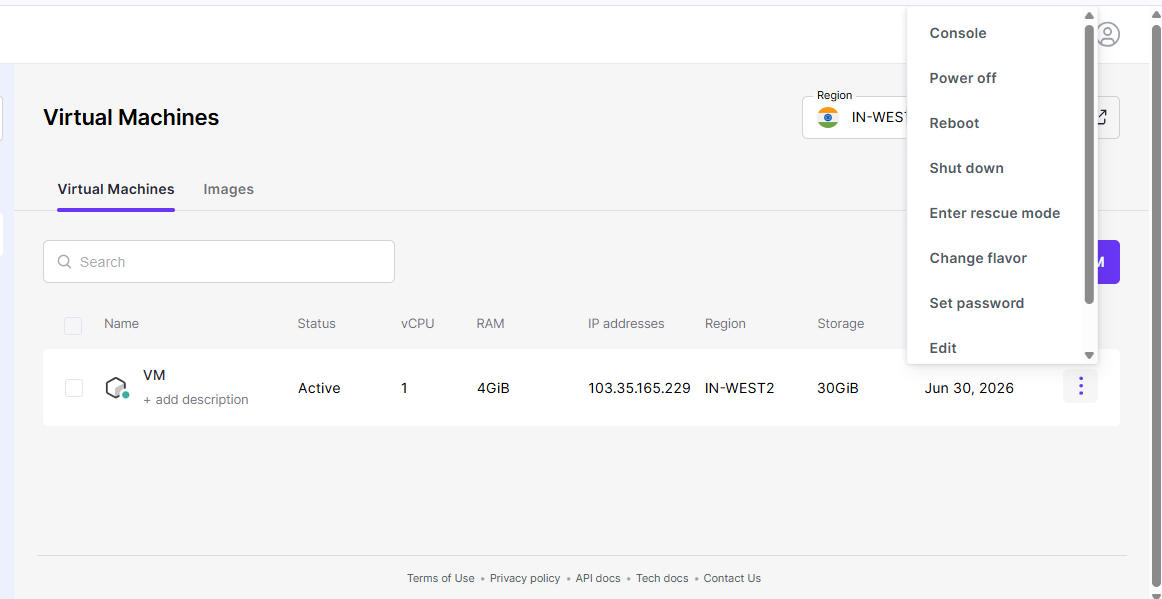
    4. Open the Actions menu (⋯).
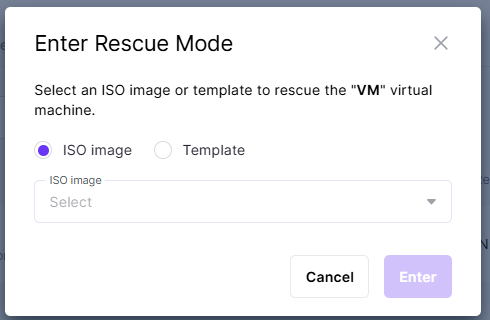
    5. Select Rescue Mode or Enter Rescue Mode.
      Rescue Mode
    6. Choose the appropriate rescue image (Linux or Windows).Rescue Mode
    7. Click Start or Enter to begin.

    The VM status will change to Rescue.

    Note: Once the rescue environment is ready, connect using the VM console or SSH.

    Using Rescue Mode

    Access the Rescue Environment

    • Open the VM console from the Cloud dashboard.
    • Log in using the credentials provided for the rescue image.

    Mount the Original Disk

    After logging into the rescue environment, identify the attached disks.

    Bash
    fdisk -l
    lsblk

    Create a mount point:

    Bash
    mkdir /mnt/original

    Mount the original system disk:

    Bash
    mount /dev/vdb1 /mnt/original

    After mounting, you can access the original files:

    Bash
    cd /mnt/original

    You can now inspect logs, modify configuration files, or recover data.

    Perform Required Repairs

    Common repair tasks include:

    • Reset SSH keys or passwords
    • Edit SSH configuration
    • Correct /etc/fstab
    • Repair file systems using fsck
    • Restore configuration files
    • Copy important data to another location

    Exiting Rescue Mode

    1. Return to the Cloud dashboard.
    2. Select the rescued VM.
    3. Click Exit Rescue Mode or Unrescue VM.
    4. Confirm the action.

    The VM will reboot normally using its original boot disk, and its status will return to Running (Active).

    Windows VM Notes

    • Use a rescue image that supports Windows.
    • If the rescue and original disks have conflicting disk identifiers, you may need to update the disk ID using Disk Management so Windows can locate the correct boot disk.

    Troubleshooting

    VM Cannot Enter Rescue Mode

    Possible causes:

    • The VM is not in a supported state.
    • The selected rescue image is missing or incompatible.
    •  The rescue image failed to boot.

    Try using another compatible rescue image.

    Cannot Access the Rescue Console

    Check that:

    •  Console access is available.
    • Firewall or security group settings allow SSH (if using SSH).
    • Browser-based console access is working.

    Original Disk Is Not Visible

    Verify that:

    •  Verify that the original disk is attached as a secondary disk (for example, /dev/vdb).
    •  If it is missing, attach the disk again using the Cloud management interface.

    VM Does Not Boot After Exiting Rescue Mode

    Re-enter Rescue Mode and verify:

    • Boot loader configuration
    • File system integrity
    • System configuration files

    If necessary, restore the VM from a backup or snapshot.

    Best Practices

    • Create a snapshot or backup before entering Rescue Mode.
    • Use trusted and compatible rescue images.
    • Keep the VM in Rescue Mode only for the time required.
    • Record all changes made during troubleshooting for future reference.

    Related Operations

    OperationPurpose
    Snapshot / BackupCreate a backup before making changes.
    Volume RestoreRestore the boot disk if repairs are unsuccessful.
    Reset StateRecover a VM that is stuck in an error state before or after rescue.

    Conclusion

    CMP Rescue Mode provides a temporary rescue environment for diagnosing and repairing Virtual Machine issues while keeping the original system disk available as a secondary disk. Use a compatible rescue image, mount the original disk carefully, perform only the required repairs, and exit Rescue Mode after troubleshooting is complete. Creating a snapshot or backup before making changes is recommended.

    Frequently Asked Questions (FAQ)

    Which login credentials should I use?

    In most cases, you can use the same username, password, or SSH keys as the original VM. Some rescue images (such as Ubuntu-based images) may generate a temporary password during boot. This password is displayed on the VM console.

    How long does Rescue Mode take?

    Typical duration:

    •  Enter Rescue Mode: 1–2 minutes
    •  Troubleshooting: Depends on the issue
    •  Exit Rescue Mode: 1–2 minutes

    If the VM remains in a transitional state for an extended period, review the console logs or contact support.

    Can I access files from my original VM?

    Yes. The original system disk is attached as a secondary disk (such as /dev/vda, /dev/vdb, or /dev/vdc). You can mount the disk and access or modify its files as needed.

    Will my data be affected?

    No. Rescue Mode does not automatically modify the original disk. The VM only boots from a temporary rescue environment, and your original data remains unchanged unless you manually edit or delete files.

    What should I do if Rescue Mode fails?

    If the VM enters an ERROR state, do not retry multiple times. Contact the support team and provide the VM ID, error message, time the issue occurred, and actions performed before the error.

    Is Rescue Mode secure?

    Yes. Only authorized users with the required permissions can enable Rescue Mode. Normal access controls and audit logging remain in effect.

    Best Practice: Exit Rescue Mode as soon as troubleshooting is complete to return the VM to its normal operating state.

    Can I use a custom rescue image?

    Yes, provided the rescue image includes the required properties:

    hw_rescue_device=disk
    hw_rescue_bus=virtio

    If these properties are not present, Rescue Mode may fail with a driver-related error.

  • How to Change Flavor of an Existing Virtual Machine?

    Introduction

    A VM flavor defines the compute resources assigned to a virtual machine, such as vCPUs, RAM, and storage specifications. If your workload requirements change, you can switch to a different flavor without creating a new virtual machine.

    This guide explains how to change the flavor of an existing virtual machine in CMP. You can select a suitable flavor to upgrade or downgrade the resources assigned to your VM based on your current requirements.

    Step 1: Sign In to CMP

    Log in to your CMP account using your credentials.

    After logging in, navigate to the Virtual Machines section where all your deployed VMs are displayed.

    Step 2: Locate the Target Virtual Machine

    Find the virtual machine whose resources you want to modify.

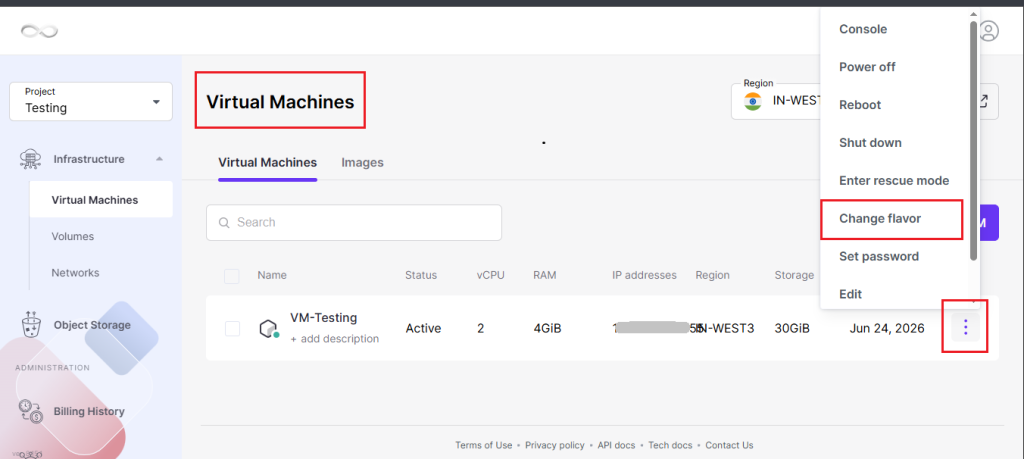
    On the right side of the VM entry, click the three-dot (⋮) action menu to view the available management options.

    Step 3: Select “Change Flavor”

    From the list of available actions, click Change Flavor.

    This will open the flavor selection window, displaying all available VM configurations.

    Change Flavor

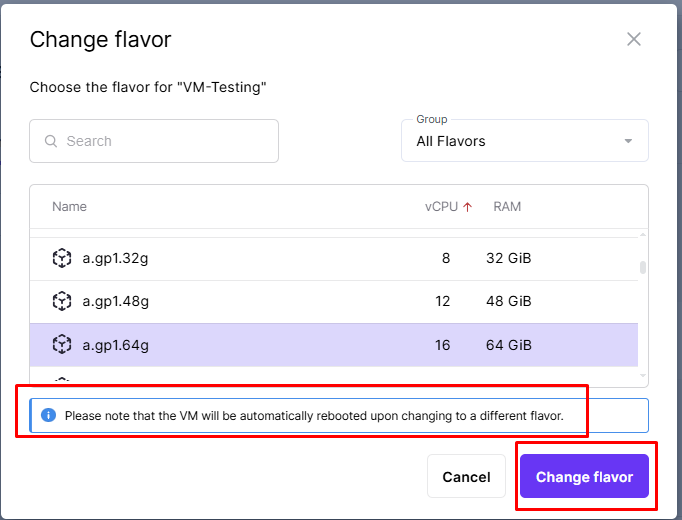
    Step 4: Choose a Suitable Flavor

    Review the available flavor options and select the configuration that best matches your requirements.

    • You can choose to upgrade (increase resources) or downgrade (decrease resources) based on your current requirements.

    Verify the selected configuration before proceeding.

    Step 5: Confirm the Flavor Change

    After selecting the desired flavor, click the Change Flavor button to submit the request.

    CMP will begin applying the new resource configuration to the VM.

    Confirm the Flavor Change

    Step 6: Wait for the Process to Complete

    The CMP platform will update the VM configuration automatically.

    Once the operation is finished, the updated flavor information will be visible in the VM details section of the dashboard.

    Important Notes:

    • No data loss: Changing the flavor does not affect the data or configuration inside the VM.
    • Downtime: A short reboot may occur while the flavor is being applied.

    Conclusion

    Changing the flavor of an existing virtual machine in CMP allows you to adjust the VM’s compute resources according to your workload requirements. You can upgrade or downgrade the available flavor without creating a new virtual machine.

    Follow the steps in this guide to select the required flavor, confirm the change, and verify the updated flavor information from the VM details section.

    FAQ’s

    What is a VM flavor?

    A VM flavor defines the compute resources assigned to a virtual machine, such as vCPUs, RAM, and storage specifications.

    How do I change the flavor of an existing virtual machine in CMP?

    Log in to CMP, navigate to Virtual Machines, locate the required VM, open the three-dot (⋮) action menu, and select Change Flavor.

    Can I upgrade the resources of an existing VM?

    Yes. You can select a higher flavor to increase the resources assigned to the virtual machine based on your requirements.

    Can I downgrade the resources of an existing VM?

    Yes. You can select a lower flavor to decrease the resources assigned to the virtual machine based on your requirements.

    Where can I find the Change Flavor option?

    The Change Flavor option is available in the three-dot (⋮) action menu on the right side of the required virtual machine entry.

    Will changing the VM flavor cause data loss?

    No. According to the source procedure, changing the flavor does not affect the data or configuration inside the VM.

    Can there be downtime when changing the VM flavor?

    Yes. A short reboot may occur while the new flavor is being applied.

    How can I verify that the flavor has been changed?

    Once the operation is complete, the updated flavor information will be visible in the VM details section of the CMP dashboard.

  • How to create a new virtual machine using a volume snapshot?

    Introduction

    Volume snapshots provide a reliable way to duplicate or recover an existing virtual machine environment. By creating a new volume or image from a snapshot, you can quickly provision a new VM containing the same operating system, configuration, and data as the original instance.

    This guide explains how to locate a volume snapshot, create a new volume or image from the snapshot, optionally create an image from a volume, provision a new virtual machine, and verify the newly created VM using the CMP dashboard.

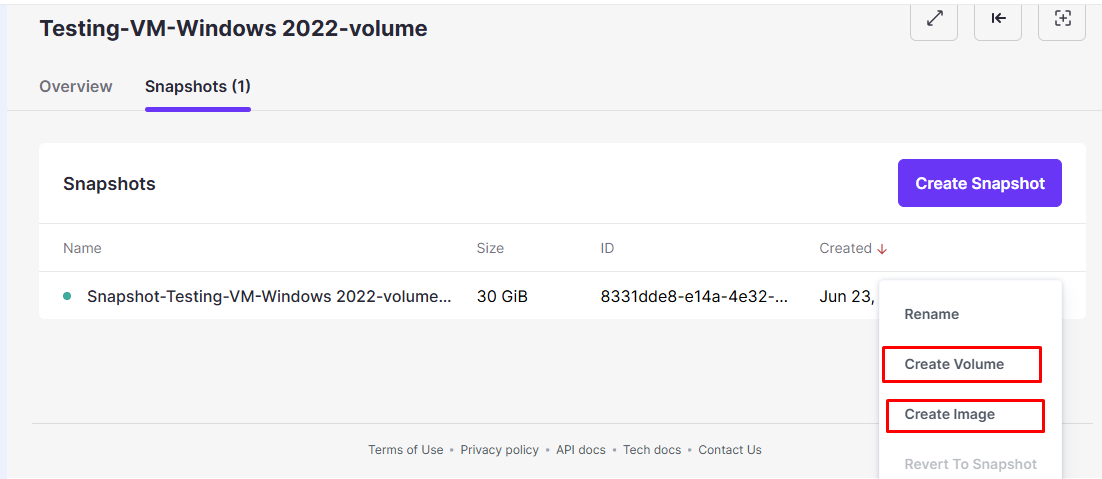
    Step 1: Locate the Snapshot

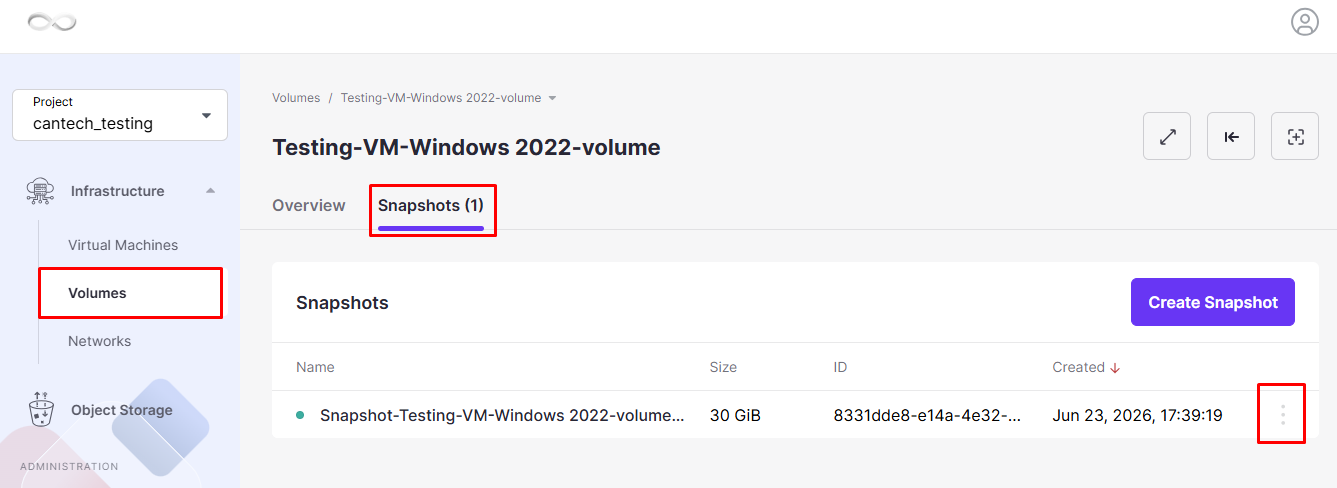
    Log in to your CMP Cloud Dashboard.

    Navigate to Volumes and select the boot volume associated with your VM.

    Open the Snapshots tab.

    Locate the snapshot you want to use for creating the new virtual machine.

    Verify that the snapshot belongs to the correct source volume before proceeding.

    Locate the Snapshot

    Step 2: Generate a Volume or Image from the Snapshot

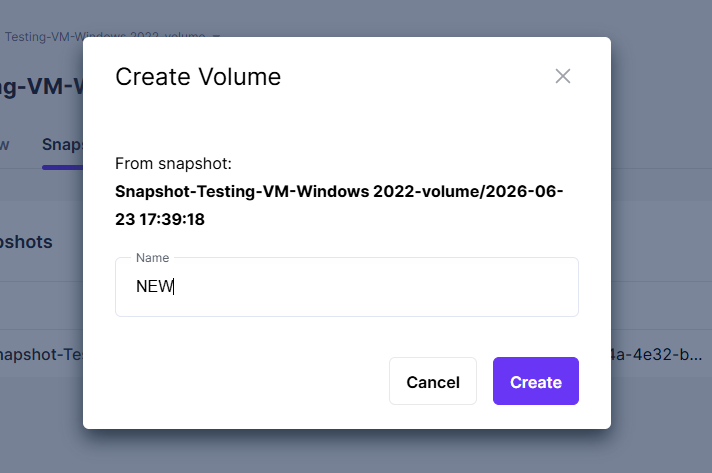
    Option A: Create a New Volume

    Select the desired snapshot.

    Click Create Volume.

    Enter a suitable Volume Name.

    Review the details and click Create.

    Wait for the process to complete. The newly created volume will be available under the Volumes section.

    Generate a Volume or Image from the Snapshot

    Create a New Volume

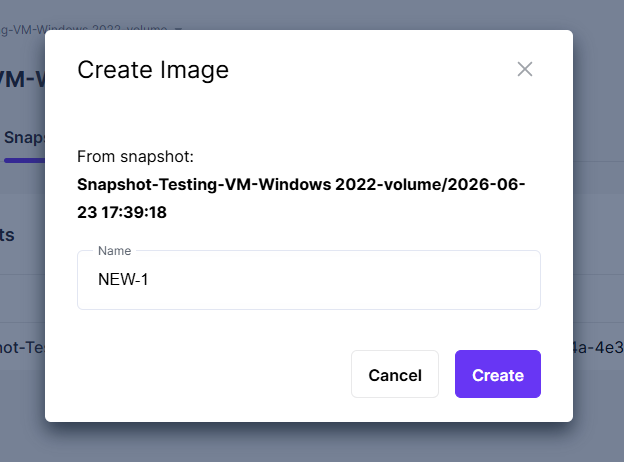
    Option B: Create an Image Directly

    Select the snapshot.

    Click Create Image.

    Provide an image name.

    Confirm the operation and wait for the image creation process to finish.

    Create an Image Directly

    Step 3: Create an Image from a Volume (Optional)

    If you created a volume from the snapshot or already have an existing boot volume, you can convert it into an image.

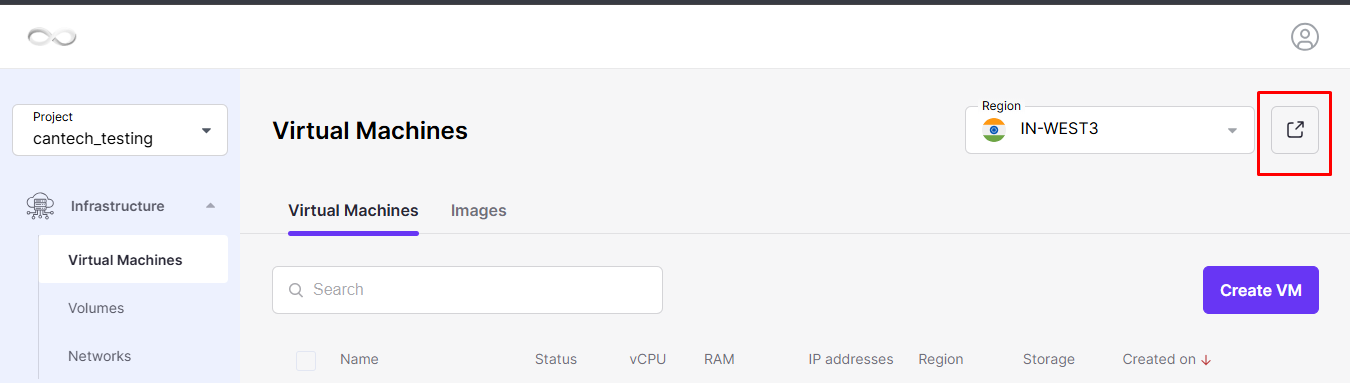
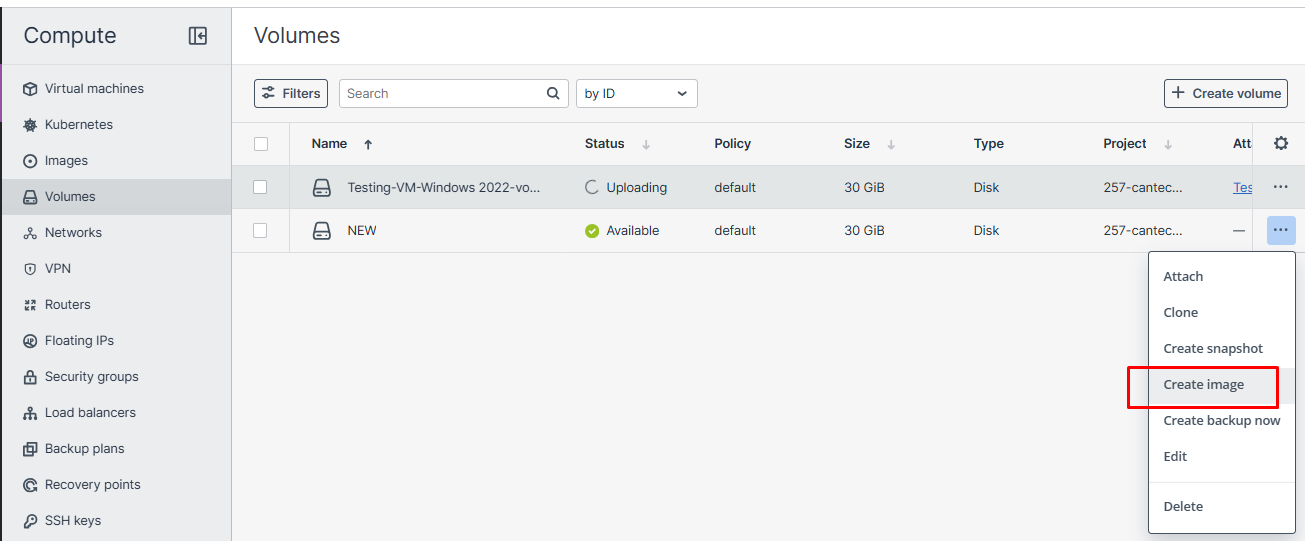
    Open the CMP Region Advanced Dashboard.

    Navigate to Compute → Volumes.

    Locate the required boot volume.

    Click the Actions Menu (⋮) next to the volume.

    Select Create Image.

    CMP Region Advanced Dashboard


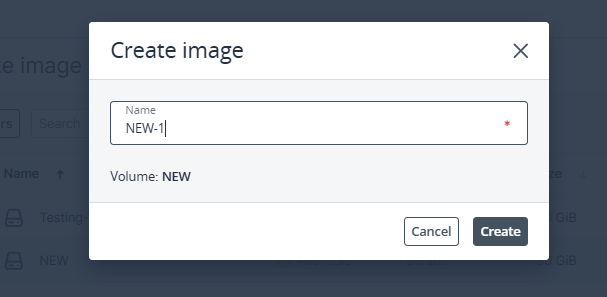
    Create an Image from a Volume

    Enter an appropriate image name.

    Click Create and wait for the image to become available.

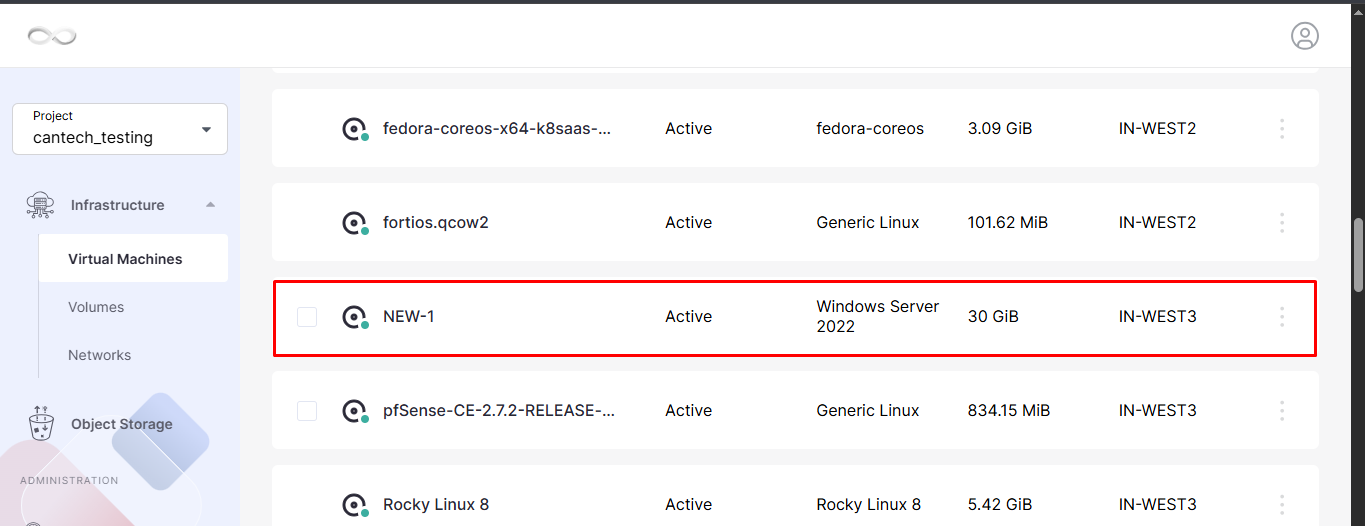
    The newly created image will appear in the Images section.

    created image

    newly created image will appear

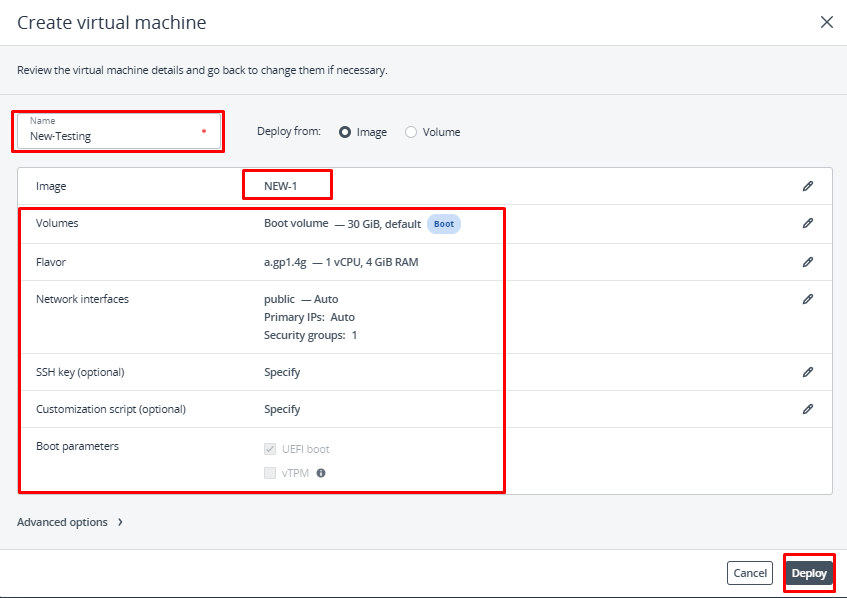
    Step 4: Provision a New Virtual Machine

    Once the image is available, you can deploy a new VM.

    Navigate to the Virtual Machines section.

    Click Create Virtual Machine.

    Select the image created from the snapshot or volume.

    Choose the desired Flavor (CPU, RAM, and Storage configuration).

    Select the required Network Interface(s).

    Enter a Virtual Machine Name.

    Configure any additional settings as required.

    Click Create or Deploy to start the VM provisioning process.

    Provision a New Virtual Machine

    Step 5: Verify the Newly Created VM

    After deployment is complete, perform the following checks.

    Verify VM Status

    Confirm that the VM status shows Running or Active.

    Test Access

    Connect using one of the available methods:

    VNC Console
    SSH (Linux)
    RDP (Windows)

    Validate Data and Services

    Ensure all expected files, applications, and configurations are present.

    Verify that services and applications start correctly.

    Confirm network connectivity and functionality.

    Conclusion

    Creating a new virtual machine using a volume snapshot in CMP allows you to provision a VM based on an existing environment. You can create a new volume or image from the snapshot, use the resulting image to provision a new VM, and then verify its status, access, data, services, and network connectivity.

    Follow the steps in this guide to create and verify a new virtual machine using a volume snapshot through the CMP dashboard.

    FAQ’s

    What is required to create a new VM using a volume snapshot?

    You need an existing volume snapshot that can be used to create a new volume or image for VM provisioning.

    How do I locate a volume snapshot in CMP?

    Log in to the CMP Cloud Dashboard, navigate to Volumes, select the boot volume associated with the VM, and open the Snapshots tab.

    Can I create a new volume from a snapshot?

    Yes. Select the required snapshot, click Create Volume, enter a suitable Volume Name, review the details, and click Create.

    Can I create an image directly from a snapshot?

    Yes. Select the snapshot and click Create Image. Provide an image name, confirm the operation, and wait for the image creation process to finish.

    Can I create an image from a volume?

    Yes. Open the CMP Region Advanced Dashboard, navigate to Compute → Volumes, select the required boot volume, and use the Actions Menu (⋮) to select Create Image.

    How do I create a new VM from the snapshot?

    Once the required image is available, navigate to Virtual Machines, click Create Virtual Machine, select the image, configure the Flavor and Network Interface(s), enter the VM name, and click Create or Deploy.

    How can I verify the newly created VM?

    Confirm that the VM status is Running or Active, then test access using VNC Console, SSH for Linux, or RDP for Windows.

    What should I verify after creating the VM?

    Verify that the expected files, applications, and configurations are present. Also confirm that services start correctly and that network connectivity and functionality are working as expected.

  • How to Access Virtual Machines Using Console?

    Introduction

    This guide explains how to access Linux or Windows virtual machines through the CMP Cloud Console. The console provides a browser-based method to connect to a virtual machine and manage it directly.

    Before accessing the virtual machine, ensure that a secure password has been configured. This guide covers the prerequisites and step-by-step procedures for accessing both Linux and Windows virtual machines through the CMP Cloud Console.

    Prerequisites

    Before accessing your virtual machine, make sure a secure password has been configured.

    Password Requirements

    For smooth console access and enhanced security, your password should:

    Contain at least 12 characters.
    Include uppercase letters (A-Z).
    Include lowercase letters (a-z).
    Include numbers (0-9).
    Include special characters (!, @, #, $, etc.).
    Be unique and difficult to guess.

    Note: Weak passwords may prevent successful login through the console.

    Connecting to a Linux Virtual Machine

    Step 1: Open the CMP Cloud Dashboard

    Log in to your CMP Cloud account and navigate to the Virtual Machines section.

    Step 2: Select the Virtual Machine

    Choose the Linux VM you want to access from the VM list.

    Step 3: Launch the Console

    Click the Console option available in the VM details panel.

    A new browser window will open displaying the VM console.

    Step 4: Enter Login Credentials

    Click inside the console window and enter your Linux username.

    For example:

    root

    Step 5: Authenticate

    Enter the password configured for the virtual machine.

    Step 6: Access the Server

    After successful authentication, you will be logged in and can start managing your Linux VM directly from the console.

    Connecting to a Windows Virtual Machine

    Step 1: Open the VM Console

    From the CMP Cloud Dashboard, select the Windows VM and click Console.

    Step 2: Configure Regional Settings

    Choose the appropriate:

    Country or Region
    Language
    Keyboard Layout

    Click Next to continue.

    Step 3: Accept License Terms

    Review the Microsoft license agreement and click Accept to proceed.

    Step 4: Set Administrator Password

    Create or enter the password for the Windows Administrator account.

    Step 5: Send Required Key Combinations

    If necessary, use the Send Key Combination feature to send commands such as:

    Ctrl + Alt + Delete

    to the virtual machine.

    Step 6: Sign In

    Enter the Administrator password and click Sign In.

    Step 7: Start Managing the VM

    Once logged in, you can manage and operate the Windows virtual machine through the browser-based console.

    Conclusion

    Accessing virtual machines through the CMP Cloud Console provides a browser-based method for managing both Linux and Windows VMs. Before starting, ensure that a secure password has been configured according to the required password guidelines.

    For Linux VMs, select the VM, launch the Console, and authenticate using the configured credentials. For Windows VMs, complete the required regional settings, accept the license terms, configure the Administrator password, and sign in through the console.

    FAQ’s

    How do I access a virtual machine using the CMP Cloud Console?

    Log in to your CMP Cloud account, navigate to the Virtual Machines section, select the required VM, and click Console.

    What are the prerequisites for console access?

    A secure password must be configured for the virtual machine before accessing it through the console.

    What password requirements should I follow?

    The password should contain at least 12 characters, including uppercase letters, lowercase letters, numbers, and special characters. It should also be unique and difficult to guess.

    Can I access Linux virtual machines through the CMP Console?

    Yes. Select the Linux VM, click Console, enter the Linux username and configured password, and authenticate to access the server.

    Can I access Windows virtual machines through the CMP Console?

    Yes. Select the Windows VM and click Console. Complete the required Windows setup and sign in using the Administrator credentials.

    What should I do if I need to send Ctrl + Alt + Delete to a Windows VM?

    Use the Send Key Combination feature available in the console to send commands such as Ctrl + Alt + Delete to the Windows virtual machine.

    What happens after successful Linux authentication?

    After successful authentication, you will be logged in and can manage the Linux virtual machine directly from the console.

    Can I manage a Windows VM after signing in through the console?

    Yes. Once successfully signed in, you can manage and operate the Windows virtual machine through the browser-based console.

  • How to Assign a Public IP to Virtual Machine?

    Introduction

    This guide explains how to assign a public IP address to a virtual machine using the CMP dashboard. A public IP allows the virtual machine to be accessed through a public network based on the configured network interface and security group settings.

    The process includes accessing the CMP dashboard, selecting the required virtual machine, editing its network interfaces, adding a public network, configuring secondary IPv4 addresses if required, selecting or creating a security group, and saving the network configuration.

    Step 1: Access the Dashboard

    Log in to your CMP Main Dashboard.

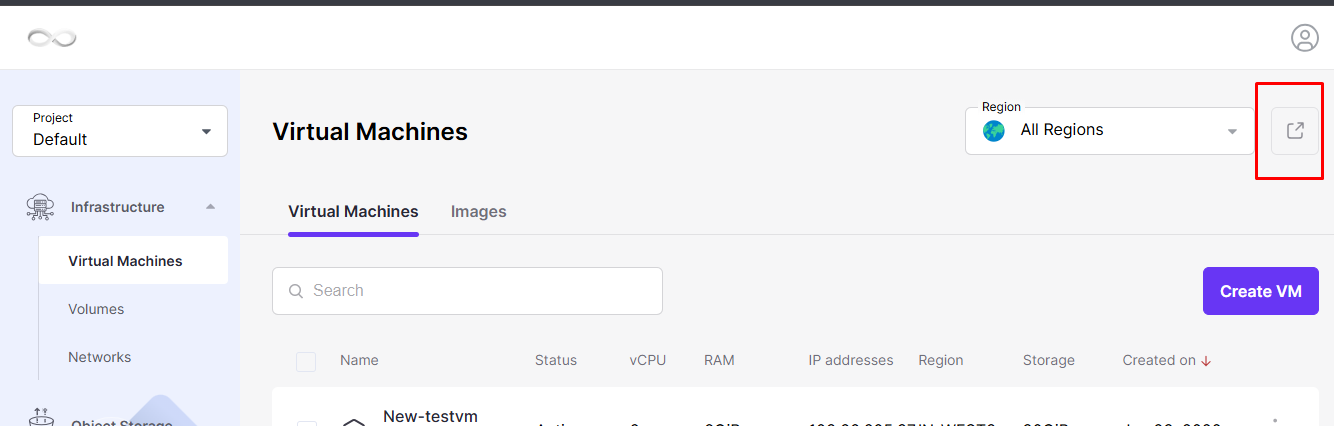
    From the CMP Region Advanced Dashboard, navigate to the virtual machine management section.

    Navigate to Virtual Machine to view the list of created virtual machines.

    Advanced Dashboard

    Note: Ensure that the required virtual machine has already been created before assigning a public IP.

    Step 2: Select the Virtual Machine

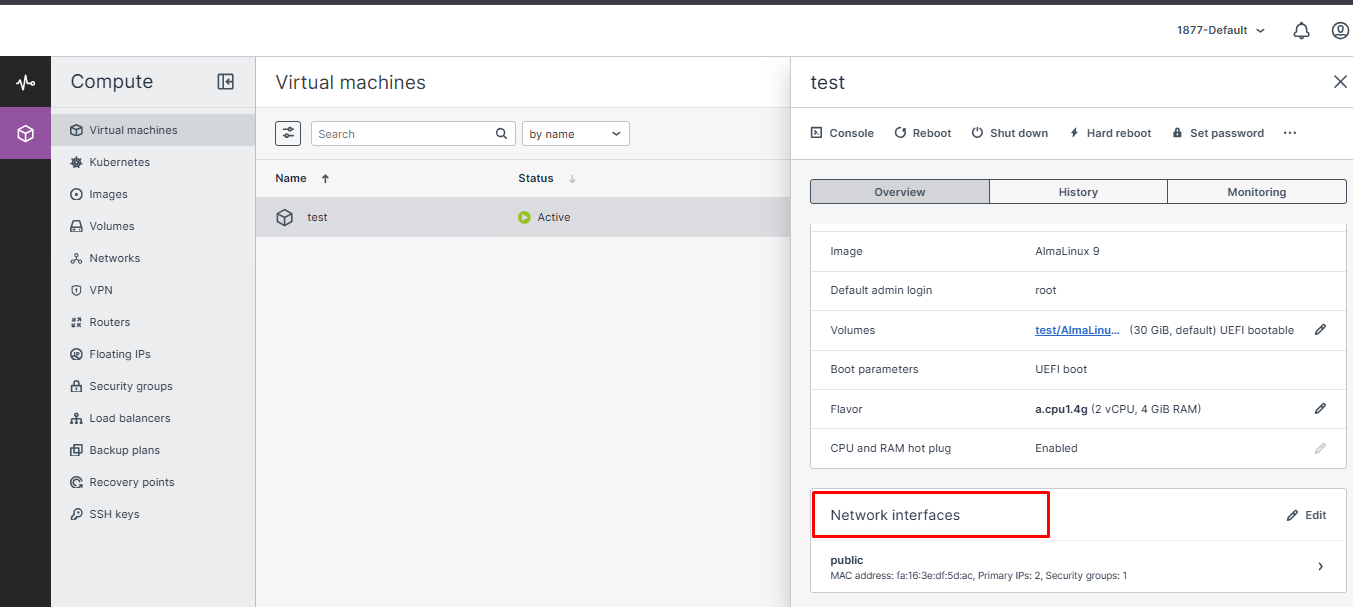
    Click on the name of the virtual machine from the list.

    Open the detailed overview of the virtual machine.

    Navigate to the Network Interfaces section.

    Select the Virtual Machine

    Click Edit.

    Network Interfaces

    Step 3: Manage Network Interfaces

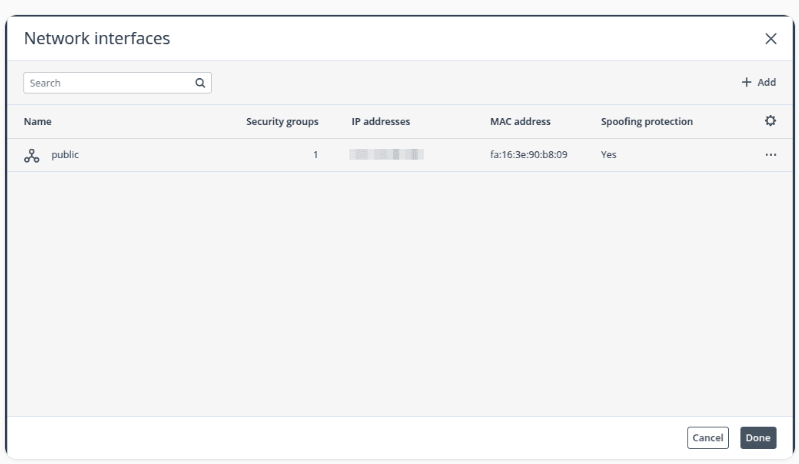
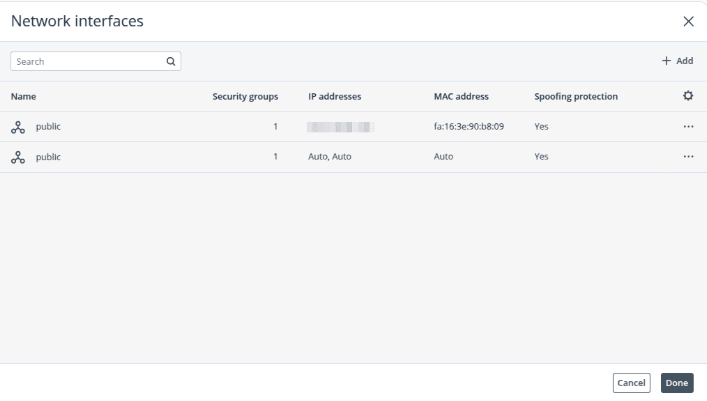
    A Network Interfaces window will appear, displaying the existing network configuration.

    Review the existing network configuration.

    To add a new network interface, click + Add.

    Step 4: Configure the Network

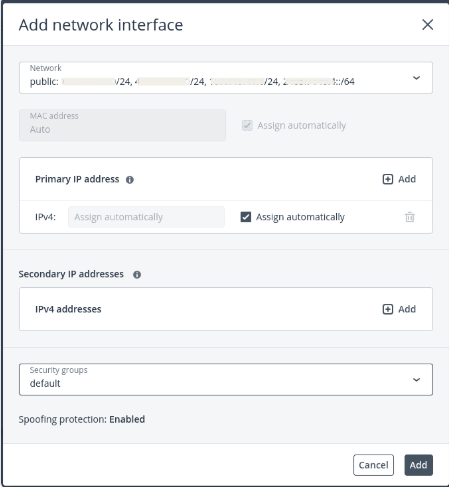
    Select a Public network for the virtual machine according to your requirements.

    To add secondary IPv4 addresses, select Secondary IPv4 Addresses.

    Use the Add or Delete options to add or remove multiple IPv4 addresses.

    Create a new security group for your project or select the Default security group.

    Important:

    Select the appropriate public network according to your requirements.

    Review the IPv4 addresses and security group configuration before saving the changes.

    Configure the Network

    Step 5: Add the Network Interface

    Click Add to save the network configuration and create the network interface.

    The newly created network interface will appear in the list.

    Click Done to finish the configuration.

    The public IP address will now be assigned to the virtual machine.

    Add the Network Interface

    Conclusion

    Assigning a public IP to a virtual machine in CMP can be completed through the virtual machine’s Network Interfaces configuration. By selecting a Public network and configuring the required IPv4 addresses and security group, the network interface can be added to the virtual machine.
    Follow the steps in this guide to configure and assign a public IP to your virtual machine through the CMP dashboard.

    FAQ’s

    How do I assign a public IP to a virtual machine in CMP?

    Log in to the CMP dashboard, select the required virtual machine, open Network Interfaces, click Edit, add a new network interface, and select a Public network.

    Where can I configure the network interface?

    Open the required virtual machine and navigate to the Network Interfaces section. Click Edit to manage the network configuration.

    Can I add multiple secondary IPv4 addresses?

    Yes. Secondary IPv4 addresses can be added or removed using the Add and Delete options under Secondary IPv4 Addresses.

    Can I select a security group when configuring the public network?

    Yes. You can create a new security group for the project or select the Default security group.

    How do I save the public network configuration?

    After configuring the network, click Add to create the network interface. The new interface will appear in the list. Click Done to complete the configuration.

    When is the public IP assigned to the virtual machine?

    The public IP is assigned to the virtual machine after the new public network interface is successfully added.

    What should I check before adding the network interface?

    Review the selected Public network, secondary IPv4 addresses if configured, and security group settings before clicking Add.

    Can I remove a secondary IPv4 address?

    Yes. Secondary IPv4 addresses can be removed using the Delete option in the Secondary IPv4 Addresses configuration.