Blog

  • Installing OpenStack Command Line Client

    1. Overview

    This guide explains how to install and configure the OpenStack Command Line Client (CLI) on a Linux system. After installation and configuration, you can use the CLI to manage OpenStack resources from the command line.

    2. Prerequisites

    Before you begin, ensure that:

    • You have access to an OpenStack environment.
    • You have administrative (root or sudo) privileges.
    • Python 3.x is installed on the system.
    • The system has an active internet connection to download the required packages.

    3. Installation Overview

    The OpenStack CLI can be installed on a Linux system using pip (Python package manager).

    Before installing the client, install the required Python dependencies. After installation, configure the CLI using an OpenStack RC file to authenticate with your OpenStack environment.

    4. Install the OpenStack CLI

    Step 1: Install Required Dependencies

    Ubuntu / Debian

    Bash
    sudo apt update
    sudo apt install python3-pip python3-dev python3-venv

    CentOS / RHEL

    Bash
    sudo yum install python3-pip python3-devel

    Step 2: Install the OpenStack Client

    Install the OpenStack CLI using pip:

    Bash
    pip install python-openstackclient

    Note: It is recommended to install the OpenStack client inside a Python virtual environment to avoid conflicts with other Python packages.

    Step 3: Verify the Installation

    After the installation is complete, verify that the OpenStack CLI is installed successfully:

    Bash
    openstack –version

    The command displays the installed version of the OpenStack client.

    5. Configure the OpenStack CLI

    Step 1: Download the OpenStack RC File

    Download the OpenStack RC file from the OpenStack Dashboard.

    Navigate to:

    Project → API Access → Download OpenStack RC File

    The RC file contains the authentication details required to access your OpenStack project.

    Step 2: Source the RC File

    Run the following command to load the authentication environment variables:

    Bash
    source /path/to/openstack_rc_file.sh

    Example RC file:
    export OS_AUTH_TYPE=v3applicationcredential
    export OS_AUTH_URL=”https://in-west3.controlcloud.app:5000/v3″

    # Application credential
    export OS_APPLICATION_CREDENTIAL_ID=””
    export OS_APPLICATION_CREDENTIAL_SECRET=””

    # Optional
    export OS_REGION_NAME=”RegionOne”

    Update the Application Credential ID and Application Credential Secret with your own values before using the file.

    Step 3: Verify the Configuration

    Run the following command:

    Bash
    openstack token issue

    If the configuration is correct, the command returns an authentication token, confirming that the CLI can communicate with the OpenStack environment.

    6. Common OpenStack CLI Commands

    List Servers

    Bash
    openstack server list

    Create a Server

    Bash
    openstack server create –image <image_id> –flavor <flavor_id> –network <network_id> <server_name>

    List Networks

    Bash
    openstack network list

    Create a Network

    Bash
    openstack network create <network_name>

    Create a Volume

    Bash
    openstack volume create –size 10 <volume_name>

    7. Troubleshooting

    Authentication Failed

    If you receive an Authentication failed error:

    • Verify that the OpenStack RC file has been sourced correctly.
    • Confirm that the authentication credentials are correct.

    Command Not Found

    If the openstack command is not available:

    • Verify that the OpenStack client was installed successfully.
    • Reinstall the package using pip if necessary.

    8. Conclusion

    After installing the OpenStack CLI and configuring it with the appropriate RC file, you can manage your OpenStack resources directly from the command line.

    Always ensure that you source the correct RC file before running OpenStack commands.
    For additional information, refer to the official OpenStack documentation.
  • How to Whitelist an IP Address in ConfigServer Firewall (CSF)

    1. Overview

    This guide explains how to whitelist an IP address using ConfigServer Security & Firewall (CSF) in WHM.

    2. Whitelist an IP Address

    Step 1: Log In to WHM

    Log in to WHM using the root account.

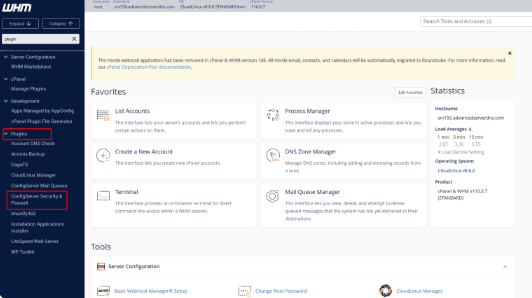
    Step 2: Open ConfigServer Security & Firewall

    Navigate to:
    WHM → Plugins → ConfigServer Security & Firewall
    WHM

    Step 3: Add the IP Address

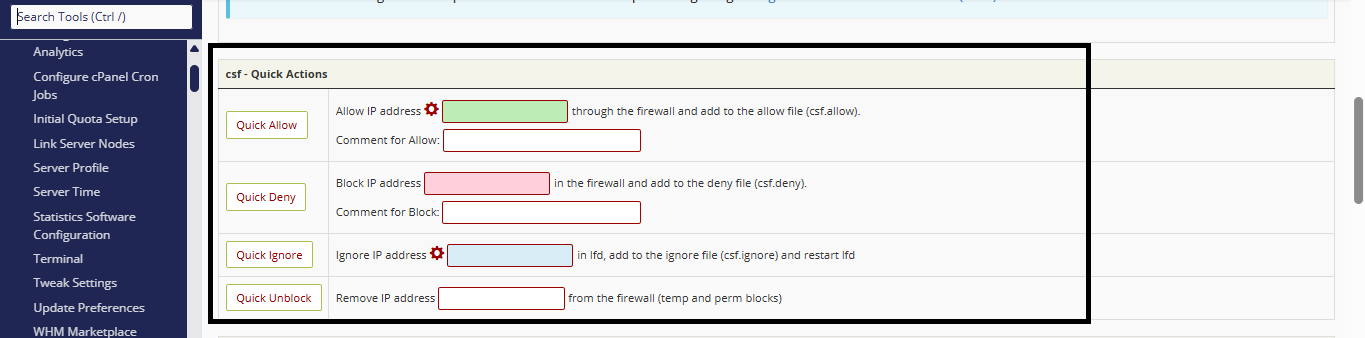
    1. Locate the text box next to the Quick Allow button.
    2. Enter the IP address that you want to whitelist.
    3. Click Quick Allow.

    Plugins

    3. Additional Options

    Quick Deny

    The Quick Deny option can be used to block an IP address from accessing the server.

    Quick Ignore

    The Quick Ignore option also allows an IP address, similar to Quick Allow, but with different behavior.

    • Quick Allow: The IP address is whitelisted. However, it can still be blocked later if it triggers ModSecurity rules or exceeds the allowed number of failed login attempts.
    • Quick Ignore: The IP address is excluded from blocking. It will not be blocked by ModSecurity or LFD (Login Failure Daemon), even if it triggers security rules or repeated login failures.
  • How to Configure CMP S3 Bucket Storage on a Linux VM Using s3cmd and s3fs

    Purpose

    This KB explains how to configure CMP S3 bucket storage on a Linux VM using:

    • s3cmd for command-line S3 operations
    • s3fs for mounting the S3 bucket as a filesystem

    Using this setup, you can upload, download, mount, and manage files in a CMP S3 bucket from a Linux server.

    Prerequisites

    Before starting, make sure you have the following:

    • A Linux VM, for example Ubuntu
    • CMP S3 Access Key
    • CMP S3 Secret Key
    • Target bucket name: linux-backup-test
    • Basic knowledge of Linux command-line operations
    • Internet connectivity from the Linux VM to the CMP S3 endpoint

    Understanding CMP S3 Access Control

    CMP S3 supports two access modes:

    Bucket visibility

    • Public bucket
    • Private bucket

    Access using keys

    • Access Key
    • Secret Key

    The Access Key and Secret Key generated from CMP S3 provide access to CMP S3 resources.

    Note: Keys created in CMP S3 work only within CMP S3.

    How to Create Access Key and Secret Key in CMP

    To access CMP S3 buckets securely, you need to generate an Access Key and Secret Key.

    Steps:

    • Log in to the CMP Dashboard.
    • Navigate to Object Storage.
    • Click on the Access tab.
    • You will see fields like:

    Region

    User ID

    Accounts

    Status

    • Click on the required access section.
    • Click on Create First Key or Create Key if one already exists.
    • Copy the generated:

    Access Key

    Secret Key

    Important: Save the Secret Key securely, as it is shown only once.

    Installing s3cmd on Linux VM

    Run the following commands:

    Bash
    sudo apt update
    sudo apt install s3cmd -y

    Verify the installation:

    Bash
    s3cmd –version

    Configuring s3cmd for CMP S3

    Run the configuration wizard:

    Bash
    s3cmd –configure

    Enter the following details when prompted:

    Prompt : Value
    Access Key : <Your-Access-Key>
    Secret Key : <Your-Secret-Key>
    Default Region : in-west2
    S3 Endpoint : s3.in-west2.purestore.io
    DNS-style bucket+hostname:port template : %(bucket)s.s3.in-west2.purestore.io
    Encryption password : Optional or leave blank
    Path to GPG program : /usr/bin/gpg
    Use HTTPS protocol : True
    HTTP Proxy server name : Leave blank unless required
    HTTP Proxy server port : 0

    Bash
    Note: Do not add https:// in the S3 Endpoint field during s3cmd –configure.

    Validate s3cmd Configuration

    Run the following command to check bucket access:

    Bash
    s3cmd ls

    Expected output should show the available bucket, for example:

    Bash
    s3://linux-backup-test

    Common Operations Using s3cmd

    • List Buckets
    Bash
    s3cmd ls
    • List Objects in Bucket
    Bash
    s3cmd ls s3://linux-backup-test
    • Create a Test File

    Before uploading, create a test file on the server:

    Bash
    echo “This is a test file for CMP S3 upload” > today1234.txt

    Verify the file:

    Bash
    ls -lh today1234.txt
    cat today1234.txt
    • Upload a File

    Upload the test file to the CMP S3 bucket:

    Bash
    s3cmd put today1234.txt s3://linux-backup-test

    Verify the uploaded file:

    Bash
    s3cmd ls s3://linux-backup-test
    • Download a File

    Download the file from the bucket:

    Bash
    s3cmd get s3://linux-backup-test/today1234.txt

    To download the file to a specific directory:

    Bash
    mkdir -p /mnt/cmp-s3
    s3cmd get s3://linux-backup-test/today1234.txt /mnt/cmp-s3/today1234.txt

    Verify the downloaded file:

    Bash
    ls -lh /mnt/cmp-s3/today1234.txt
    cat /mnt/cmp-s3/today1234.txt

    Mount CMP S3 as a Filesystem Using s3fs

    s3fs allows you to mount the CMP S3 bucket as a local directory on the Linux server.

    • Install s3fs
    Bash
    sudo apt update
    sudo apt install s3fs -y
    • Create Credentials File

    Create the password file using the Access Key and Secret Key:

    Bash
    echo ACCESS_KEY:SECRET_KEY > ~/.passwd-s3fs

    Example:

    Bash
    echo ABCD123456789:xyzsecretkey123456789 > ~/.passwd-s3fs

    Set secure permission:

    Bash
    chmod 600 ~/.passwd-s3fs
    Bash
    Important: Replace ACCESS_KEY and SECRET_KEY with the actual CMP S3 credentials.
    • Create Mount Directory

    Create the directory where the bucket will be mounted:

    Bash
    mkdir -p /mnt/cmp-s3

    Verify the directory:

    Bash
    ls -ld /mnt/cmp-s3
    • Mount the CMP S3 Bucket

    Mount the bucket linux-backup-test on /mnt/cmp-s3:

    Bash
    s3fs linux-backup-test /mnt/cmp-s3 -o url=https://s3.in-west2.purestore.io -o use_path_request_style
    • Verify the Mount

    Check whether the bucket is mounted successfully:

    Bash
    mount | grep s3fs

    Expected output:

    Bash
    s3fs on /mnt/cmp-s3 type fuse.s3fs

    You can also check using:

    Bash
    df -h | grep cmp-s3

    List files from the mounted bucket:

    Bash
    ls -la /mnt/cmp-s3

    File Operations Using Mounted S3 Directory

    Once the bucket is mounted, you can manage files like a normal Linux directory.

    • Create a Local Test File

    Create a local test file:

    Bash
    echo “This is a test upload using s3fs mount” > /root/localfile.txt

    Verify it:

    Bash
    ls -lh /root/localfile.txt
    cat /root/localfile.txt
    • Upload File to Bucket Using cp Command

    Copy the local file to the mounted S3 bucket:

    Bash
    cp /root/localfile.txt /mnt/cmp-s3/

    Verify:

    Bash
    ls -lh /mnt/cmp-s3/

    You can also verify using s3cmd:

    Bash
    s3cmd ls s3://linux-backup-test
    • Create a New File Directly in Mounted Bucket

    Create a file directly inside the mounted S3 bucket:

    Bash
    echo “Hello CMP S3” > /mnt/cmp-s3/hello.txt

    Verify:

    Bash
    ls -lh /mnt/cmp-s3/hello.txt
    cat /mnt/cmp-s3/hello.txt
    • Download/Copy File from Mounted Bucket to Local Server

    Create a local download directory:

    Bash
    mkdir -p ~/Downloads

    Copy the file from mounted bucket to local directory:

    Bash
    cp /mnt/cmp-s3/hello.txt ~/Downloads/

    Verify:

    Bash
    ls -lh ~/Downloads/hello.txt
    cat ~/Downloads/hello.txt
    • Delete a File from Bucket

    Delete the file from the mounted S3 bucket:

    Bash
    rm /mnt/cmp-s3/hello.txt

    Verify:

    Bash
    rm /mnt/cmp-s3/hello.txt

    Or verify using:

    Bash
    s3cmd ls s3://linux-backup-test

    Unmount the Bucket

    When the work is completed, unmount the bucket:

    Bash
    fusermount -u /mnt/cmp-s3

    If fusermount is not available, use:

    Bash
    umount /mnt/cmp-s3

    Verify that it is unmounted:

    Bash
    mount | grep s3fs

    If no output is shown, the bucket has been unmounted successfully.

    Important Notes

    • Make sure the mount directory exists before running the s3fs mount command.
    • Keep the .passwd-s3fs file secure with 600 permission.
    • Do not share the Secret Key with anyone.
    • Use HTTPS endpoint for secure connectivity.
    • For persistent mount after reboot, an entry can be added in /etc/fstab with proper credential handling.
    • If s3cmd ls gives a connection refused error, check that use_https = True is configured in ~/.s3cfg.

    Troubleshooting

    Issue: Connection Refused

    Error:

    Bash
    ERROR: Could not connect to server: [Errno 111] Connection refused

    Check the ~/.s3cfg file:

    Bash
    cat ~/.s3cfg

    Make sure this value is set:

    Bash
    use_https = True

    Also confirm the endpoint:

    Bash
    host_base = s3.in-west2.purestore.io
    host_bucket = %(bucket)s.s3.in-west2.purestore.io

    Issue: File Not Found During Copy

    Error:

    Bash
    cp: cannot stat ‘/path/to/localfile.txt’: No such file or directory

    Reason:

    /path/to/localfile.txt is only a sample path. You need to create an actual file first.

    Create a test file:

    Bash
    echo “This is a test file” > /root/localfile.txt

    Then copy it:

    Bash
    cp /root/localfile.txt /mnt/cmp-s3/

    Issue: Mount Directory Does Not Exist

    Create the mount directory:

    Bash
    mkdir -p /mnt/cmp-s3

    Then run the mount command again.

    Conclusion

    CMP S3 bucket storage can be accessed from Linux using both s3cmd and s3fs.

    • s3cmd is useful for CLI-based upload/download operations.
    • s3fs is useful when you want to mount the S3 bucket as a local filesystem.

    In this setup, the bucket linux-backup-test was configured and mounted successfully on:

    Bash
    /mnt/cmp-s3
  • How to Use UFW Firewall on Linux

    1. Overview

    UFW (Uncomplicated Firewall) is a simple command-line tool used to manage firewall rules on Linux systems, primarily Ubuntu and Debian-based distributions.

    UFW is installed by default on most Ubuntu Server installations, but it is not enabled by default. You must enable it manually after configuring the required firewall rules.

    This guide explains how to install, configure, and manage UFW.

    2. Prerequisites

    Before you begin, ensure that you have:

    • A Linux server running Ubuntu or Debian.
    • Root or sudo privileges.
    • SSH access already configured if you are managing the server remotely.

    3. Verify That UFW Is Installed

    Check whether UFW is installed:

    Bash
    which ufw

    If UFW is not installed, install it using:

    Bash
    sudo apt install ufw -y

    4. Check the UFW Status

    View the current firewall status:

    Bash
    sudo ufw status

    5. Configure Default Firewall Policies

    It is recommended to configure the default firewall policies before enabling UFW.
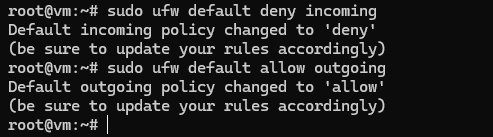
    Block all incoming connections:

    Bash
    sudo ufw default deny incoming

    Allow all outgoing connections:

    Bash
    sudo ufw default allow outgoing

    This configuration blocks all incoming traffic while allowing all outgoing traffic.

    6. Allow Required Services

    Before enabling UFW, allow any services that require network access.

    Allow SSH
    For the default SSH port:

    Bash
    sudo ufw allow ssh

    If SSH uses a custom port (for example, 2222):

    Bash
    sudo ufw allow 2222/tcp

    Note: Allow SSH before enabling UFW to avoid losing remote access.

    Allow HTTP and HTTPS

    Bash
    sudo ufw allow 80/tcp
    sudo ufw allow 443/tcp

    Allow MySQL

    Bash
    sudo ufw allow 3306/tcp

    Allow Traffic from a Specific IP Address

    Bash
    sudo ufw allow from 192.168.xx.xx

    7. Enable UFW

    Before enabling the firewall, verify that SSH access has been allowed.

    Check the current rules:

    Bash
    sudo ufw status

    Ensure that one of the following rules is present:

    • OpenSSH
    • 22/tcp
    • Your custom SSH port (for example, 2222/tcp)

    Important: If SSH is not allowed before enabling UFW, you may lose remote access to the server.
    Enable the firewall:

    Bash
    sudo ufw enable

    Display the current firewall configuration:

    Bash
    sudo ufw status verbose

    8. Enable UFW Logging

    Enable logging for monitoring and troubleshooting:

    Bash
    sudo ufw logging on

    9. Verify IPv6 Support

    If IPv6 is enabled on the server, verify that UFW is configured to manage IPv6 traffic.
    Check the UFW configuration:

    Bash
    sudo grep IPV6 /etc/default/ufw

    If IPv6 support is disabled in UFW, services may still be accessible over IPv6 even when IPv4 access is restricted.

    10. Cloud Security Groups and UFW

    Cloud Security Groups operate at the network level, while UFW operates inside the Linux operating system.

    • Cloud Security Groups determine whether traffic can reach the Virtual Machine.
    • UFW determines whether traffic is allowed or blocked inside the Virtual Machine.

    How They Work Together

    • If a port is blocked by the Cloud Security Group, traffic will not reach the Virtual Machine, even if UFW allows it.
    • If a port is allowed by the Cloud Security Group, UFW can still block access inside the Virtual Machine.

    Best Practice

    For improved security, use both:

    • Cloud Security Groups as the first layer of protection.
    • UFW as the second layer inside the server.

    11. View Firewall Rules with Numbers

    Display all configured firewall rules with line numbers:

    Bash
    sudo ufw status numbered

    This makes it easier to identify and remove specific rules.

    12. Remove a Firewall Rule

    First, display the numbered rules:

    Bash
    sudo ufw status numbered

    Remove a rule by specifying its number:

    Bash
    sudo ufw delete <rule_number>

    Example:

    Bash
    sudo ufw delete 3
  • How to Set a Password on a Linux Virtual Machine

    1. Overview

    This guide explains how to set or reset the password of a newly created or existing Linux Virtual Machine (VM).

    2. Set or Reset the Password

    Step 1: Log In to the Cloud Dashboard

    Sign in to the Cloud dashboard using your account credentials.

    Step 2: Select the Virtual Machine

    Navigate to the list of Virtual Machines and select the Linux VM for which you want to set or reset the password.

    Step 3: Open the Console

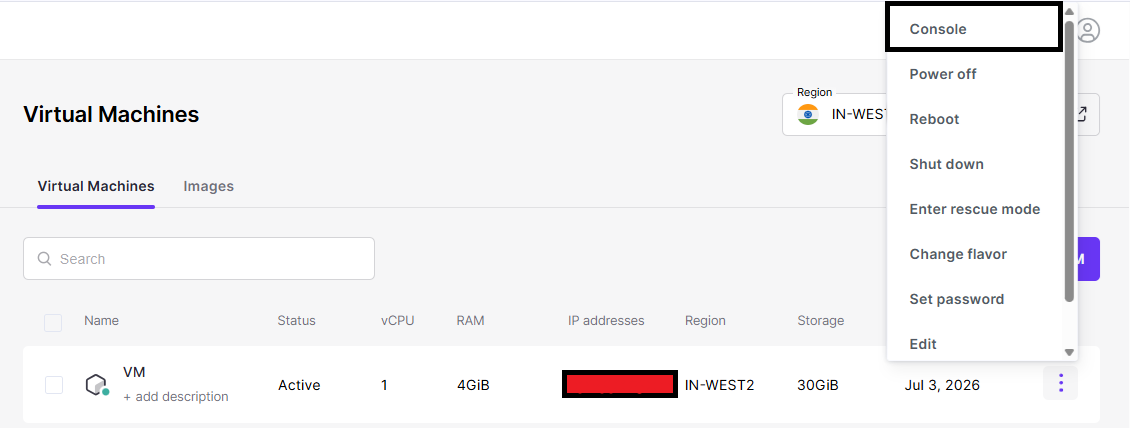
    Click the Console drop-down menu.

    Console

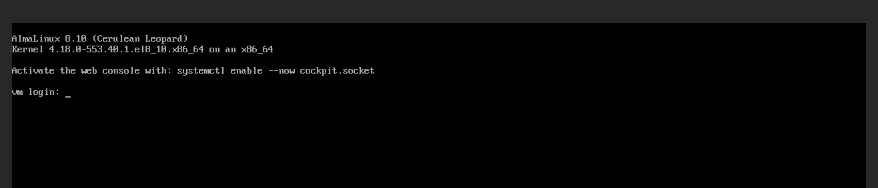
    Step 4: Log In to the Virtual Machine

    Log in to the Virtual Machine using the existing password.

    If you do not have a password, refer to the appropriate article to set the initial password before continuing.

    Console

    Step 5: Change the Password

    Run the following command to set a new password:

    Bash
    passwd <username>

    For most Linux images, the default user is root.
    Example:

    Bash
    passwd root

    After entering and confirming the new password, use the updated credentials for future logins.

    Console root

    3. Password Requirements

    When creating a new password, follow these guidelines:

    • Minimum length of 12–16 characters.
    • Include uppercase letters, lowercase letters, numbers, and special characters (such as @, #, $).
    • Avoid common or easily guessed words.
    • Do not reuse previously used passwords.

    Following these guidelines helps improve the security of your Virtual Machine and reduces the risk of unauthorized access.

  • How to Set the Password for a Newly Created Virtual Machine from the Advance Panel

    1. Overview

    This guide explains how to set or reset the login password for a Virtual Machine (VM) using the Cloud Advance panel.

    You can use this feature to:

    • Set the initial password for a newly created VM.
    • Reset a forgotten password.
    • Update the existing password for security purposes.

    2. Prerequisites

    Before setting or resetting the password, ensure that:

    • The Virtual Machine is in the Running state.

    Note: The password cannot be set or reset if the VM is powered off. Start the VM before proceeding.

    3. Set the VM Password

    Step 1: Open the Virtual Machine

    1. Log in to the Cloud Advance panel.
    2. From the left navigation menu, select Virtual Machines.
    3. Click the name of the Virtual Machine.
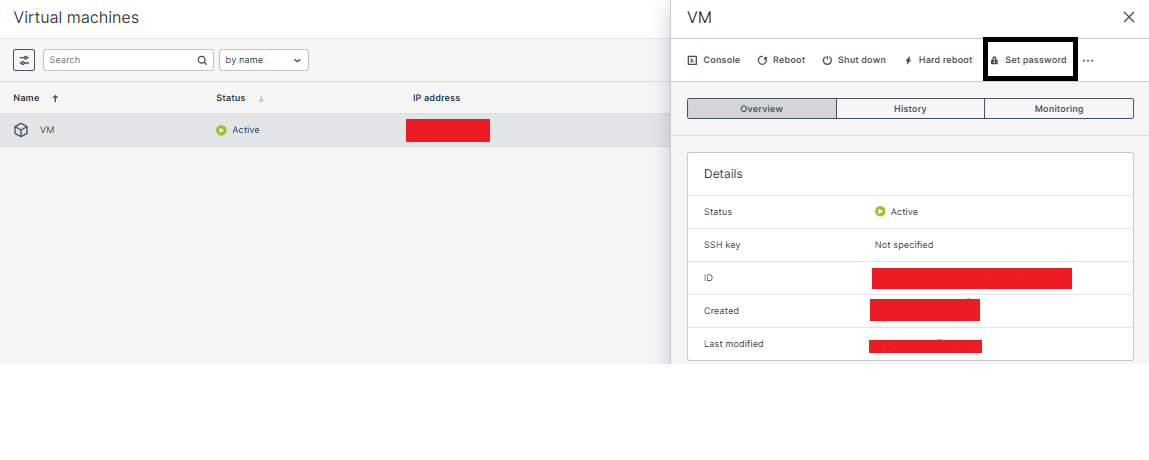
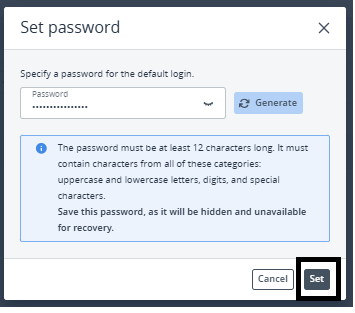
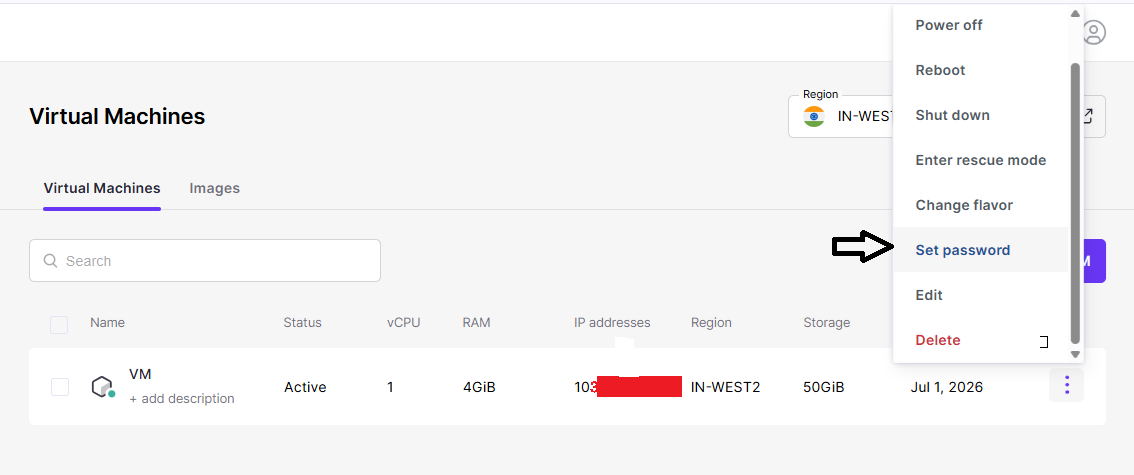
    4. Click Set Password.

    PasswordNote: If the Set Password option is unavailable or disabled, the QEMU Guest Agent may not be installed or running.
    4. QEMU Guest Agent Requirement

    The Set Password feature requires the QEMU Guest Agent to be installed and running inside the Virtual Machine.

    This feature works automatically on standard operating system images such as:

    • Ubuntu
    • Debian
    • CentOS

    It may not be available on Virtual Machines created from custom ISO images.

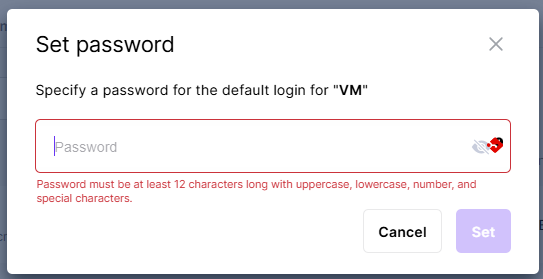
    5. Enter or Generate a Password

    You can choose either of the following options:

    • Click Generate Password to automatically create a strong password.
    • Enter a new password manually.

    6. Apply the Password

    1. Click Set.
    2. Wait for the confirmation message indicating that the password has been updated successfully.


    Set

    7. Default User Accounts

    The password is applied to the default operating system user.
    Operating System         Default User
    Ubuntu                                 root
    Debian                                  root
    CentOS / Rocky Linux root
    Windows                             Administrator

    8. Password Requirements

    The new password must meet the following requirements:

    • Minimum length of 12–16 characters.
    • Include uppercase letters, lowercase letters, numbers, and special characters (such as @, #, $).
    • Avoid common or easily guessed words.
    • Do not reuse previously used passwords.

    Following these guidelines helps improve the security of your Virtual Machine.

    9. Verify the New Password

    After setting or resetting the password, verify that you can log in successfully.

    Windows Virtual Machines

    Note: Before connecting through RDP, ensure that port 3389 is allowed in the Cloud Security Group. If port 3389 is blocked, the RDP connection will fail even if the password has been updated successfully.

    1. Open a new Remote Desktop (RDP) connection.
    2. Connect to the VM using its IP address.
    3. Enter the Administrator username and the new password.
    4. Verify that the login is successful.

    Linux Virtual Machines

    Note: Before connecting through SSH, ensure that port 22 is allowed in the Cloud Security Group. If port 22 is blocked, the SSH connection will fail even if the password has been updated successfully.

    Open a terminal and connect to the VM using SSH:

    Bash
    ssh username@<VM_IP>

    Enter the username and the new password to verify that the login is successful.

  • How to Secure the SSH Port in Linux

    1. Overview

    Securing SSH access helps protect your Linux server from unauthorized access and automated attacks.

    This guide explains how to secure the SSH service on Ubuntu and AlmaLinux, including operating system-specific commands where required.

    2. Change the Default SSH Port

    Changing the default SSH port (22) can help reduce automated scanning and attack attempts.

    Step 1: Edit the SSH Configuration

    Open the SSH configuration file:

    Bash
    sudo nano /etc/ssh/sshd_config

    Locate the following line:

    Port 22

    Change it to a different port number, for example:

    Port 24357

    Note: Choose a port number between 1024 and 65535.

    Step 2: Restart the SSH Service

    Ubuntu

    Bash
    sudo systemctl restart ssh

    AlmaLinux

    Bash
    sudo systemctl restart sshd

    3. Update Firewall Rules

    Allow the new SSH port through the firewall before restarting the SSH service.

    Ubuntu (UFW)

    Bash
    sudo ufw allow 24357/tcp
    sudo ufw enable

    AlmaLinux (firewalld)

    Bash
    sudo firewall-cmd –permanent –add-port=24357/tcp
    sudo firewall-cmd –reload

    4. Disable Root Login

    Disabling direct root login provides an additional layer of security.

    Open the SSH configuration file:

    Bash
    sudo nano /etc/ssh/sshd_config

    Add or update the following setting:

    PermitRootLogin no

    Restart the SSH service after saving the changes.

    5. Use SSH Key Authentication

    SSH key authentication is more secure than password-based authentication.

    Option A: Use the SSH Key Pair Generated During VM Creation

    When creating the Virtual Machine, select the option to generate a new SSH key pair.

    A .pem file (for example, MYSSHKey.pem) will be downloaded to your local computer.

    Set the correct file permission:

    Bash
    chmod 400 MYSSHKey.pem

    Navigate to the directory containing the key:

    Bash
    cd Downloads/

    Connect to the server using the SSH key:

    Bash
    ssh -i MYSSHKey.pem root@your-server-ip -p 24357

    Note: No password is required when using the .pem file provided during VM creation.

    Option B: Generate an SSH Key Pair on Your Local Machine

    Generate a new SSH key pair:

    Bash
    ssh-keygen -t rsa -b 4096

    The keys are created in the following locations:
    Public key: ~/.ssh/id_rsa.pub
    Private key: ~/.ssh/id_rsa
    Note: Do not share your private key.

    Copy the Public Key to the Server

    Run:

    Command Prompt
    ssh-copy-id -p 24357 root@your-server-ip

    Enter the user’s password when prompted.
    Alternatively, copy the contents of:

    ~/.ssh/id_rsa.pub

    to:

    ~/.ssh/authorized_keys

    on the remote server.

    Set the Correct Permissions

    Bash
    chmod 700 ~/.ssh
    chmod 600 ~/.ssh/authorized_keys

    Disable Password Authentication

    Edit the SSH configuration file:

    Bash
    sudo nano /etc/ssh/sshd_config

    Update the following settings:

    PasswordAuthentication no
    ChallengeResponseAuthentication no
    UsePAM no

    Restart the SSH service after saving the configuration.

    6. Install and Configure Fail2Ban

    Fail2Ban helps protect the server from brute-force login attempts.

    Install Fail2Ban

    Ubuntu

    Bash
    sudo apt install fail2ban

    AlmaLinux

    Bash
    sudo dnf install epel-release -y
    sudo dnf install fail2ban -y

    Enable and Start the Service

    Bash
    sudo systemctl enable fail2ban –now

    Configure Fail2Ban (Optional)

    Create or edit the following configuration file:

    Bash
    /etc/fail2ban/jail.local

    Enable the SSH jail as required.

  • How to Reset the Password of a Windows Virtual Machine

    1. Overview

    This guide explains how to reset the Administrator password of a Windows Virtual Machine (VM) using the Cloud dashboard.

    2. Prerequisites

    Before resetting the password, ensure that:

    • You have access to the Cloud dashboard.
    • The Windows Virtual Machine is in the Running state.

    Note: Password reset is available only when the VM is powered on. If the VM is stopped, start it before proceeding.

    3. Reset the Windows VM Password

    Step 1: Log In to the Cloud Dashboard

    Sign in to the Cloud dashboard using your account credentials.

    Step 2: Open the Virtual Machines List

    1. Navigate to the list of Virtual Machines.
    2. Select the Windows VM for which you want to reset the password.

    Dashboard

    Step 3: Open the Action Menu

    From the VM details page, click the Action drop-down menu.

    Select Set Password.

    Step 4: Enter a New Password

    Enter a new password for the Windows VM.

    Step 5: Apply the Password

    Click Set to apply the new password.

    The password for the Administrator account will be updated.

    4. Password Requirements

    The new password must meet the following requirements:

    • Minimum length of 12–16 characters.
    • Include uppercase letters, lowercase letters, numbers, and special characters (such as @, #, $).
    • Avoid common or easily guessed words.
    • Do not reuse previously used passwords.

    Following these guidelines helps improve the security of your virtual machine.

    5. Verify the New Password

    After resetting the password, verify that you can log in successfully.

    For Windows Virtual Machines:

    Note: Before connecting through RDP, ensure that port 3389 is allowed in your Cloud Security Group. If port 3389 is blocked, the RDP connection will fail even if the password has been reset successfully.

    1. Open a new Remote Desktop (RDP) connection to the VM’s IP address.
    2. Enter the Administrator username and the new password.
    3. Confirm that you can successfully log in.

    6. Troubleshooting

    Unable to Connect Through RDP After Password Reset

    If the password reset is successful but the RDP connection fails, verify the following:

    • Firewall / Security Group: Ensure TCP port 3389 is allowed for your IP address in the Cloud Security Group.
    • VM Status: Confirm that the VM is still in the Running state.
    • Username: Verify that you are signing in with the Administrator account.


  • How to Delete an Old Virtual Machine and Create a New Virtual Machine with the Same IP Address

    1. Overview

    This guide explains how to delete an existing Virtual Machine (VM) and create a new VM using the same IP address.

    2. Delete the Existing Virtual Machine

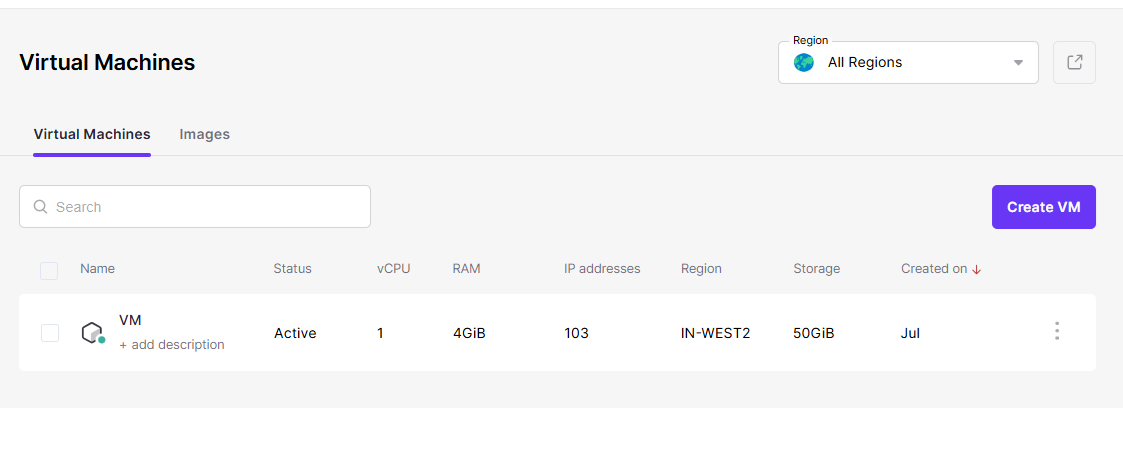
    1. Log in to the Cloud dashboard.
    2. Navigate to Infrastructure → Virtual Machines.
    3. Locate the VM that is using the IP address you want to reuse.
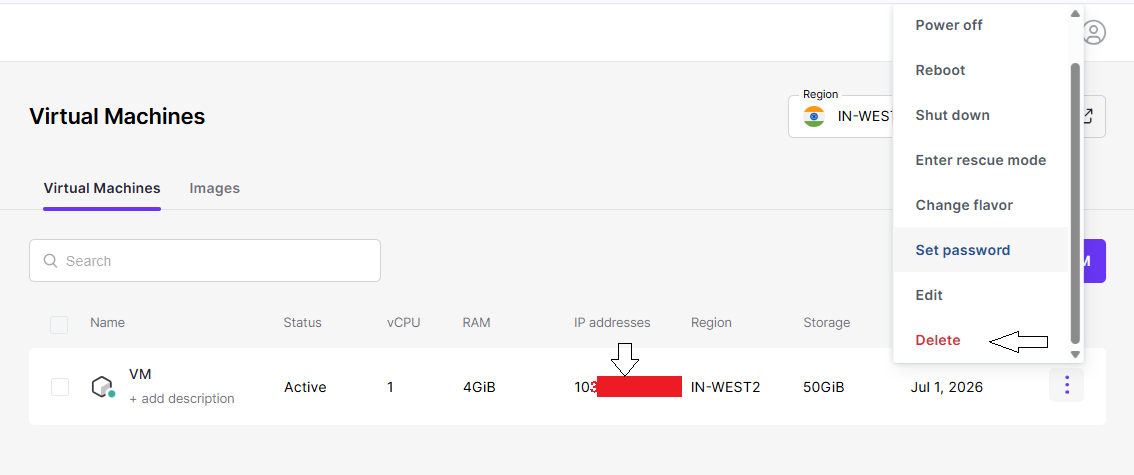
    4. Open the Actions menu (⋯).
    5. Click Delete.

    Dashboard

    3. Create a New Virtual Machine

    1. Start the process to create a new Virtual Machine.
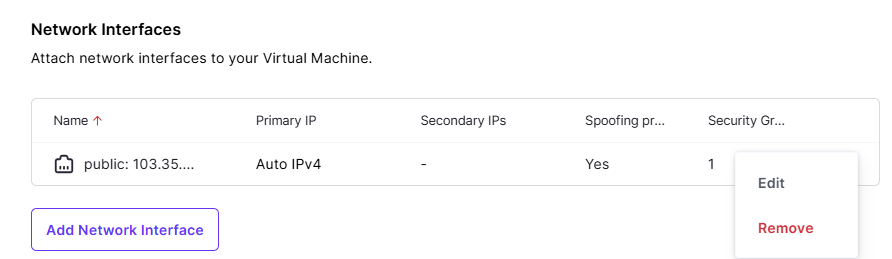
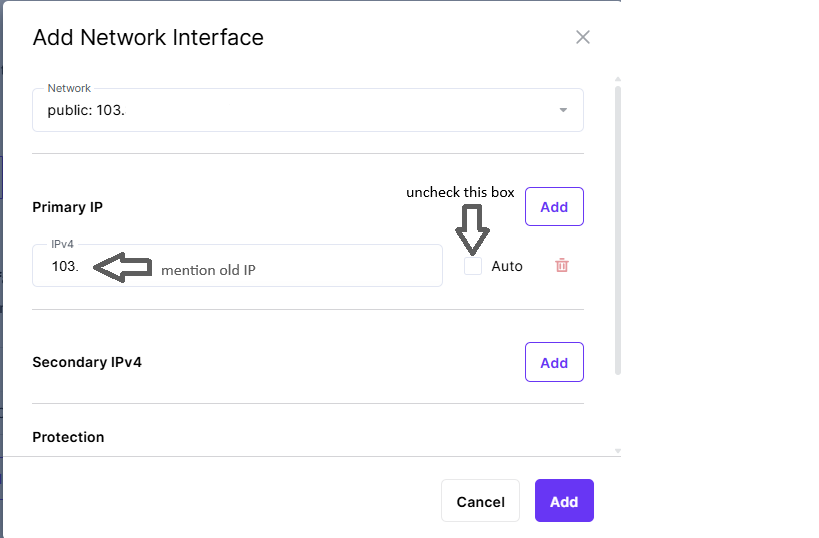
    2. During the configuration, go to Network Interfaces.
    3. Click Edit.

    Network

    4. Assign the Existing IP Address

    In the Edit Network window:

    1. Clear the Auto option.
    2. Enter the IP address of the deleted VM in the Primary IP field.
    3. Click Save.

    Network

    5. Result

    The new Virtual Machine will be created using the same IP address that was assigned to the previous VM.

  • How to Copy Files Over SSH Using rsync

    1. Overview

    This guide explains how to securely copy files from one server to another using rsync over SSH.

    Using rsync over SSH is a secure and efficient method for transferring and synchronizing files. It is commonly used for backups, data migration, and scheduled file synchronization.

    2. Prerequisites

    Before you begin, ensure that:

    • SSH access is enabled on both servers.
    • rsync is installed on both servers.
    • You have root or sudo privileges.

    3. Install rsync

    If rsync is not already installed, install it on both the source and destination servers.

    Debian / Ubuntu

    Bash
    apt install rsync -y

    CentOS / RHEL / AlmaLinux

    Bash
    yum install rsync -y

    4. Configure SSH Key-Based Authentication

    To avoid entering the SSH password for every rsync operation, configure SSH key-based authentication from the source server to the destination server.

    Step 1: Generate an SSH Key Pair

    On the source server, run:

    Bash
    ssh-keygen -t rsa -b 4096 -C “rsync-ssh-key”
    • Press Enter to accept the default location (/root/.ssh/id_rsa).
    • Leave the passphrase empty if passwordless authentication is required.

    Step 2: Copy the Public Key to the Destination Server

    Run the following command:

    Bash
    ssh-copy-id root@destination-vm

    This copies the public key (id_rsa.pub) to the destination server and adds it to the ~/.ssh/authorized_keys file.

    Step 3: Verify the SSH Connection

    Test the SSH login:

    ssh root@destination-vm

    If the configuration is successful, you should be able to log in without entering a password.

    5. Copy Files Using rsync

    Use the following command to copy files over SSH:

    Bash
    rsync -avz -e ssh /path/to/source-directory/ root@destination-vm:/path/to/destination-directory/

    Command Options :
    -a
    Archive mode. Preserves file permissions, timestamps, and symbolic links.

    -v
    Displays detailed output during the transfer.

    -z
    Compresses data during transfer.

    -e ssh
    Uses SSH as the transport protocol.

    6. Example: Copy a Directory

    To copy the contents of /var/www/html to /var/www/backup on the destination server:

    Bash
    rsync -avz -e ssh /var/www/html/ root@destination-vm:/var/www/backup/

    Note: A trailing slash (/) on the source directory copies only the contents of the directory. Without the trailing slash, the entire directory is copied.

    7. Perform a Dry Run

    To preview the files that will be transferred without making any changes, run:

    Bash
    rsync -avz –dry-run -e ssh /var/www/html/ root@destination-vm:/var/www/backup/

    8. Automate rsync Using Cron

    Open the crontab editor:

    Bash
    crontab -e

    Example: Run the rsync command every day at 2:00 AM.

    Bash
    0 2 * * * rsync -avz -e ssh /var/www/html/ root@destination-vm:/var/www/backup/ >> /var/log/rsync.log 2>&1

    9. Troubleshooting

    Permission Denied

    Verify that SSH key-based authentication is configured correctly and that the SSH key permissions are correct.

    Connection Refused

    Ensure that the SSH service is running on the destination server.

    Path Errors

    Verify that the source and destination directories exist before running the command.

    10. Conclusion

    Using rsync with SSH provides a secure and efficient way to transfer files between servers. It is well suited for backups, data migration, and automated file synchronization while preserving file attributes during the transfer.