1. Overview
RDP (Remote Desktop Protocol) is a Microsoft protocol that allows you to remotely access and control a Windows computer over a network or the internet.
By default, RDP uses port 3389.
When you connect using the Remote Desktop Connection (mstsc.exe) application, your keyboard, mouse, and screen are transmitted to the remote computer, allowing you to control it through a graphical interface.
2. Enable RDP on a New Windows Server VM
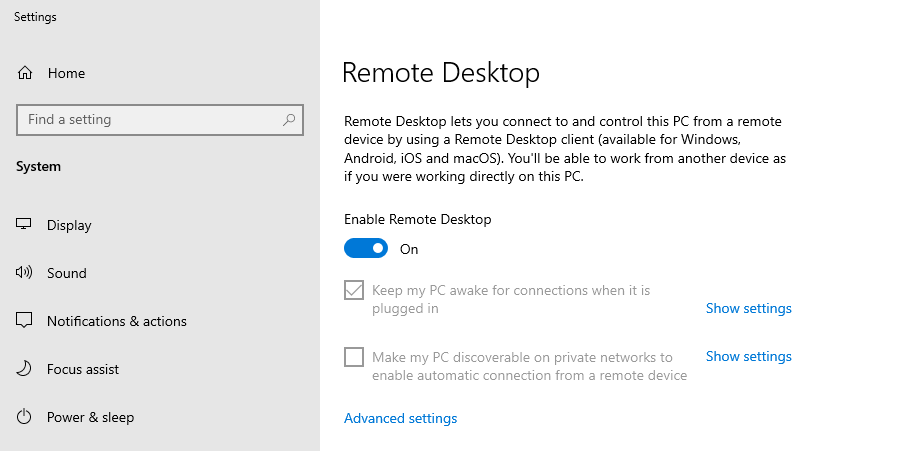
Step 1: Enable Remote Desktop
- Open Start → Settings → System → Remote Desktop.
- Turn Enable Remote Desktop to On.
- Click Confirm when prompted.
Step 2: Allow RDP Through Windows Firewall
- Open Windows Defender Firewall.
- Click Allow an app or feature through Windows Defender Firewall.
- Make sure Remote Desktop is enabled for the required network profiles (Private and/or Public).
Step 3: Configure User Access
- Right-click This PC and select Properties.
- Click Remote Settings.
- Under Remote Desktop, click Select Users.
- Add the user accounts that should be allowed to connect through RDP.
3. Change the Default RDP Port
Step 1: Open Registry Editor
- Press Windows + R.
- Type regedit and press Enter.
- If prompted by User Account Control (UAC), click Yes.
Step 2: Locate the RDP Port Setting
Navigate to the following registry path:
HKEY_LOCAL_MACHINE
└─ System
└─ CurrentControlSet
└─ Control
└─ Terminal Server
└─ WinStations
└─ RDP-Tcp
Step 3: Change the Port Number
- In the right pane, locate PortNumber.
- Double-click PortNumber.
- Select Decimal under Base.
- Enter the new port number (for example, 3390 or 5000).
- Click OK.
Tip: Choose a port number between 1025 and 65535 that is not already in use.
Step 4: Allow the New Port Through Windows Firewall
- Open Windows Defender Firewall with Advanced Security.
- Select Inbound Rules.
- Click New Rule.
- Select Port, then click Next.
- Choose TCP and enter the new port number.
- Click Next.
- Select Allow the connection.
- Click Next.
- Select the required network profiles (Domain, Private, and/or Public).
- Click Next.
- Enter a name for the rule (for example, Custom RDP Port).
- Click Finish.
Step 5: Apply the Changes
Restart the server.
Or restart the Remote Desktop service using Command Prompt with administrative privileges:
net stop termservice
net start termservice
Tip: Record the new RDP port number and verify that you can connect successfully before ending your current remote session. This helps prevent accidental loss of access to the server.