Blog

  • Managing Backups


    There are two types of backups:


    1- Full Backup : Copies the entire compute volume.


    2- Incremental Backup : Copies only the changes made since the last backup.

    To create a backup plan:

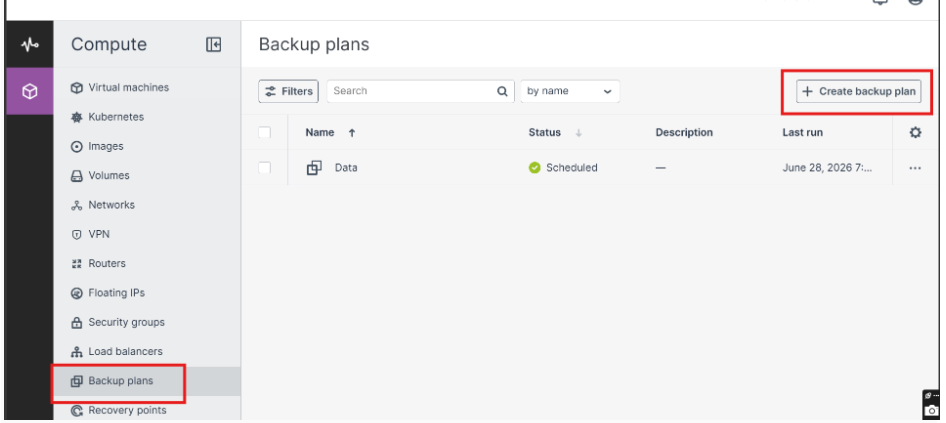
    1. Go to the Backup Plans screen and click Create Backup Plan.

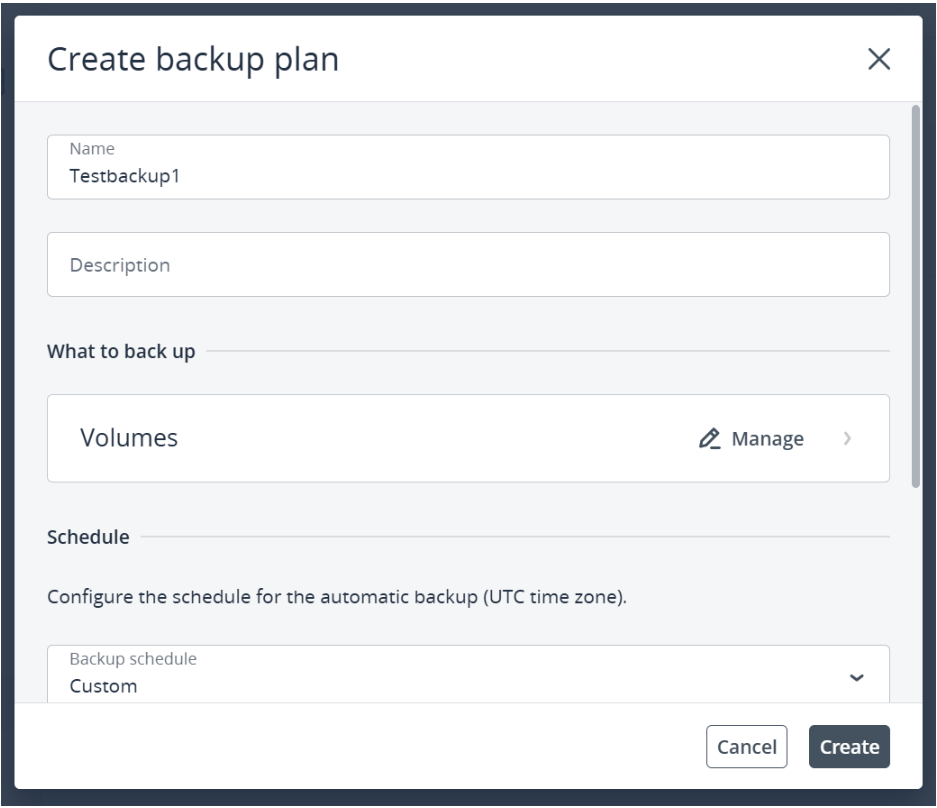
    1. In the Create Backup Plan window:
    • Enter a name for the backup plan.
    • Optionally, add a description (avoid personal or sensitive information).

    1. Under What to back up, click Manage.
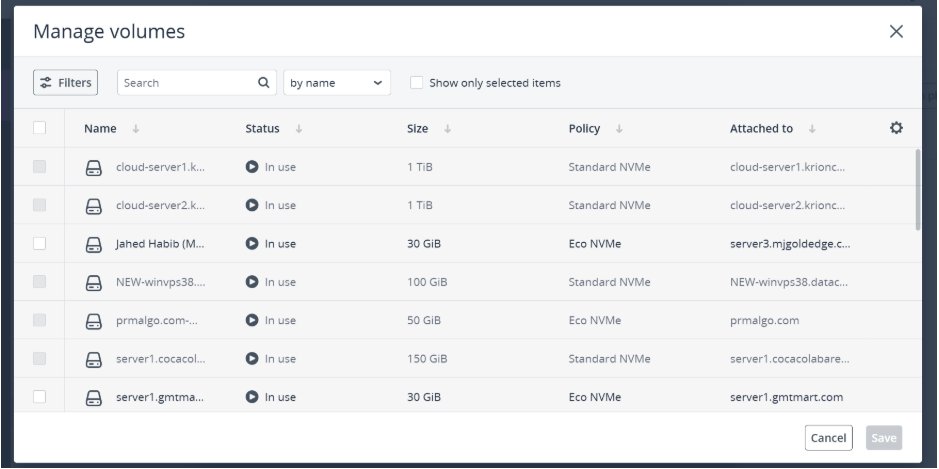
    • In the Manage Volumes window, select the volumes you want to include in the backup plan.
    • Click Save.

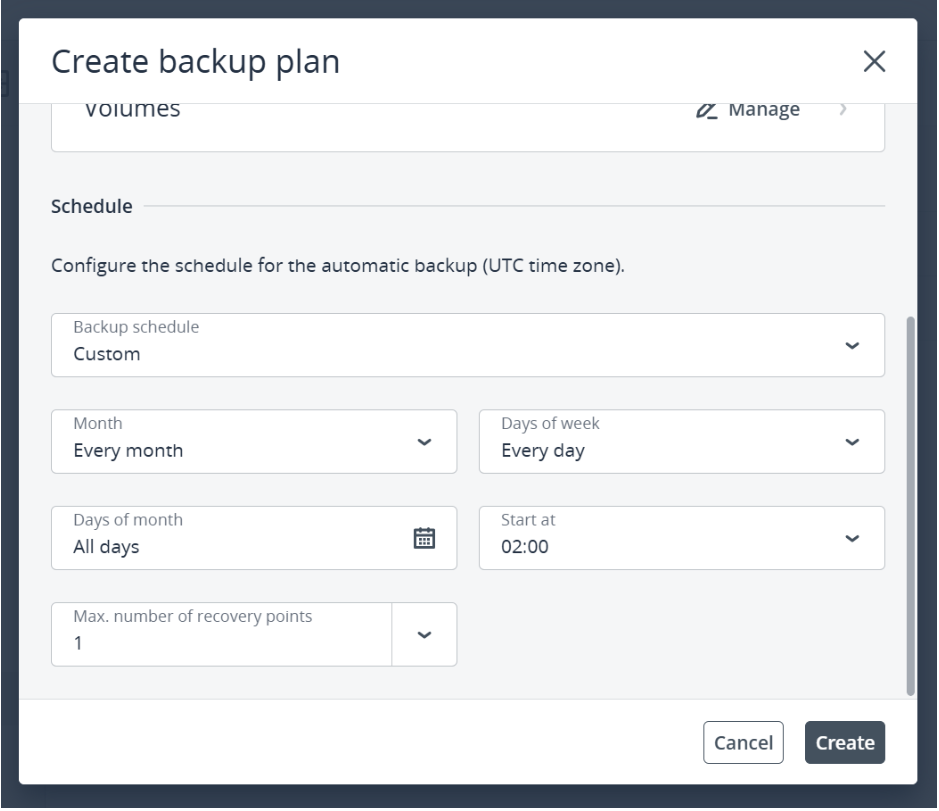
    1. Under Schedule, choose the backup schedule:
    • Retention: 7 Days – Creates a daily backup of the selected volumes and keeps up to 7 full backup chains. In this case, the max number of recovery point is 1.
    • Retention: 14 Days – Creates a daily backup of the selected volumes and keeps up to 14 full backup chains. In this case, the max number of recovery point is 2.
    • Custom Retention – Allows you to set a custom backup schedule. You can choose specific months, days of the week, days of the month, backup time, and the maximum number of full recovery points to keep.

    1. Click Create.

    To Add Volumes to a Backup Plan:

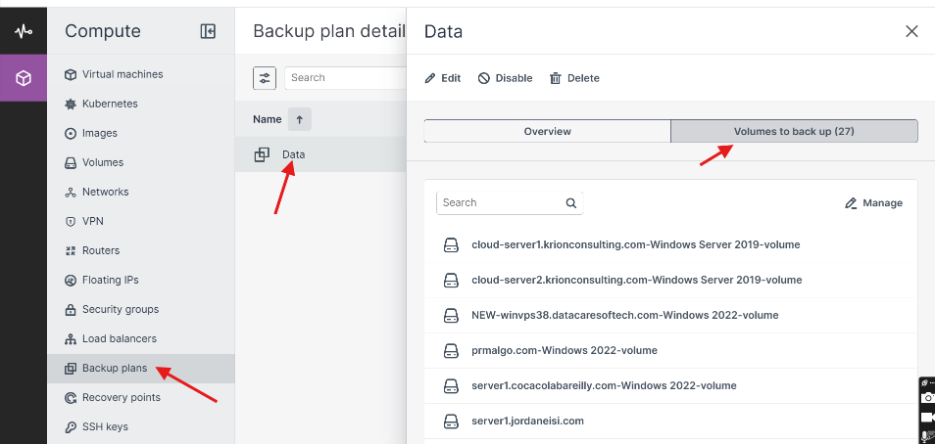
    1. Go to the Backup Plans screen and select the backup plan you want.
    2. On the right, open the Volumes to Back Up tab to see the current volumes.
    3. Click Manage above the list.
    4. In the Manage Volumes window, select the volumes you want to add.

    5. Click Save.
    To Remove Volumes from a Backup Plan:

    1. Go to the Backup Plans screen and select the backup plan you want.
    2. On the right, open the Volumes to Back Up tab to see the current volumes.
    3. Click Manage above the list.
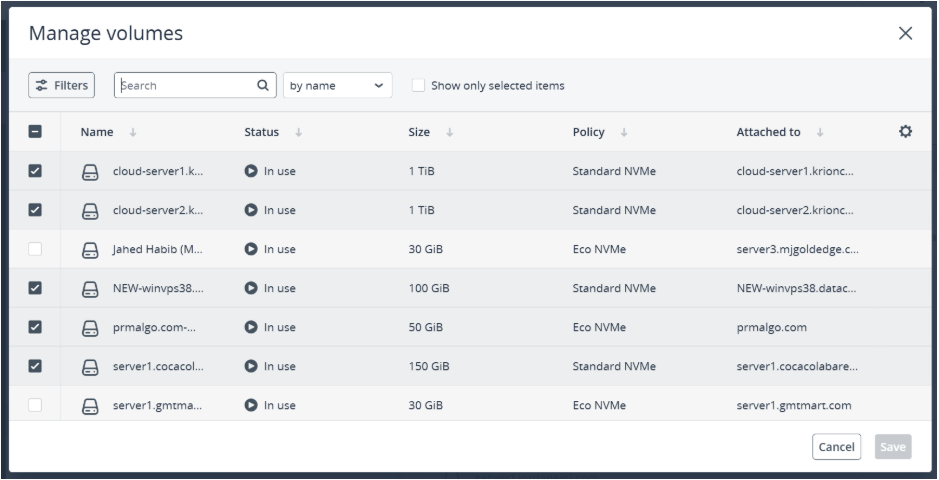
    4. In the Manage Volumes window:

    • Uncheck the volumes you want to remove.

    • To filter and view only assigned volumes, check Show Only Selected Items near the search bar.

    5. Click Save.


  • How to Add Your Own ISO Image to Cantech Cloud and create Virtual machine Using Custom Image


    Overview
    This article explains how to upload a custom ISO or image to your Cantech Cloud account and then create a virtual machine (VM) using that image.
    Uploading your own image allows you to install your preferred operating system, use pre-configured templates, or migrate an existing on-premise setup to Cantech Cloud.
    .

    Step 1: Upload Your Custom Image

    1. Log in to your Cantech Cloud account.
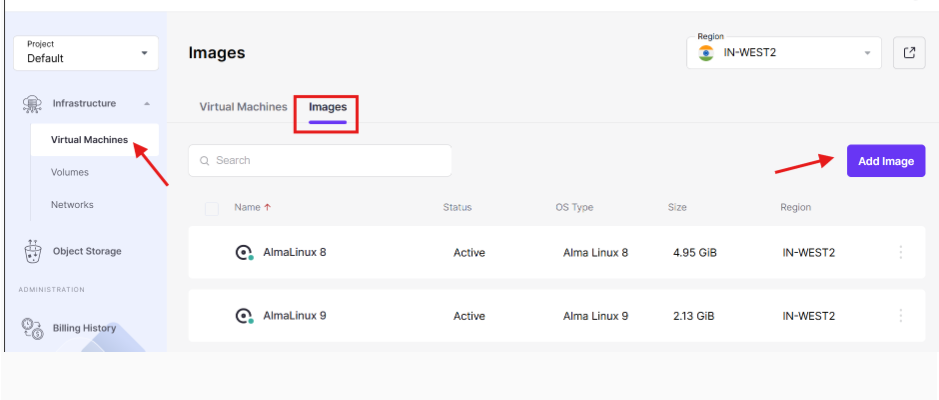
    2. In the left-hand menu, navigate to Virtual Machines → Images.
    3. Select the region where you want to upload the image.

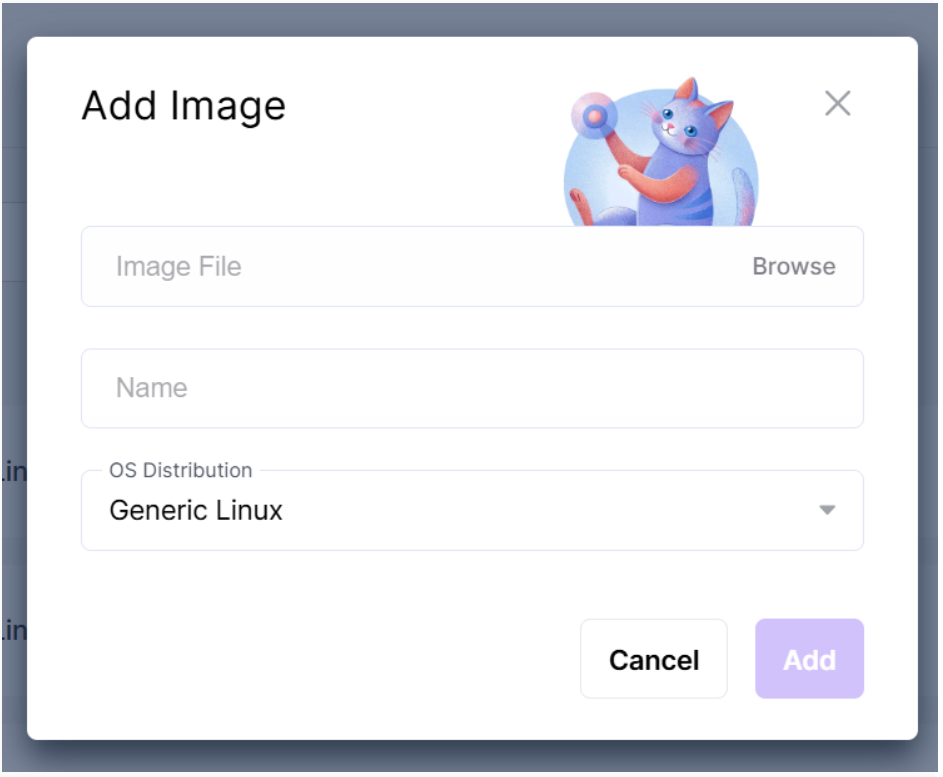
    4. Click Add Image.

    5. Choose your custom ISO/image file from your local system and click Add to begin the upload.


    Step 2: Verify the Uploaded Image

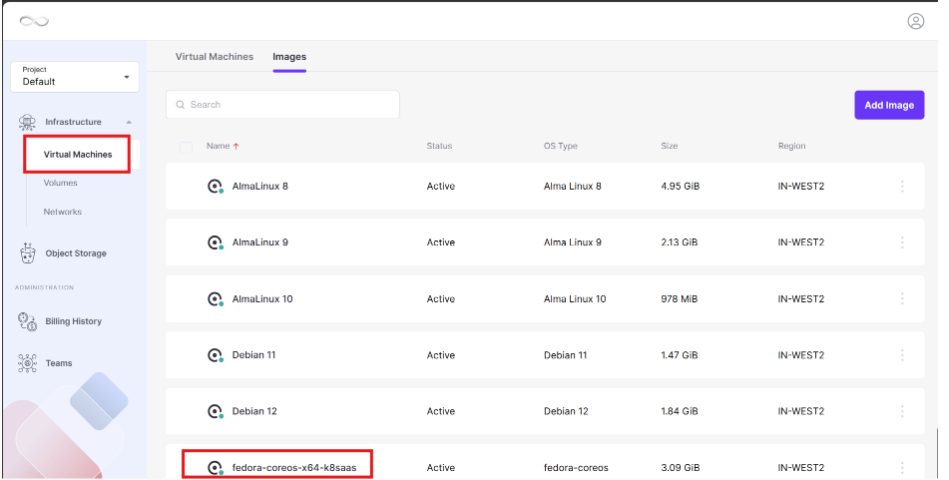
    1. Once the upload completes, go to Virtual Machines → Images.
    2. Confirm that your image appears in the list with status Available or Ready.
    3. If the status shows Processing, wait until the upload is complete before deploying.

    Step 3: Create a Virtual Machine Using the Custom Image

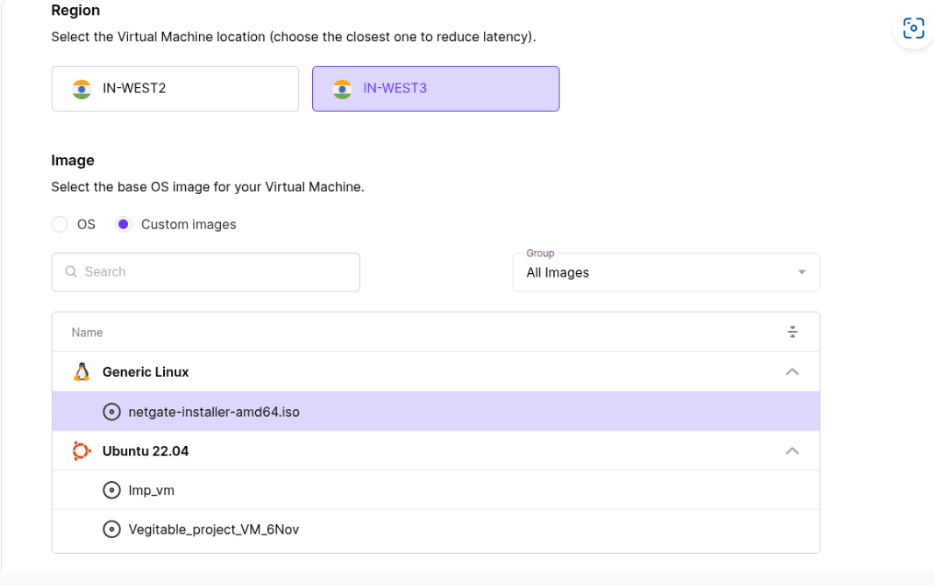
    1. Choose the same region where your image was uploaded.
    2. Navigate to Virtual Machines → Create VM
    3. From the image section, select the custom image you uploaded earlier.

    4. Configure other settings:

    Server Type: Choose the compute plan (CPU and RAM).
    Storage: Adjust the disk size
    Network: Select private/public network interfaces as needed.

    Name: Set a custom name for your Virtual Machine.

    Access: Add SSH keys or set a root password.
  • How to troubleshoot a Linux VM which is not reachable

    Step 1: Verify the VM Status in the Cloud Dashboard

    • Log in to your Cloud Dashboard.
    • Navigate to Virtual Machines.
    • Locate the affected virtual machine.
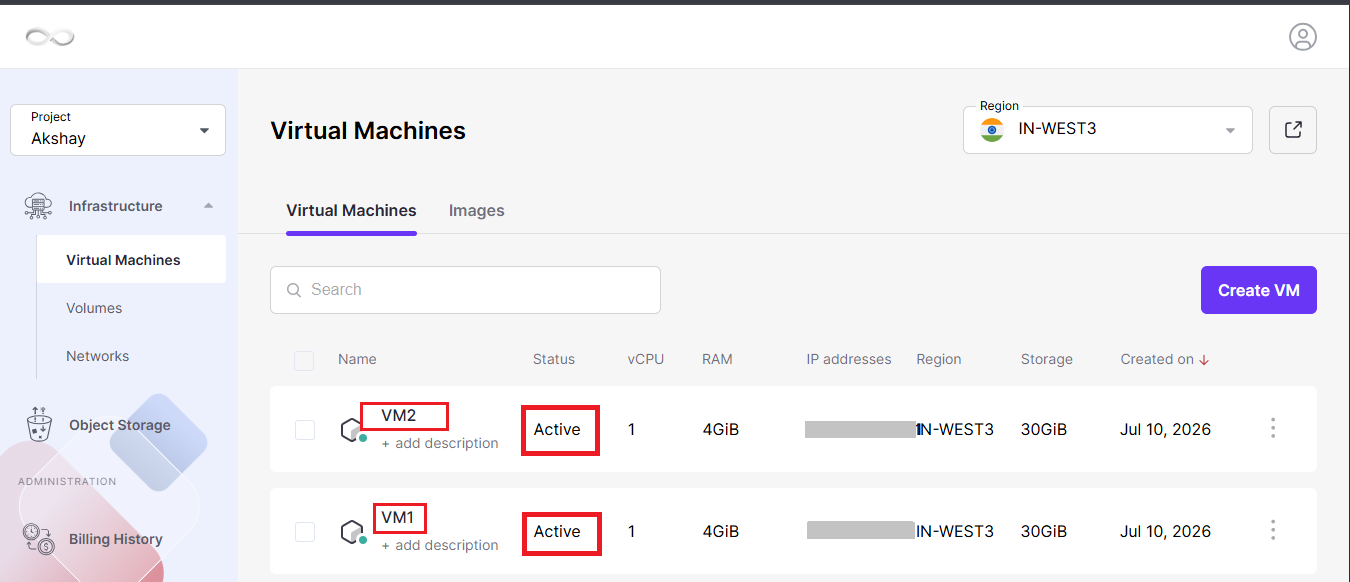
    • Check whether the VM is in the Running state.
    • If the VM is stopped, start it.
    • If it is already running but inaccessible, perform a reboot and wait for the VM to come back online.

    Verify the VM Status

    Step 2: Connect Using the Console

    • Open the Console from the Cloud Dashboard.
    • Check whether the console opens successfully.
    • If the console is accessible, the operating system is most likely running.
    • If the console opens but responds very slowly or does not accept commands:
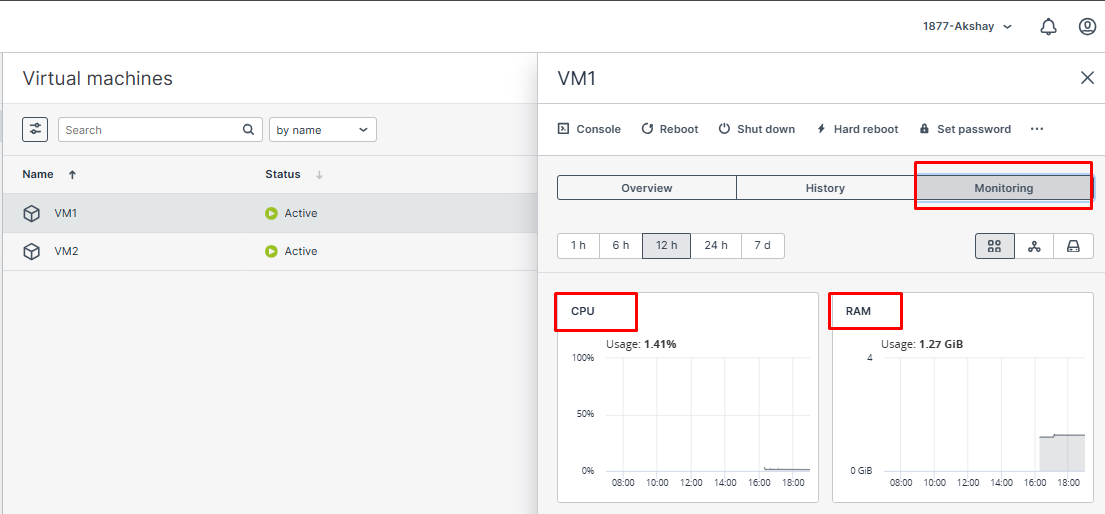
    • Open the CMP Advanced Panel.
    • Review the CPU and RAM utilization of the VPS.
    • If CPU or memory usage is unusually high:
    • Reboot the VPS.
    • Wait a few minutes and try accessing the console again.
    • If the console does not load or remains completely unresponsive, escalate the issue to the support team.

    Connect Using the Console

    Step 3: Validate Network Connectivity

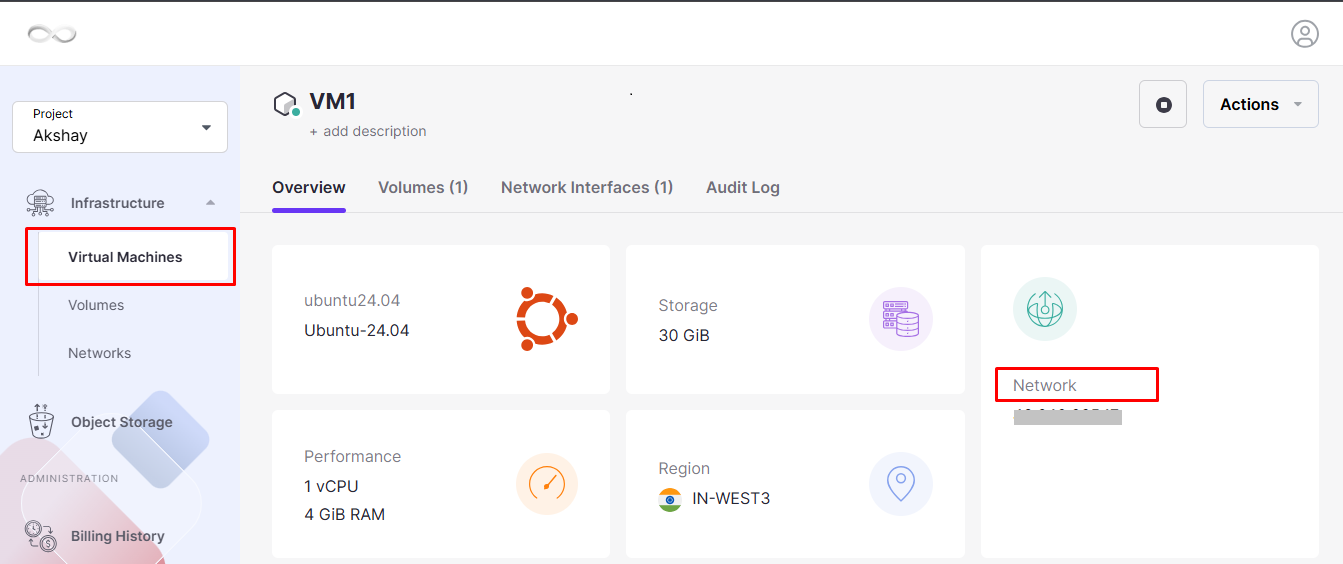
    • Confirm that the VM has a Public IP Address assigned if remote access is required.
    • From your local computer, test network connectivity by pinging the VM’s public IP.
    Bash
    ping <Public-IP>
    • If the VM does not respond to ping even though a public IP is attached, contact the support team for further investigation.
    • Verify that the required Security Group or firewall rules allow inbound traffic.
    • Ensure that the necessary ports are open and listening.

    Validate Network Connectivity

    Step 4: Check the Operating System Firewall

    A firewall configured inside the VM may block incoming connections.

    Ubuntu/Debian

    Bash
    sudo ufw status

    AlmaLinux/CentOS/RHEL

    Bash
    sudo firewall-cmd –list-all
    • Review the active firewall rules.
    • Confirm that the SSH port (or any required service port) is allowed.
    • If necessary, temporarily disable or adjust the firewall rules to verify whether the firewall is causing the connectivity issue.

    Step 5: Verify the SSH Service

    If the VM is accessible through the console but SSH connections fail, verify that the SSH daemon is running correctly.

    Check SSH Service Status

    Bash
    sudo systemctl status sshd

    or on Ubuntu:

    Bash
    sudo systemctl status ssh

    Restart the SSH Service (if required)

    Bash
    sudo systemctl restart sshd

    or

    Bash
    sudo systemctl restart ssh

    Confirm SSH Is Listening on Port 22

    Bash
    ss -tlnp | grep 22
    • If output is displayed, SSH is listening normally.
    • If no output is returned, SSH is not listening on the expected port.

    Review the SSH configuration file for incorrect settings.

    Bash
    sudo nano /etc/ssh/sshd_config

    After making changes, restart the SSH service.

    Step 6: Check Disk Usage

    A filesystem that is completely full can prevent services from functioning correctly and may make the VM inaccessible.

    Run the following command:

    Bash
    df -h

    Review the output carefully.

    • If the root (/) partition is close to or at 100% usage, free up disk space by deleting unnecessary files, clearing logs, or expanding the disk if required.
    • After reclaiming space, restart any affected services or reboot the VM if necessary.
  • Managing SSH Keys

    SSH keys offer a secure and reliable way to access your Virtual Machines (VMs) over SSH. Instead of using passwords, SSH key authentication ensures that only users with the matching private key can log in. The Cloud Region Advanced Dashboard allows you to create, manage, and delete SSH public keys for your infrastructure.

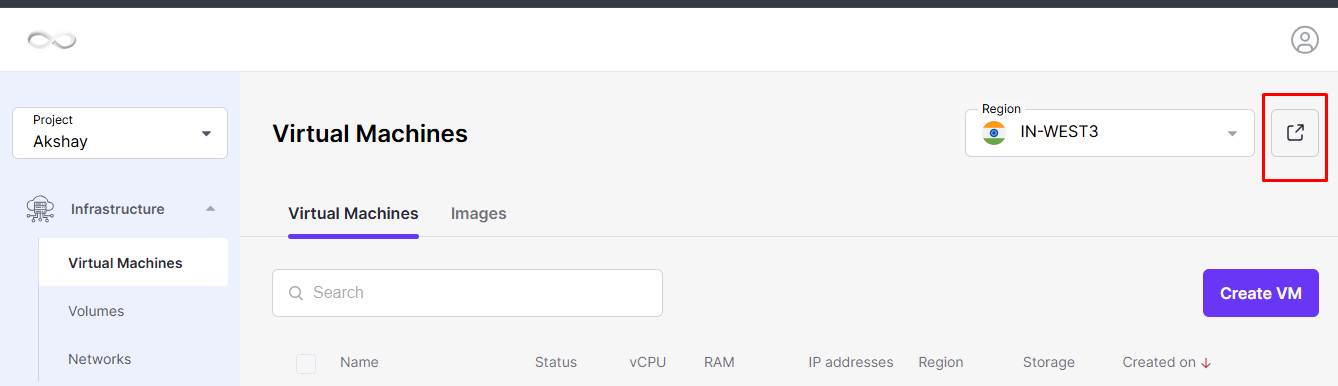
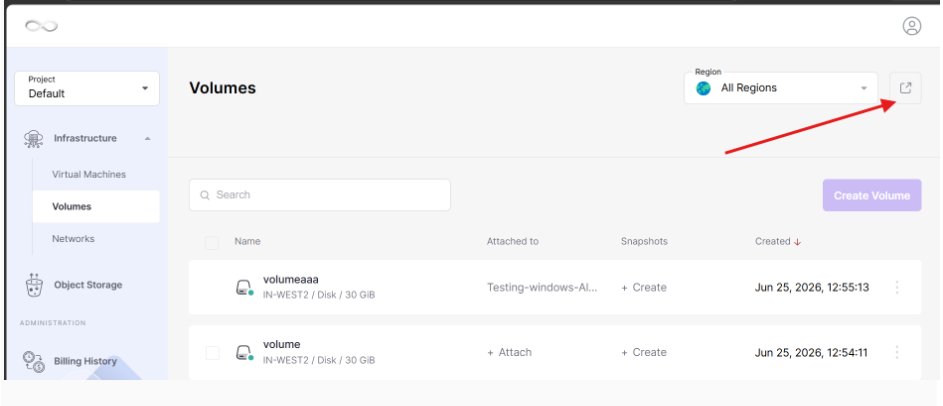
    Click the arrow to open the Region Advanced Dashboard, where you can manage your SSH keys.

    open the Region Advanced Dashboard

    Creating and Adding an SSH Public Key

    You can add an SSH public key either while creating a new virtual machine or by using the SSH Keys section in the Cloud Region Advanced Dashboard.

    Method 1: Add an SSH Key During VM Creation

    While creating a new virtual machine, choose SSH Key Authentication as the login method, as described in Section – How to Create Virtual Machines.

    Method 2: Add an SSH Key from the Dashboard

    Step 1: Generate an SSH Key Pair

    On your local computer or client machine, generate a new SSH key pair by running the following command:

    Bash
    ssh-keygen -t rsa

    After executing the command, two files will be created:

    • Private Key: Stored securely on your system (for example, /root/.ssh/id_rsa). Keep this file private and never share it.
    • Public Key: Stored as /root/.ssh/id_rsa.pub. This key is uploaded to the CloudPe platform.

    Step 2: Open the SSH Keys Page

    Log in to the Cloud Region Advanced Dashboard.

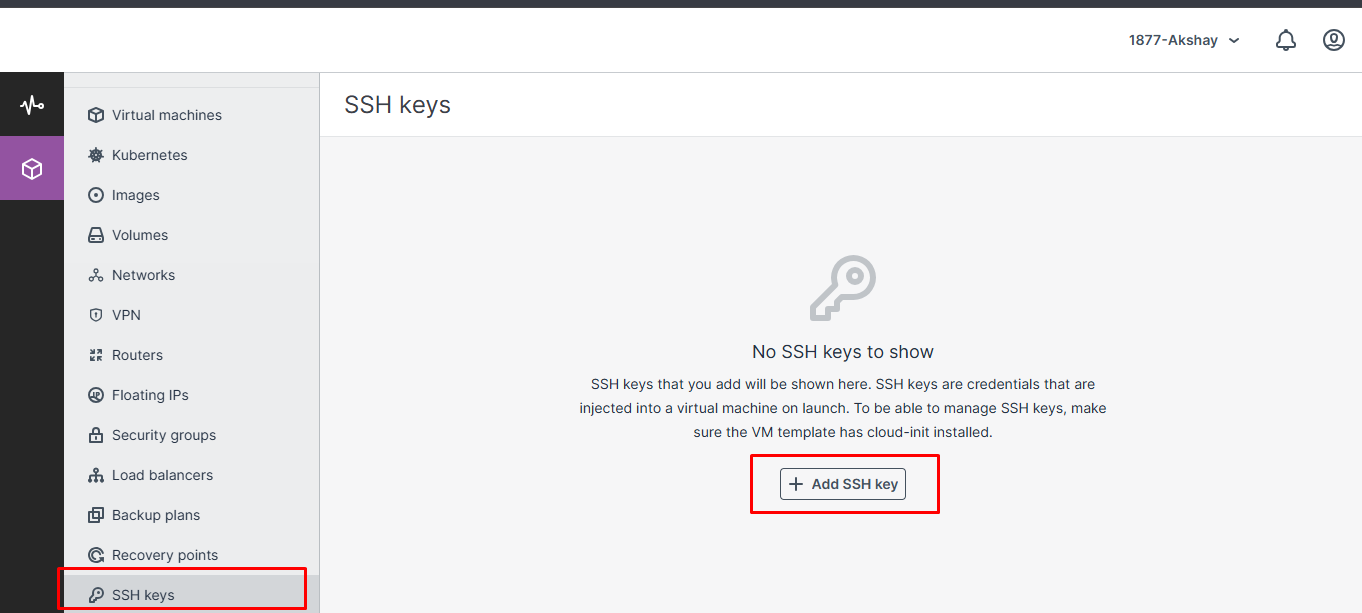
    From the left navigation menu, open the SSH Keys section.

    Step 3: Add a New SSH Key

    Click the Add Key button.

    Add a New SSH Key

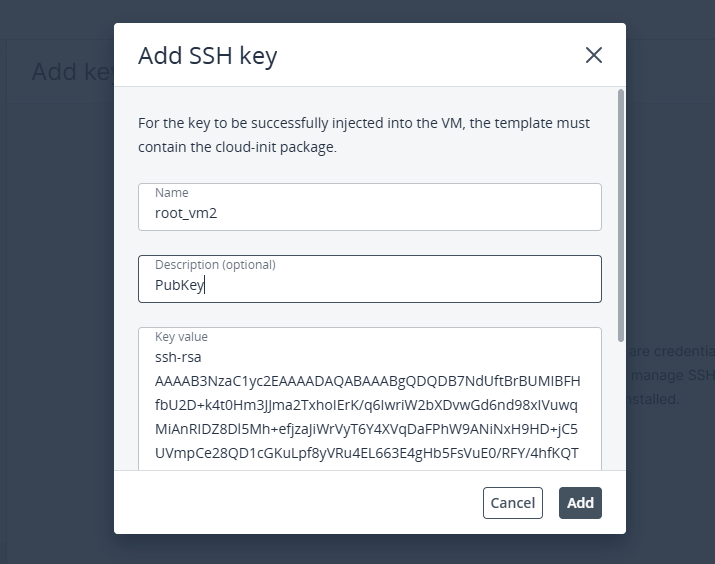
    Step 4: Enter the SSH Key Details

    In the Add SSH Key window:

    • Enter a meaningful Name for the SSH key.
    • Open the public key file (/root/.ssh/id_rsa.pub) using any text editor.
    • Copy the complete contents of the public key.
    • Paste the copied key into the Key Value field.
    • (Optional) Enter a Description to help identify the key. Avoid including confidential or personal information.

    Add SSH Key window

    Step 5: Save the SSH Key

    After verifying the information, click Save.

    The SSH public key will now be available and can be selected when creating new virtual machines.

    Deleting an SSH Public Key

    If an SSH key is no longer required, you can remove it from the dashboard.

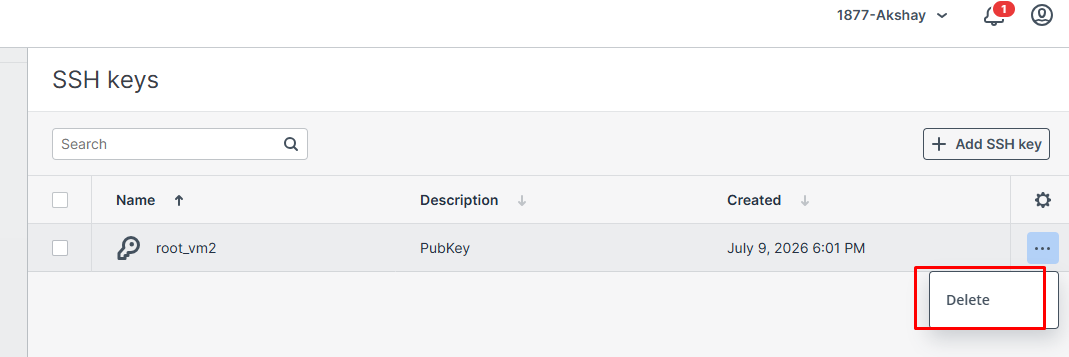
    Deleting an SSH Public Key

    Step 1: Open the SSH Keys Section

    Navigate to the SSH Keys page in the Cloud Region Advanced Dashboard.

    Step 2: Select the SSH Key

    Locate the SSH key that you want to remove.

    Click the Delete button corresponding to that key.

    Step 3: Confirm the Deletion

    A confirmation dialog will appear.

    Click Confirm to permanently remove the SSH key from the dashboard.

    Note: If the deleted key has already been injected into any VM, it will remain accessible within those VMs.

  • Creating volumes from images

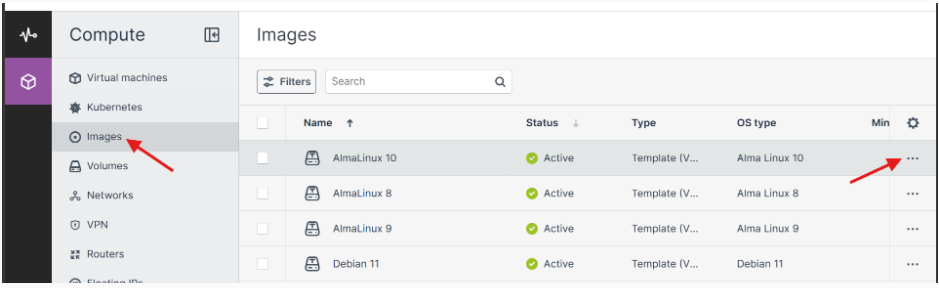
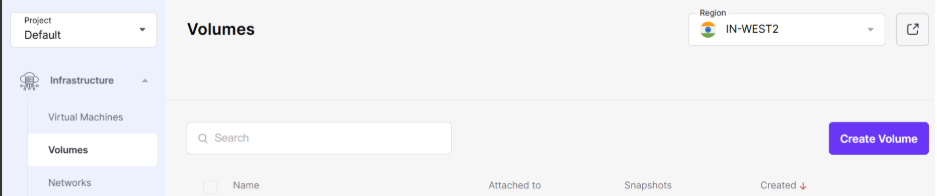
    • To make the volume, select the region where your image is present, then go to the advanced dashboard from the main dashboard

    • To make a volume from an image:
    1. Go to the Images screen, and then click the required image.
    2. On the image panel, click Create volume.
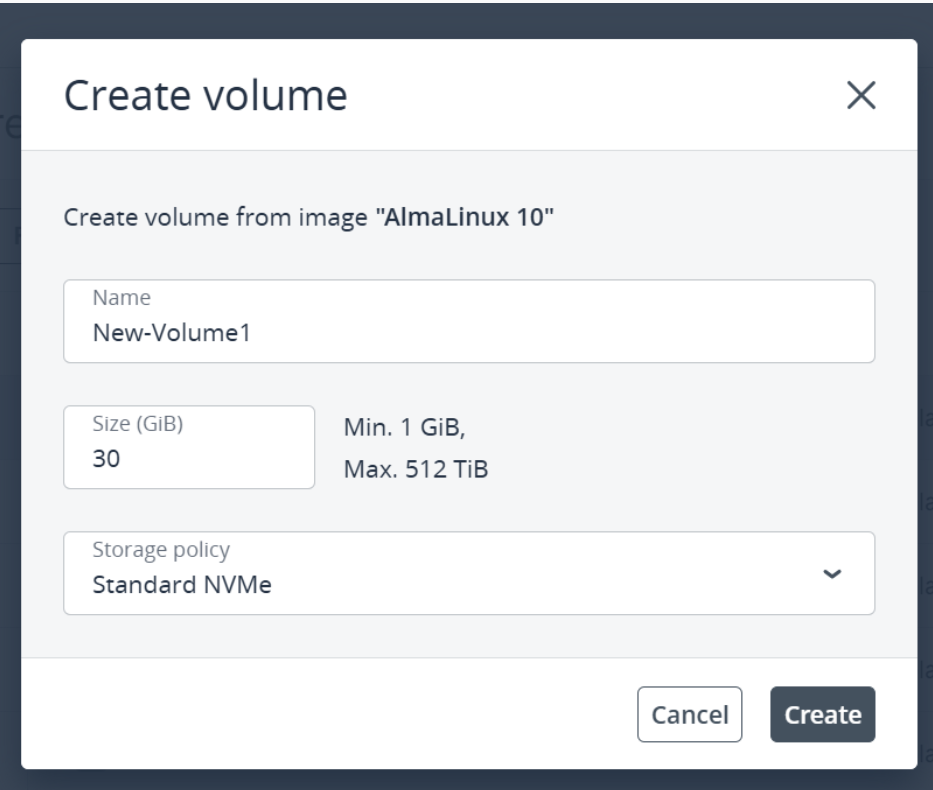
    3. In the Create volume window, specify the volume name, size, and select a storage policy.


    4. Click Create
    .
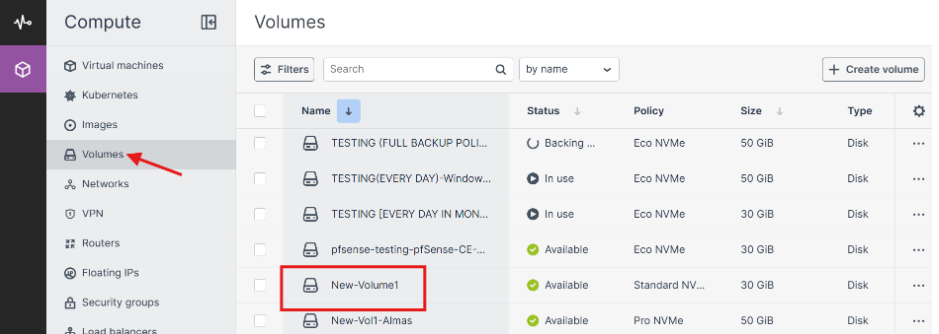
         The new volume will appear on the Volumes screen.


  • Creating volumes

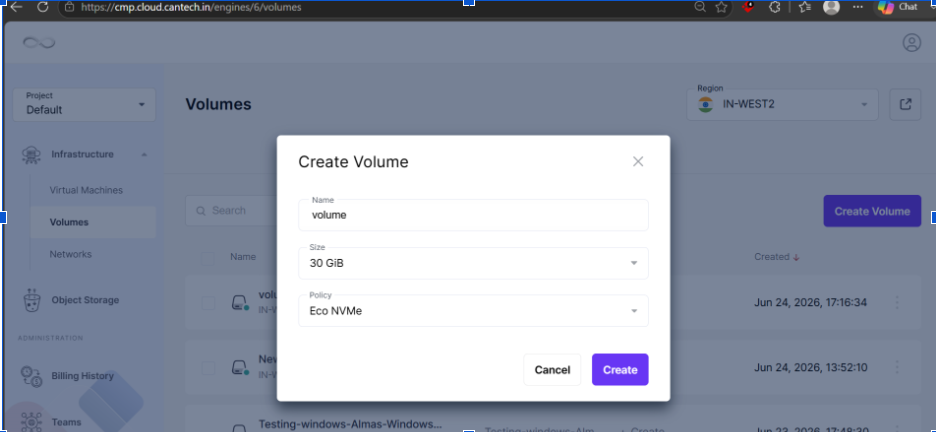
    • On the Volumes screen select region and, click Create volume.
    • In the Create volume window, specify a volume name and size in gigabytes, and select a storage policy, You can choose Default or General Purpose and then click Create.The volume has been created and can be viewed on the Volume screen.
    • If you want to customize your volume size you can go to the advanced dashboard and then create a new volume of the required size and attach it to virtual machineOnce the volume is created, you can attach it to your existing VM.
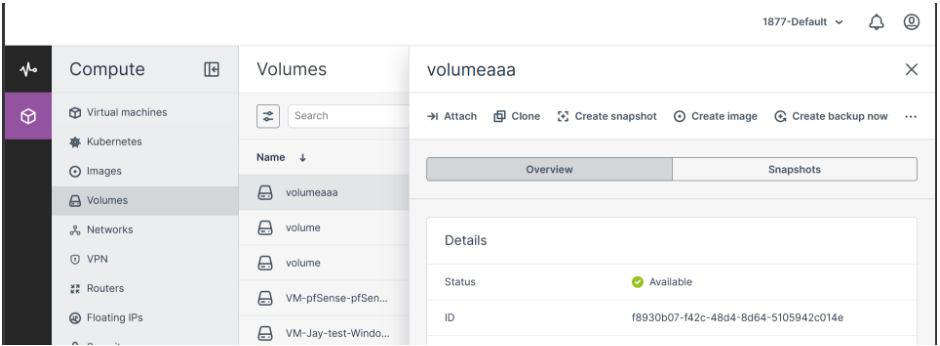
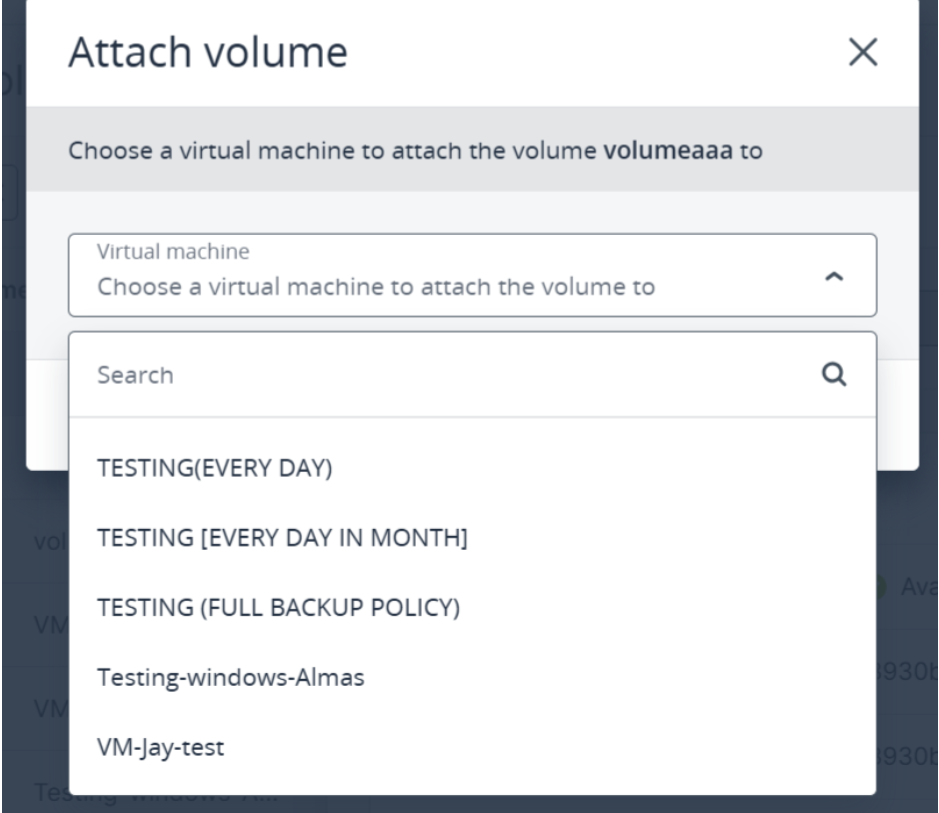
      To attaching Volume to Virtual Machine >> Go into Compute section >> Volumes >> click on left side three dots >>  Click on attach  >> Select your vm name to attach

    • You will see notification volume has been attached.
  • Creating Backup from Volume

    • Step 1: Navigate to the Volumes Section


      Log in to your Cantech Cloud account.
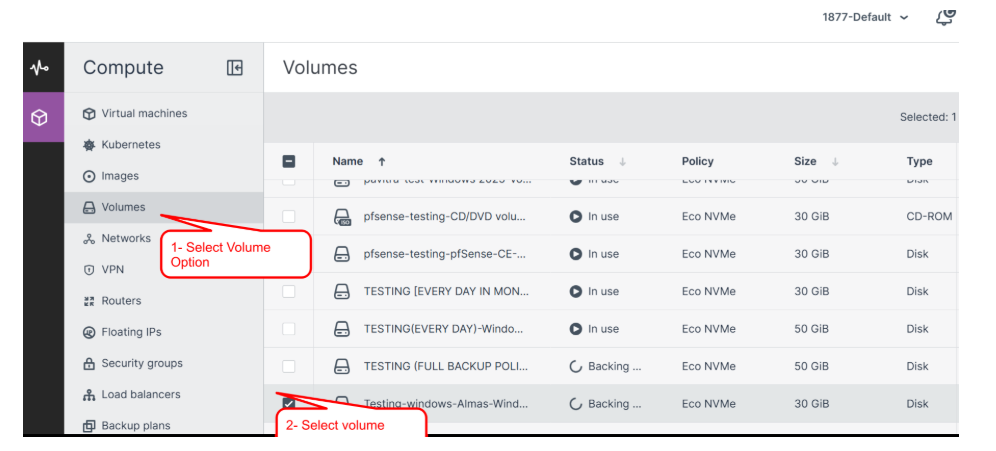
    • In the left-hand menu, click on “Volumes” under the Compute section.
      You will see a list of volumes, as shown in the image.

      Step 2: Select the Volume for Backup
    • Identify the volume you want to back up. For example, in the image, the volume “Testing-Windows” is selected.
    • Click on the three-dot menu next to the selected volume.
    • From the dropdown menu, choose “Create backup now”.


      Step 3: Backup Creation Process

      Once you select the “Create backup now” option, a progress notification will appear in the bottom-right corner, indicating that the backup process has started.

      Wait for the process to complete. The system ensures that the data is securely backed up.

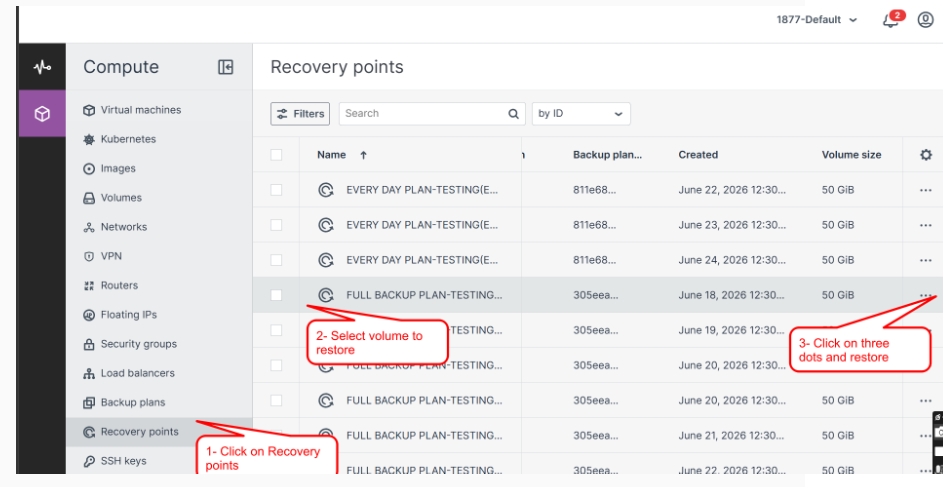
      Step 4: Click on “Recovery Points” to view all available recovery points for restoration. 

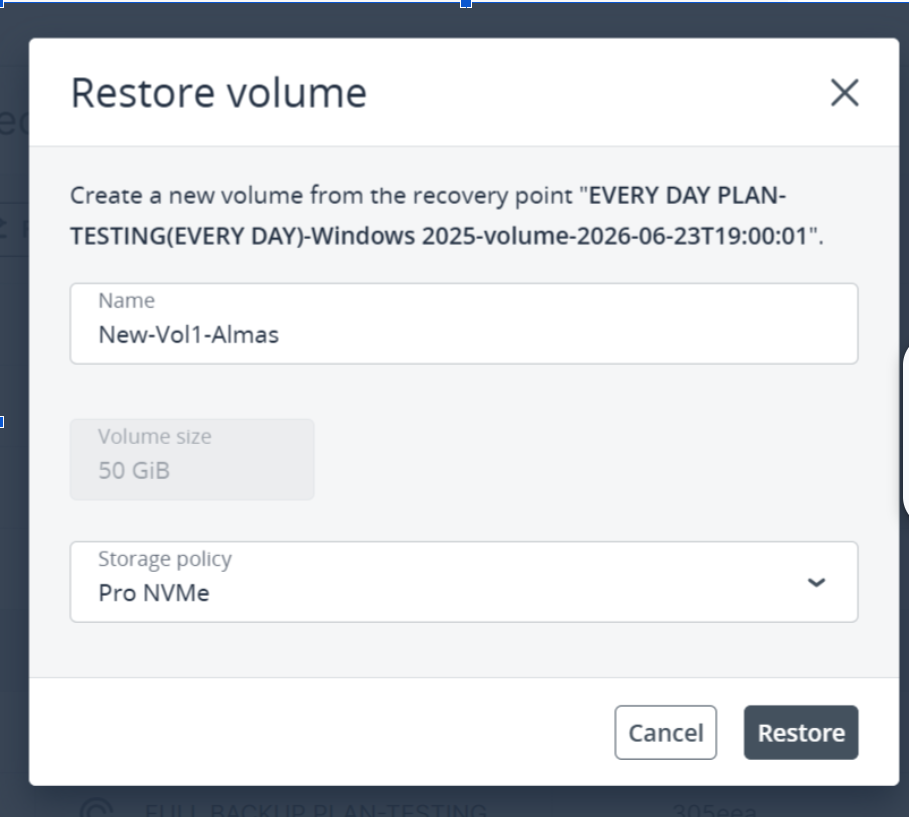
      Step 5 : When you click on “Restore Volume,” you will need to create a new volume, choose the storage policy, and then click “Restore.”

      • After restoration go into the volume section you will see new volume has been restored there.

  • Attaching and Detaching Volumes

                    Attaching and Detaching Volumes


    Overview  
    Volumes in CMP can be attached to or detached from virtual machines to expand storage or reassign resources. An attached volume becomes usable inside the VM, while a detached volume is released for reuse.
    Attaching a Volume
    • Go to Compute → Volume to view all volumes.
    • Select the desired volume and click the three dots (⋮) menu.
    • Choose Attach.
    • In the pop‑up window, select the target VM and confirm.

    • The VM name will appear in the Attached to section.
      Once attached, the volume can be added and used inside the VM.
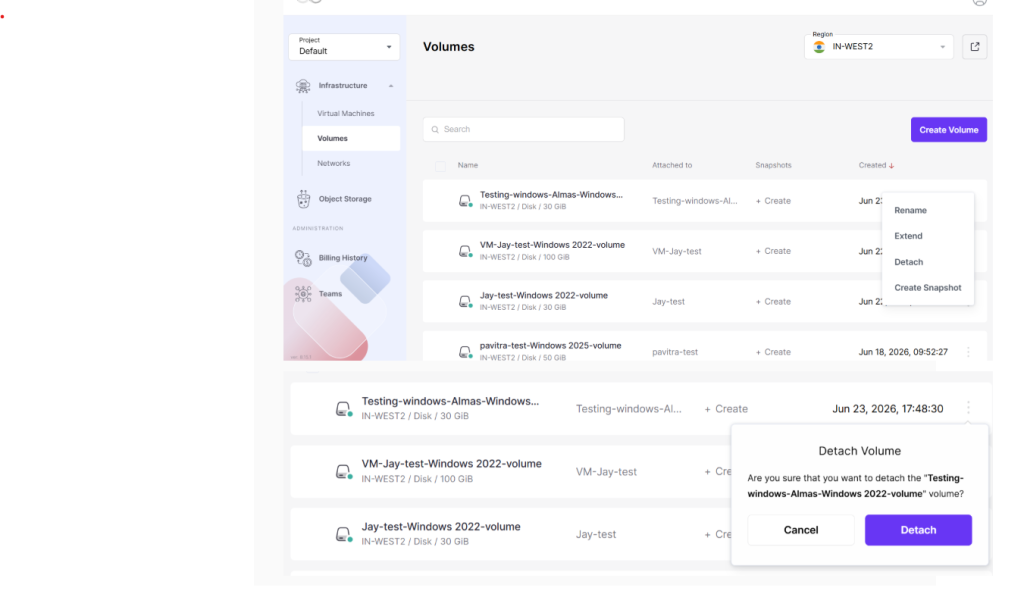
    Detaching a Volume
    • Go to Compute → Volume.
    • Select the attached volume and click the three dots (⋮) menu.
    • Choose Detach.
    • Confirm the action.
    • The volume will now show as detached and can be re‑attached to another VM if required.
    Summary 
    Attaching a volume links it to a VM for use, while detaching removes the link so the volume can be reused elsewhere. Always unmount the volume inside the VM before detaching to avoid data loss.
    You can observe that the volume is detached from the virtual machine.


  • Managing Virtual Machine

    Step 1: Create a Virtual Machine

    Create a new virtual machine by following the instructions provided in the How to Create Virtual Machines guide.

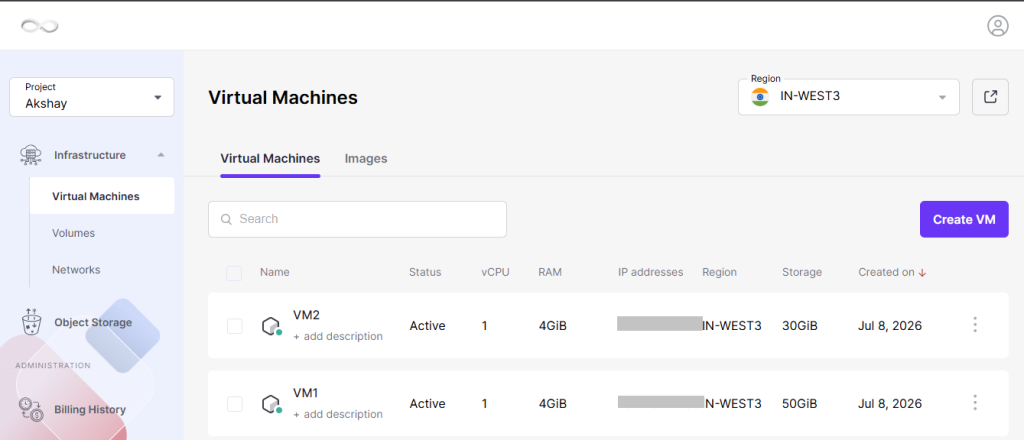
    After the deployment is complete, the newly created virtual machine will be displayed in the Virtual Machines list.

    Create a Virtual Machine

    Step 2: Open the Virtual Machine Details

    From the list of available virtual machines, click on the name of the required VM to open its management and configuration page.

    Open the Virtual Machine Details

    Virtual Machine Overview

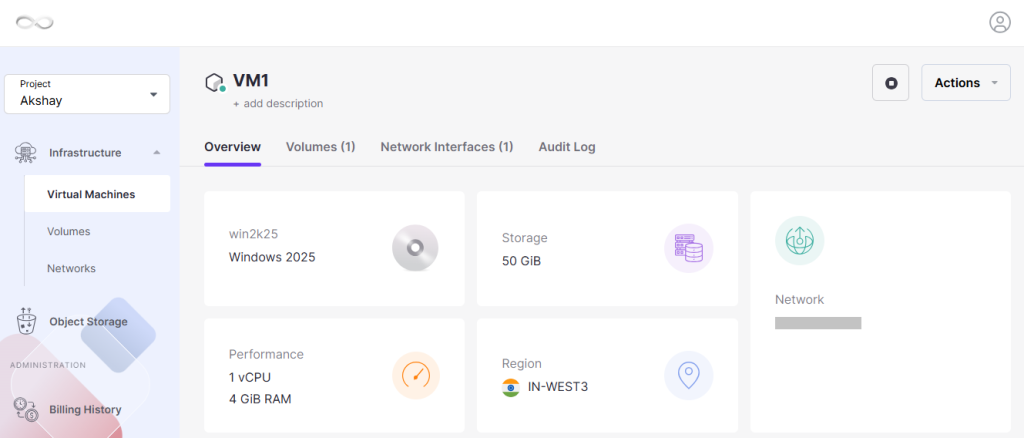
    The Overview section provides important information about the selected virtual machine.

    Basic Information

    Name
    Displays the unique name assigned to the virtual machine.

    Operating System
    Shows the operating system currently installed on the VM.

    Resource Configuration

    The Resource Allocation section displays the hardware resources assigned to the virtual machine.

    vCPU
    Shows the number of virtual processors allocated to the VM.

    RAM
    Displays the total memory assigned to the virtual machine.

    Storage
    Indicates the total disk capacity available for the VM.

    Network Details

    The Networking section contains information related to the VM’s network connectivity.

    IP Address
    Displays the private or public IP address assigned to the virtual machine for network communication.

    Region
    Shows the data center location where the virtual machine is currently hosted.

    Virtual Machine Overview

    VM Management Actions

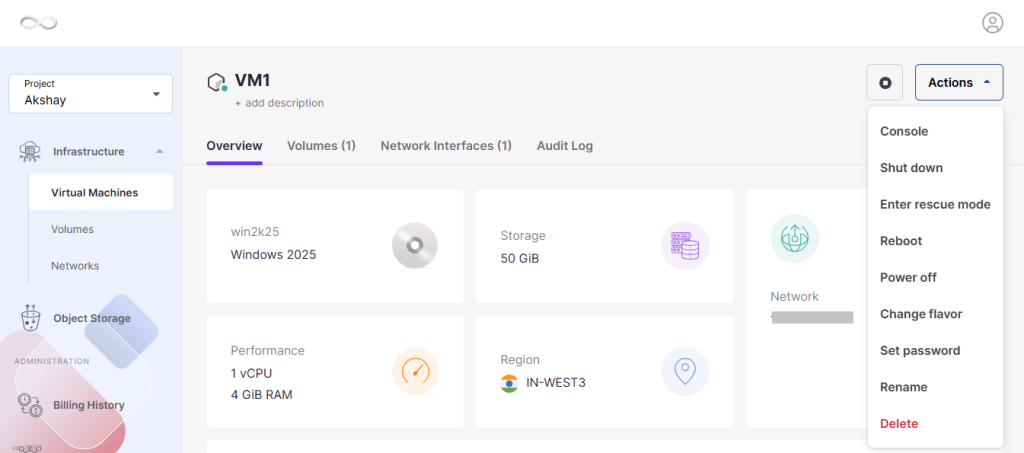
    Click the Actions dropdown menu to access the available management options for the virtual machine.

    Console

    Launch the VM console to directly access and manage the operating system.

    Shut Down / Power Off

    Gracefully stop the virtual machine and power it off safely.

    Reboot

    Restart the virtual machine without removing or recreating it.

    Change Flavor

    Update the VM’s hardware profile by increasing or decreasing resources such as vCPU and RAM.

    Set Password

    Assign a new login password for accessing the virtual machine.

    Rename

    Modify the display name of the virtual machine.

    Delete

    Permanently remove the virtual machine along with all of its associated resources.

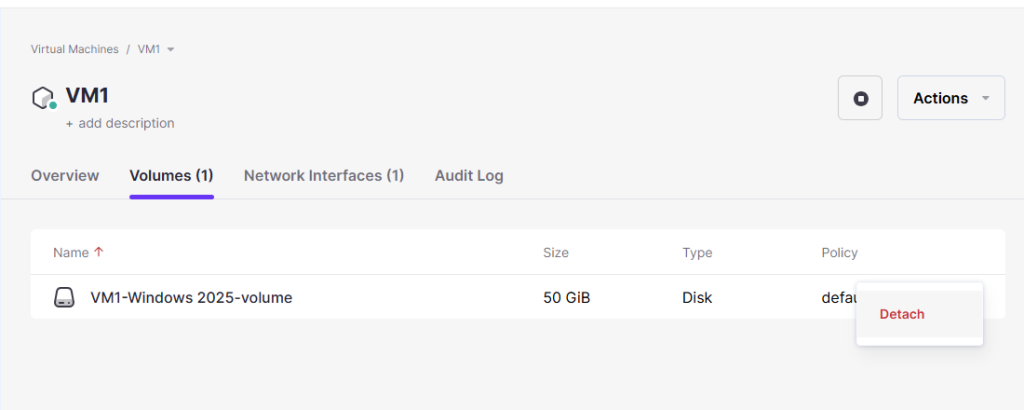
    Managing Volumes

    Open the Volumes section to view all storage volumes currently attached to the virtual machine.

    If required, you can safely detach an attached volume from the VM.

    Managing Volumes

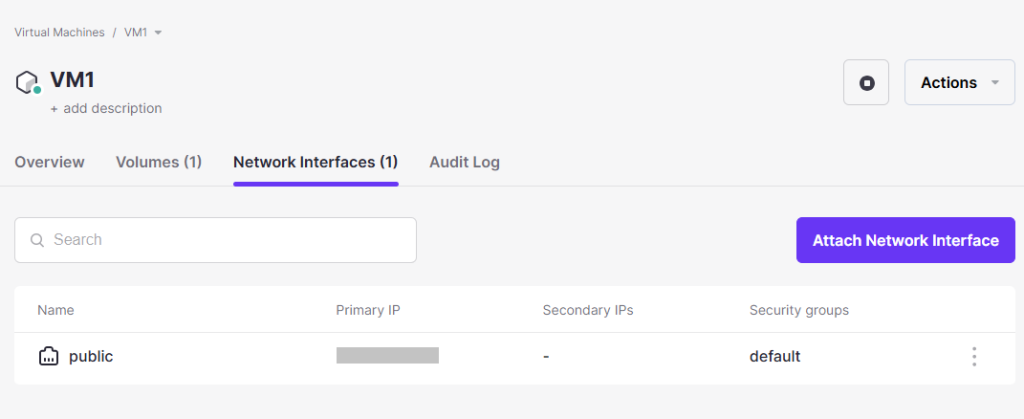
    Network Interface

    Go to the Network Interface section to review the virtual machine’s networking details.

    This section displays the available network interfaces, IP configuration, and connectivity information.

    Network Interface

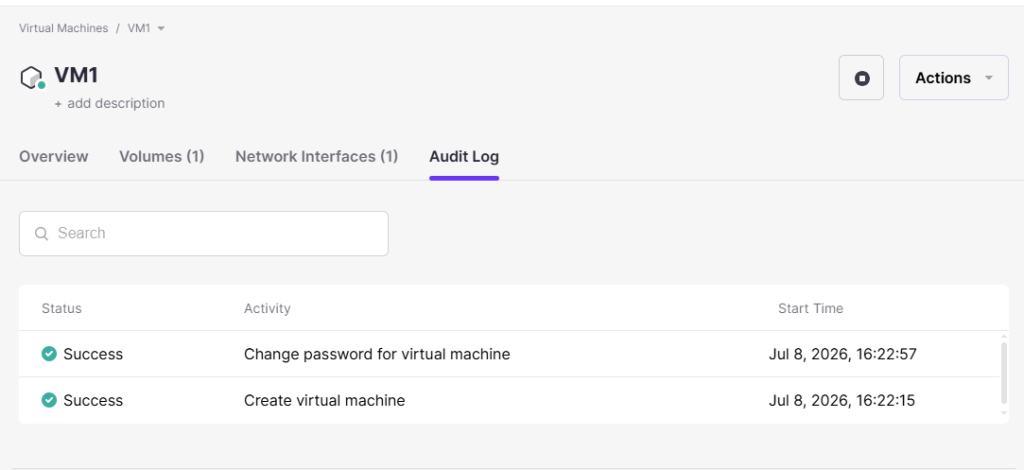
    Audit Log

    The Audit Log records every activity performed on the virtual machine.

    It helps administrators monitor configuration changes, user actions, and system events for troubleshooting and auditing purposes.

    Audit Log

  • How to create Virtual Machines

    Cloud provides a flexible and scalable cloud platform that allows you to deploy virtual machines (VMs) quickly for hosting applications, development, testing, or other workloads.

    If you want to create a Virtual Machine using the Advanced Panel, refer to the Advanced Panel documentation.

    Follow the steps below to create a Virtual Machine from the Cloud Dashboard.

    Step 1: Log in to the Cloud Dashboard

    Sign in to your Cloud account using your registered credentials.

    Step 2: Open the Virtual Machines Section

    After logging in, navigate to the main dashboard and click Virtual Machines to open the VM management page.
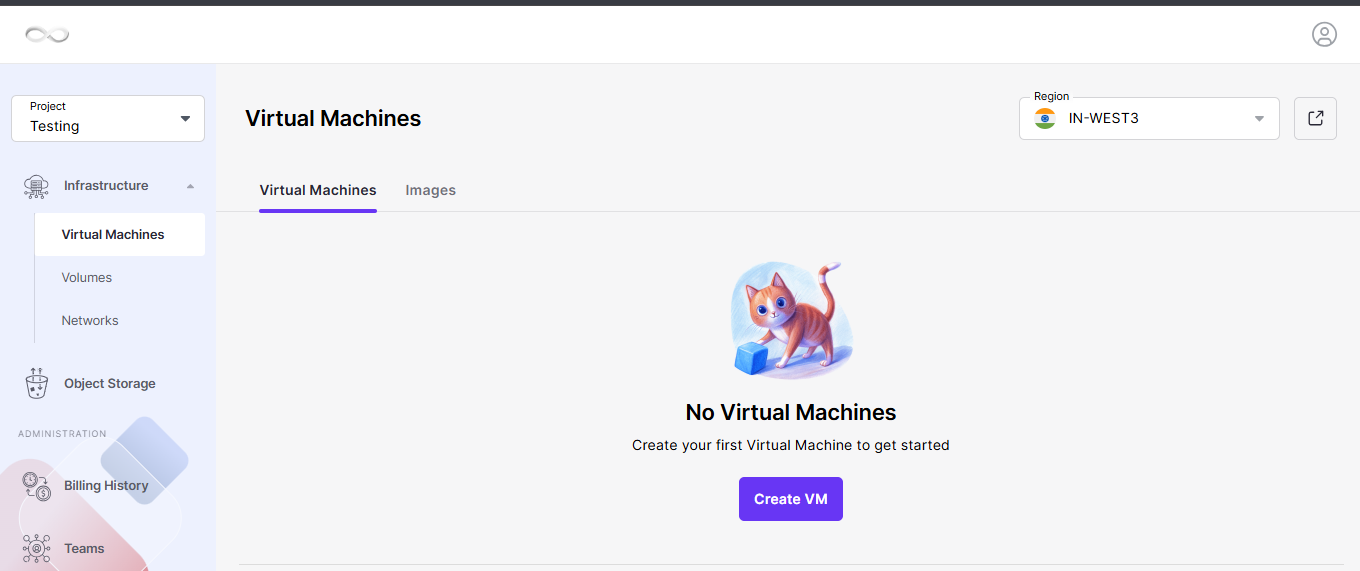
    Open the Virtual Machines Section

    Step 3: Select a Project

    From the Project dropdown menu, choose the project where you want to deploy the new virtual machine.

    If you haven’t created a project yet, create one first before proceeding.
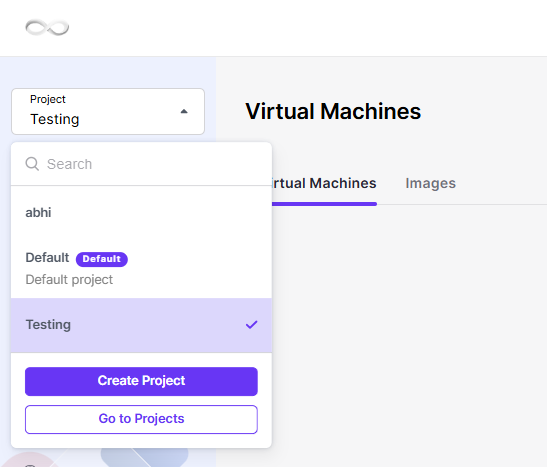
    Select a Project

    Step 4: Choose the Deployment Location

    The default deployment region is IN-WEST3, which is automatically selected.
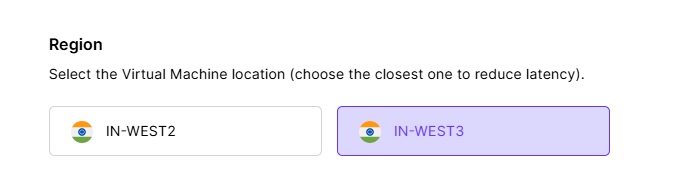
     

    Choose the Deployment Location

    As Cloud expands its infrastructure, additional regions will become available, allowing you to deploy your virtual machines closer to your users or applications.

    Step 5: Select the Operating System Image

    Choose the operating system image that you want to install on your virtual machine from the list of available images.

    Supported operating systems include multiple Linux and Windows distributions.
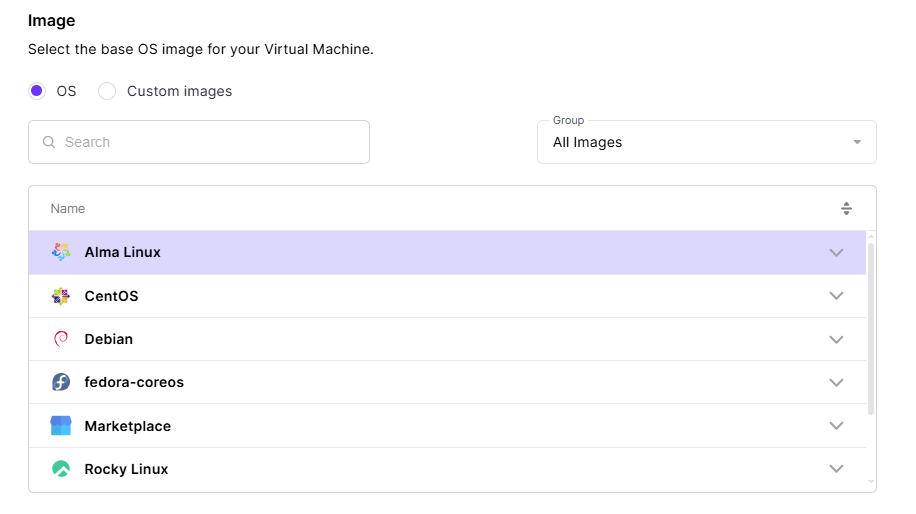
    Select the Operating System Image

    Using a Custom Image

    Custom Image: If you want to use your own custom image, you can upload it and create a virtual machine (VM) using that image.
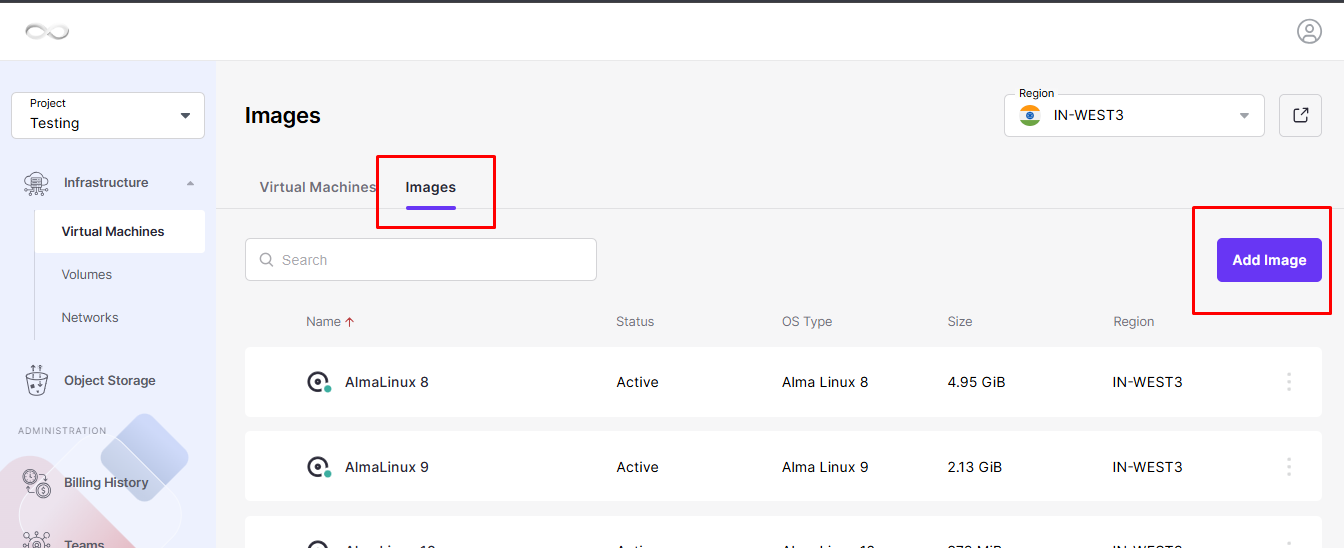

    Step 6: Select the Virtual Machine Flavor

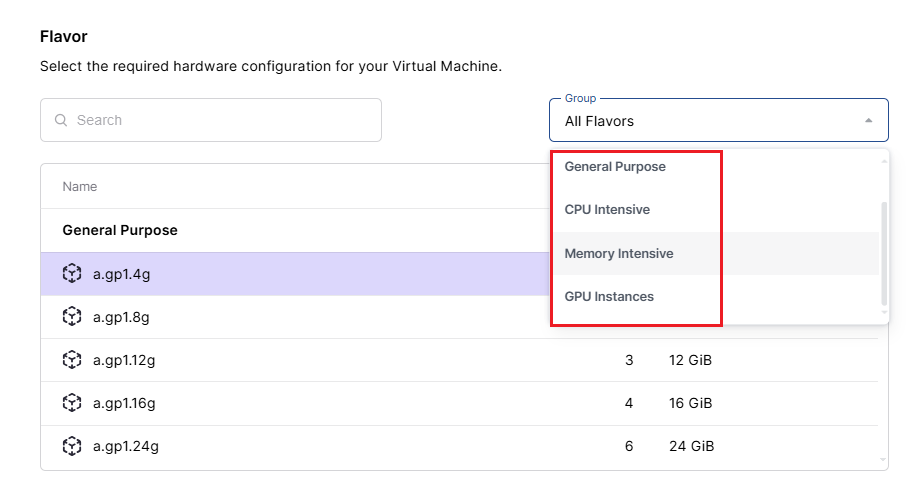
    Click the Flavor dropdown menu and select the hardware configuration that matches your workload.

    Each flavor defines the available:

    • General Purpose
    • CPU Intensive
    • Memory Intensive
    • GPU Instances


    Select the Virtual Machine Flavor

    Choose a flavor that satisfies the minimum hardware requirements of the operating system you selected earlier. More demanding operating systems may require additional CPU and memory resources.

    Step 7: Configure Storage Volumes

    The Volumes section contains the boot disk that will store the operating system and system files.

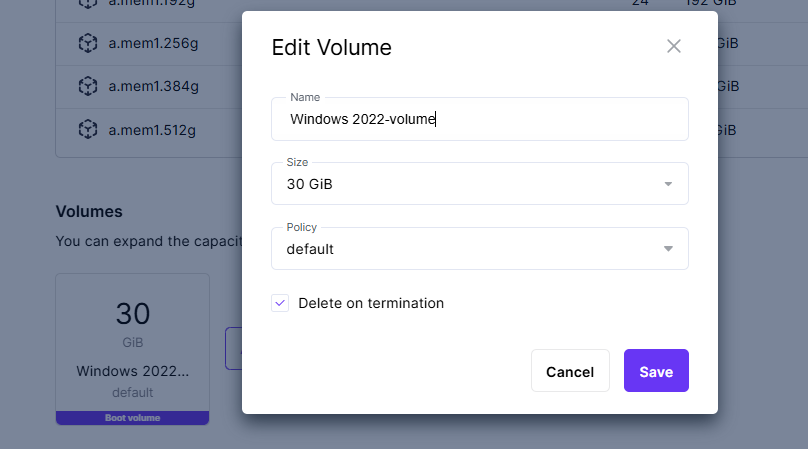
    Modify the Boot Volume

    Verify that the default boot disk provides enough storage.

    If additional capacity is required:

    • Click Edit Volume
    • Enter the desired disk size
    • Click Save

    Configure Storage Volumes

    Add Additional Volumes

    If your workload requires extra storage:

    • Click Add Volume
    • Specify the required size
    • Click Save
    • Attach the volume using the available dropdown option
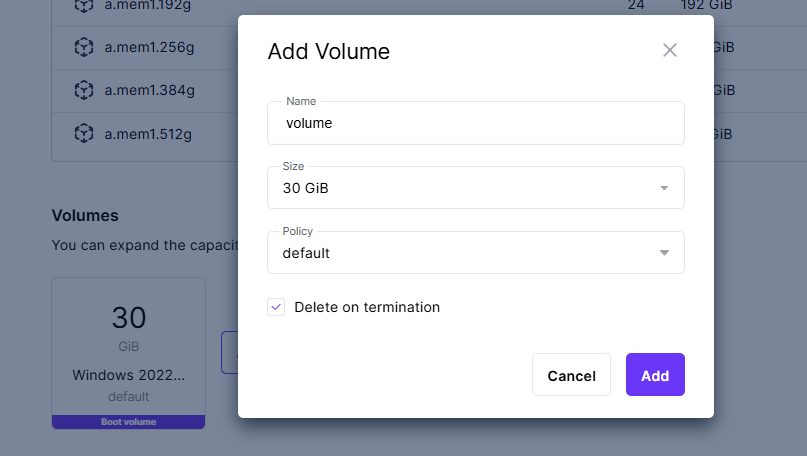
     

    Add Additional Volumes

    Custom Volume Sizes

    If you require a custom-sized disk such as:
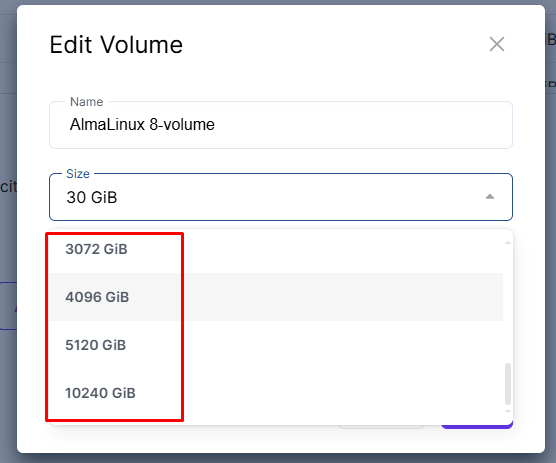
    • 30 GiB
    • 50 GiB
    • 100 GiB

    Custom Volume Sizes

    You can first create the volume from the Cloud Advanced Dashboard and attach it while creating the virtual machine.

    After deployment, you can resize volumes or attach additional non-boot disks whenever needed.

    Step 8: Configure Network Interfaces

    Click Add Network Interface and select the network that your virtual machine will use.

    Public Network

    A public network allows external access to your VM, making it suitable for hosting web servers, APIs, or any services requiring internet connectivity.

    To configure a public IP:

    • Click Add Network Interface
    • Select a Public IP Pool
    • Enable Assign Automatically
    • Click Add

    Cloud can automatically assign either:
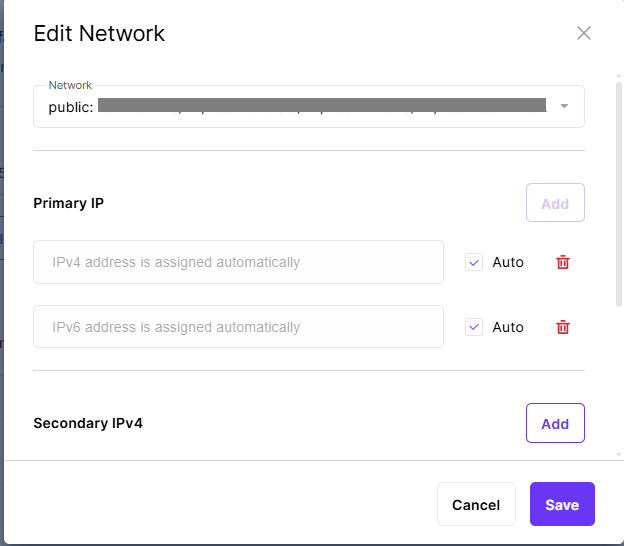
    • IPv4
    • IPv6

    Configure Network Interfaces

    You may also remove assigned addresses using the Delete icon whenever necessary.

    Secondary IP Addresses

    If your application requires multiple IP addresses, you can add secondary IPv4 or IPv6 addresses.

    Unlike the primary IP address, secondary IPs are not automatically configured inside the operating system. You must configure them manually after the virtual machine is deployed.

    Security Groups

    If the selected network includes IP Address Management (IPAM), the following settings are automatically enabled:

    • Spoofing Protection
    • Default Security Group

    The default security group allows inbound and outbound communication for the virtual machine.

    Step 9: Enter the Virtual Machine Name

    Provide a unique and meaningful name for the virtual machine.

    Using descriptive names makes future management easier, especially when multiple virtual machines are deployed.

    Enter the Virtual Machine Name

    Step 10: Configure Advanced Settings

    Set the Administrator Password

    Create a strong password that will be used to access the virtual machine after deployment.

    A secure password should contain:

    • Uppercase letters
    • Lowercase letters
    • Numbers
    • Special characters

    If preferred, you may skip this step and configure or reset the password later from the Cloud Dashboard.

    Configure SSH Authentication

    SSH keys provide a secure way to access Linux virtual machines.

    You can either:

    • Use an existing SSH key pair
    • Generate a new SSH key

    Generate a New SSH Key:

    Select one of the supported algorithms:

    Click Generate.
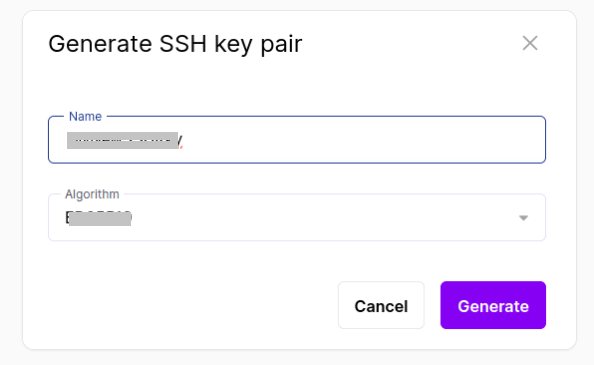
    Generate a New SSH Key:

    Cloud automatically creates the key pair and downloads the private .pem key file to your computer.

    Upload an Existing Public Key

    If you already have an SSH key pair, click Add Public SSH Key and paste your existing public key.

    This allows secure passwordless authentication when connecting to the virtual machine.

    Add a Customization Script (Optional)

    Provide user data to customize the VM after launch. User data can be in a YAML-based configuration file or a shell script that runs commands on the VM upon launch.
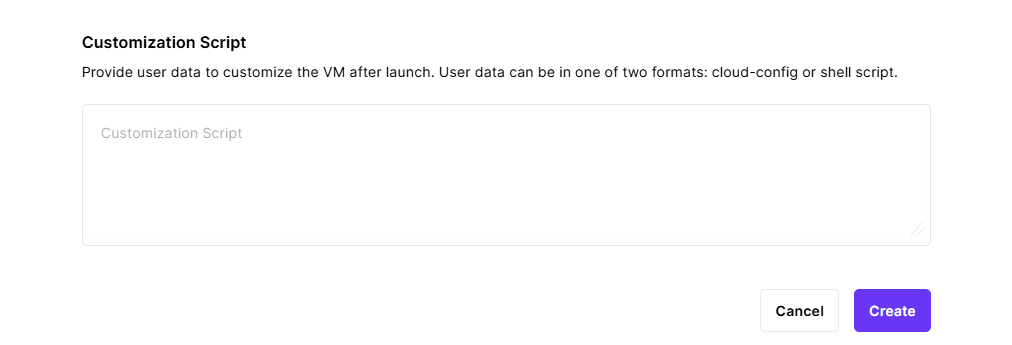
     

    Add a Customization Script

    After configuring all of the VM parameters, click on the Create Button to create your Virtual Machine.